Friday, March 25, 2016

Bulkhead flats anyone?


While I was getting the layout staged the other night another nagging issue arose.  I need to get some loads!  It'll make things a little easier for me to grab cars for the four manifests that feed El Dorado and easier for the El Dorado crew to sort the cars once the arrive in El Dorado.

So I started figuring what type of loads I needed and it came down to pretty much two car types: Flat cars and open hoppers.  Heavy Metal in Malvern needs three types of cars to which receive steel for the their manufacturing needs.  Right now I have Coil Cars, Gondolas, Flat cars and Bulkhead flats.

I have the Coil cars, Gons and flat cars covered but am lacking on Bulkhead flats.  I started looking around for a few more Bulkheads and couldn't believe how pricy they've become.  A little more snooping on the web and ran across how someone used the Red Caboose Bulkhead kits from years ago to convert some of their flats! Hmmmm?


I did a little digging through my detail supply and ran across three sets that I had picked up years ago.  Sweet!  Next I went to my flat car stash and found three Athearn 53' flats that shouted "Pick me! Pick me please?"

While the kits said they were meant for Kadee cars [Ha! That in itself tells you how old they are!]  I found they fit pretty good even on the Athearn cars!  Close enough for me.

So I grabbed the first car, a MoPac flat.


And turned it into this.  I had to mix some paint to get it to match the color on the car.


After I had them installed and painted I swapped out the Accumate trucks and couplers [again, this dates the cars! Now they come with Mchenry couplers, I believe.]  I had to do a little modification to to the car frame get the trucks to work properly.  First I had to grind off just a bit of thickness on the bottom of the end frames, just above the couplers.  The paint was pretty thick and the MTL couplers just touched the frame.  

Next I had to grind off just a tad off the top of the MTL trucks around the bolster hole because they were a bit thicker than the Accumate trucks.  If I didn't then the screw that Athearn uses to secure the trucks in place would press down tight on the MTL bolster and would keep it from rotating freely.  A pretty easy job, I just used a cutoff disk in the dremel and gently ground away until things fit.  Didn't need to be too precise about it as nothing shows.

The replacement trucks needed wheels sets so I snapped in some Brown MTL Medium profile wheels, Done!  Not a bad project and didn't take too long either. 


While the DRGW and MoPac cars have 10' heads, the TTX was an 8' kit.  Funny thing, all three kits had the same part number, even the 10' kits were slightly different as well.  The MoPac's head was even on the sides and the DRGW's heads had a lip that stuck out further than the outer upright beams? So with these three new Bulkheads Added to the fleet, I should have enough to get the loads delivered with ease.  Sure wish I could find some more of these?
  
The next thing I want to try is to paint the cheap looking plastic decks so they resemble weather beaten, sun bleached, oil soaked wood decks and give the cars a good coat of weathering.  Once that's done I can make some steel loads for Heavy Metal and this should make it easier for the crews and add to the look.


Saturday, March 19, 2016

More E 's and F 's will join the fleet...


Several years ago I got in contact with a custom painter to have a few E's and F units painted up in the Rock Island's Maroon with a yellow wing as well as some Red and Yellow units to help fill in the gaps in my fleet.  While most of these older covered wagons were retired by 1975, a few soldiered on until the end.

Even though I'm modeling beyond the shutdown, I still wanted a few of these to add some color and interest to the roster.  There's just something about seeing a covered wagon lashed up in a string of hood units or leading the hood units!


About two months ago I learned that my painter had passed away and I worked with several great folks to see if I could get my stuff returned, which I was able to, thanks guys!

I started looking around for another painted shortly after receiving my shells,  I made contact with a few of them and asked for some estimates.  Once I settled on one I began to do a little work on the shells since I was in a holding pattern on my kitchen cabinets yet.

I've added details before but this time I wanted to try some body work which meant filling in some holes.  I have used Squadron Green putty with mixed results. Recently I was told to try some Bondo Spot Putty which was suppose to dry a little faster and not shrink as much.  I was also told that I should try and fill the holes with styrene as much as possible then putty in the remaining gaps, makes sense.

Well I got things gathered up: some BLMA horns, styrene, my touch-n-flow applicator, a sharp Exacto blades, a pair of snips and sprue cutters.  Then I sat in front of the computer for several hours examining the pictures I've collected over the years until I decided on which units I wanted and what each unit needed for detail parts.

Here are the four units that I want to add to my roster, all of which will be in freight service.


Now, one thing I've learned over the years, be it right or wrong, was "Less is More".  I add just enough details to make it say Rock Island.  This generally includes the unambiguous 5 chime air horns, cab shades, and a firecracker antenna and maybe snow plows.   But one thing I don't get into is lift rings, handrails, grab irons......the finer details.  I suppose one could call this the 3' rule?

Anyway, I started the process by removing the airhorns.  To fill these in I used .030" x .030" styrene stips that I kind of tapered on the ends so I could wedge them into the holes. Once I got them wedged in,  I placed a small drop of MEK from the touch-n-flow applicator and waited a few seconds for the MEK to soften the styrene and shell, then I pushed them a bit more until I could see they filled the slide in a bit more.  This worked good because while they were soft, they conformed to fill the holes completely and then I let them dry.


After getting the F7A to this point, this image from the movie "A Fish Called Wanda" came to mind!


Then I snipped the styrene as close as I could and began smoothing them off with a file and then fine sandpaper.


This worked great as I did not need any putty to fill the holes!

I needed to fill in the lower headlight on the F units, so following the same technique.  I found a small chunk of styrene from a model sprue and filled it to fit much like I did with the square styrene strips and repeated the same process. It worked like a champ!   


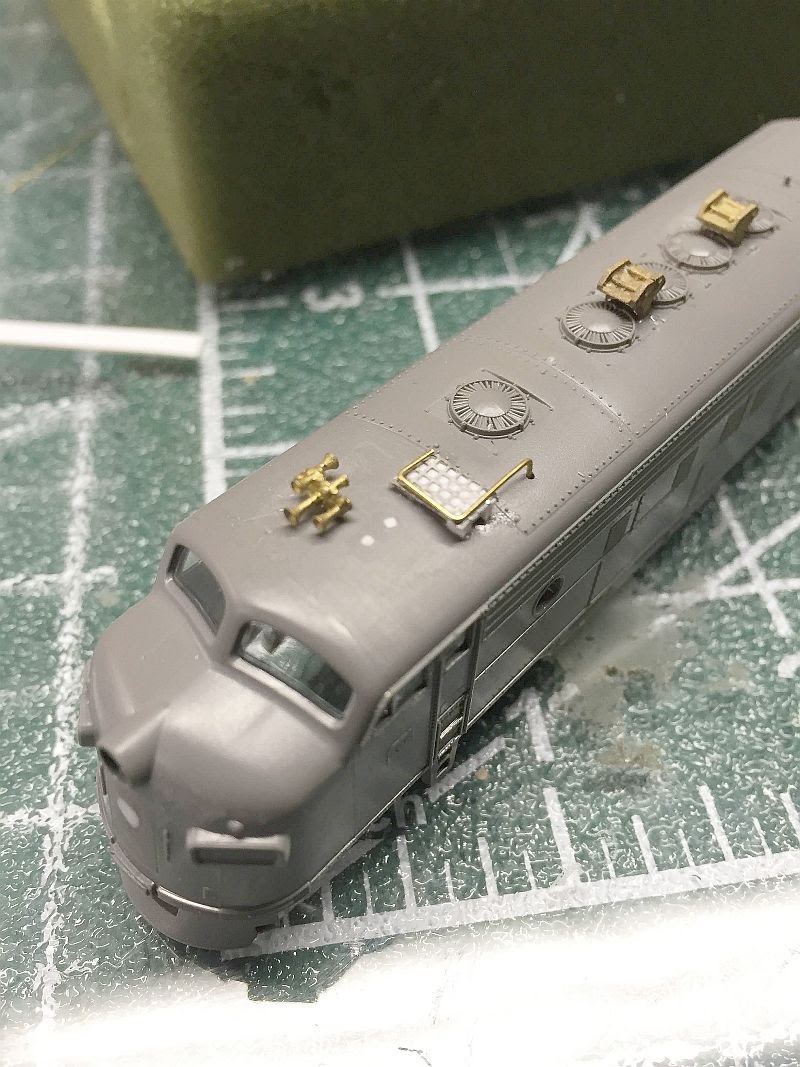
After the holes were plugged and sanded smooth I added the details.  First I added the BLMA 5 chime horns to all of the A units.


On the F7A I went a little further and I added a pair of flared spark arrestors as well as a rooftop radiator that I made from scratch.  Wasn't anything special and did not follow close to a prototype, mainly because images of the rooftops are rare and hard to find.


Once the radiator and arrestors were in place I added some very small screens to the them to add a bit more detail.


Next step, off to the painter. 
Normally I have no issue with painting my own locos, but these E's & F's have curved stripes and I just don't feel like tackling them at this time.  Plus it will give me a chance to scout out a new painter...


Monday, March 14, 2016

Graphite for better conductivity?


Since my last post where I mentioned that I planned to use some Graphite to help with dirty tracks, I had some comments about it so I did a further reading and thought I share a bit more about it.

The original thread on N Scale.net was "Best Track Cleaning liquid" where a poster asked what everyone used to clean track?  One poster, Paul S. mentioned how he uses Graphite.
My first thoughts and questions were about reduced tractive effort or slipping?

He replied:
"None at all, Allen. If someone finds that's occurring, then it's a sure sign they have applied too much. Clean the track once, apply a few swipes of graphite here and there (must be from a graphite stick, not a pencil). Then let the trains distribute the graphite.
This topic has been delved into on the Model Railroad Hobbyist forum and in the MRH e-zine. I was a "slow adopter," having been a staunch No-Ox advocate. No more!

Here are two links of interest:


http://mrhpub.com/2015-05-may/port/files/168.html

http://model-railroad-hobbyist.com/node/17181

It's the micro-arcing between the rails and the locomotive wheels that creates most of the black crud we see on nickel-silver rail. The graphite, being a conductor, almost eliminates this problem."


So I found a few sticks on eBay and and have applied a bit on the layout before the next session to see if it helps or not. After reading the actual MRH article and watching the video, I think I'll re-apply some in the manner in which the guy in the video did.

It almost sound too easy and simple, but what do we have to lose?


Sunday, March 13, 2016

Crew call?


Last night Doug came over and he got the last of his chips installed.  While he was working on them, I continued cleaning the layout up for hopefully another Op Session.

To date, all the tracks are cleaned except the 8 staging tracks for the through trains.  I still need to clean off the boxes and other minimal crap that's sitting on the workbench layout from small projects and eBay sales.

After reading a thread on N Scale.net about what is a good cleaning fluid to use for cleaning the rails, one poster mentioned No-Ox and another said he nixed No-Ox in favor of using a 4B Graphite stick. I picked up a few off of eBay to give them a try.  He said that it helps with the conductivity of the rails so I thought I'd give it a try this time.

I've used a bit of it the other night while screwing around with the S2's.  One issue I seen already, and kind of figured on, was it may reduce tractive efforts if too much was applied.  In the last video I posted showing the single S2 pulling twelve cars it started to slip.  I think was due to the fact I had applied a bit too much, but I took care of it with a quick swipe of a clothe.  Last night I went around to specific areas and applied a bit more and then ran some trains to help spread it out.  So we'll see how well it works.

As for the troublesome S2, it's fixed and I've ran it to break it in good, so it will used to switch out Malvern this session. Have a sneaking suspicion there may be a fight to see who's gonna pull the Razorback trick, gonna get some popcorn ready!

Other than that, that's about all for now....  


Saturday, March 5, 2016

Atlas ALCo S-2 in the shop for repairs


I was so excited back when Atlas announced their new ALCo S-2 switcher in N scale, I could hardly contain myself as this is exactly what I was looking for.  An ALCo switcher for Malvern, this would complete my all ALCo fleet on the W&OV!   
I was really Jonesing for it and it seemed to take forever to get it to the shelves, and when I finally arrived I had several disappointments.

The first thing was it wouldn't run on the layout as a DC loco (I didn't go with sound).  It would just short the system out, so I had to wait for a chip to arrive. The second issue it had was after I got the chip installed it would only pull about 5-6 cars. Grrrrr!

Knowing it would do better from what others had said I began to do some research.  Several posters on a couple of forums mentioned they had the same problems, one said that both axles were spinning freely in one truck, the other said there was something on one of his gears that made it ran with a twitch and what he found was a "Mark" on one of the gears.

When I flipped my unit over to see if any of the axles were spinning freely, I found just the opposite. The outer axle on the truck under the cab was seized up and would not spin at all.  As matter of fact, there were also two small flat spots on both wheels because I had let run for a spell to help break it in!

As Wyatt said to me about this "Now you have a true to life sound: Flat spots!" Great!

So I began to tear the unit apart but got stuck when it came to removing the truck from the unit.  A little help from Chris333 on TRW with an explanation on how to unhook the wires from the board and drop the truck out and I was off and running.

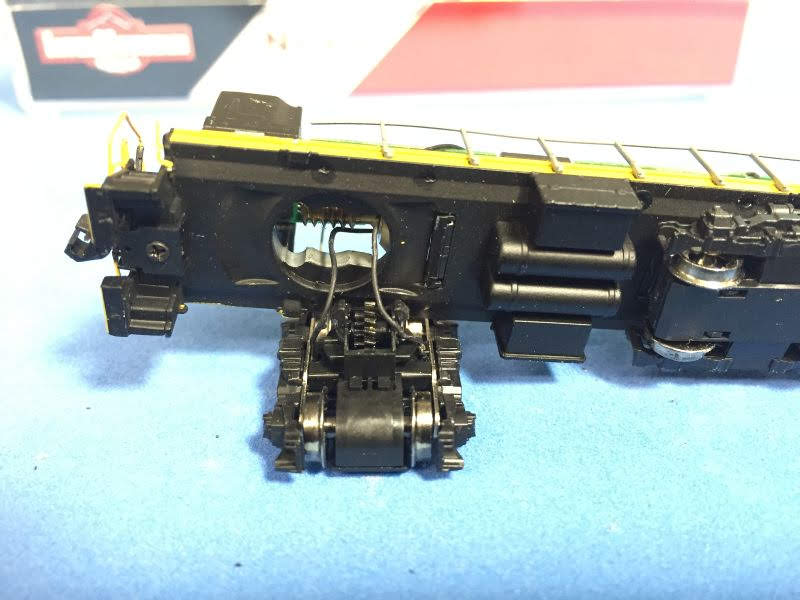
Here is the unit with the shell and cab removed.


In the middle of the board on the both sides, you can see two little black clips that snap on to the board that pinch the wires to the board from both trucks and the motor.


The trucks come out similar to the way all Atlas trucks come out of the chassis, there are two little tips that hold the truck in the chassis.  If press slightly on one with a screwdriver, it pops right out.


Here is the truck removed from the chassis and the wires from the board.


The truck after you take it apart.  The wires are soldered to the axle cups.


It's kind of hard to see, but on the top wheels where the glare is, those are the flat spots I added.


Overall it wasn't too bad to tear down, but I feel it should be added as a requirement for the NMRA MMR achievement program just to get the trucks re-assembled, lol.  

Thanks again with help Chris!

After having it apart I inspected everything as closely as I could and didn't find anything that would make the axle seize up like it did?  So I re-assembled and put it back on the track to test it and hoped for the best.  Success!
Now it ran smoother and pulled more than 5 cars!!!

I also installed the chip in the second S-2 I picked up and MU'ed them for a quick test to see what they would do.  One note, in the video with the single unit you'll see the single unit slipping. This is because I also tried using some 4B graphite sticks to help with track conductivity that another member on NSN (Paul) mentioned, but I think I may have gotten a bit too much on the rails which caused it to slip a bit.  After wiping the rails quickly to remove some of the graphite, it did run a bit better without as much slippage.


So now my W&OV fleet of ALCo's is complete!  The W&OV job is going to be highly sought after on the next Ops session... 


Monday, February 29, 2016

Easy switching at Crushmoore


Hadn't been up to Malvern in sometime, since it was a nice day I took a break from my cabinet shop, grabbed the cameras and slipped up to see if anything new was going on.  The first order of business was to stop at the local Kwiky Mart to get a foamer snack and a soda before running over to the W&OV's shop.

As I walked out the door I was greeted with a big plume of smoke which could only come from an ALCo!  I jumped in the truck and headed towards the smoke.  I was just in time to see the newly acquired S-2 getting ready to switch out some cars at Crushmoore!

Couldn't have timed it better, I had just enough time to get the video camera setup.


******


I'm in a holding pattern on the cabinets at the moment, waiting on some plastic laminate to show up so I can cover my countertops.  Which is why I jumped on the closet cabinets.

The other day Doug had asked if he could come over and work on some more chip installs on a few of his locos Friday night since he had some spare time on his hands.  I also thought it might be a good time to get downstairs again and get the layout cleared off and cleaned up some more.  So while Doug worked on his chips I dove into cleaning up the tracks in Malvern.  They were just as I had left them last May after adding the static grass, damn I can't believe it's been almost a year!!!

Of course I needed to see if I could get them cleaned enough to actually run something, and since I had the new Atlas S-2 chipped and sitting in the facility, why not?

Much to my surprise the S-2 sprang to life and after a few swipes on the main tracks in town it was running like a dream.  Then I went after the tracks where I had planted the tall weeds....ugh!
I had to scrape the railheads with a sharp blade, then I used a brightboy and finished the job off with a good eraser.  But I still needed to go in after the insides of the rail to get some of the static grass of them.

Several minutes later things were pretty smooth.  I still need to touch up a few spots, but it was clean enough that the cars were rolling smoothly so I tried the    S-2.  Ran in, ran out!  Awesome!!!

I also grabbed a few of the Bluford Woodchip hoppers that I had recently picked up to see how they looked and ran..... they are nice cars!  Might have to get a few more of them?

The only issue I had was with the tractive effort of the S-2.  It seemed to slip a lot as evident in the video while pulling out the string of 5 loaded chip cars with factory weights.  I'm kind of thinking that it needs a bit more break-in time to get the blacking off the wheels and I also need to check the wheel gauge.

All in all it was good to scratch the itch!!!
Looking forward to getting an op session going again here before the end of April I hope?

I might even have the kitchen close by then...


Is that better Rod?


Sunday, February 28, 2016

A New Kitchen part 12


I decided to take on a side project that would help with the issue of storing some of the stuff in the existing cabinets when we start to remove them.  I have a closet at the top of the stairs that has only been used for nothing other than junk storage.  It was made with nothing more than a typical closet normally has, a shelf and closet rod. I always had the idea of making it some sort of a pantry storage.


One day while snooping on Google images for ideas about spice racks I stumbled upon several pictures where they poster had used "Slatwall" paneling in their mudroom or laundry rooms to store their cleaning supplies!

While this one is made of pegboard, I thought slatwall would give a cleaner appearance?


I'm not a huge fan of Euro style cabinets, but for this situation I thought they would work great.
What I designed was nothing more than two open shelving units with adjustable shelves.  These would sit on each side of the door opening.  The left side was 6" deep and the right side was 17" deep, both were 17 3/4" wide.

3/4" white melamine would work perfect for this project, one to brighten the closet and two easy to clean.

After getting the cabinets drawn up, I had my friend draw them on his CAD program and then upload them to his CNC router.  A real time saver!

This video shows the router working on the first sheet of parts.


Once the parts were routed out, I ran them through an Edgebander that applied a 1mm White PVC edging to the face of the parts. Then I laid them out and started to assemble them.


The deep cabinet with one side, top middle shelf and bottom screwed together.


Assembled and sliding the 1/4" back into place.


Ready to install.


Same closet, new interiors!


This whole project took less than 3 hours to complete.
An hour to route and edgeband the parts, 30 minutes to assemble the two cabinets and an hour to prep the closet and install the cabinets and slatwall.

Now we have someplace to store stuff from the kitchen when we start ripping it out.  When we're done we'll use it as a pantry / cleaning supply storage.

Now, as for trains!  I'll have a post next about getting the layout cleaned and ready for a possible Op Session, because this is a blog about my layout in case you think I've forgotten, lol.....

Jump to A New kitchen pt13


Tuesday, February 2, 2016

SNOWMAGEDDON !!! February 2, 2016


Or at least that's how they were forecasting it for the last week and half....


They were predicting 12-15" in town, but I think we wound up around 5"- 6", which I am not complaining about.

With the doors and drawer fronts done, I had some time to kill before getting the countertops made up.  One thing I've been neglecting has been the basement.  Last fall and early winter I was busy selling stuff on eBay and I kind of let things get out of hand like my box supply.  So I took full advantage of the snowday today and got after it.


After an hour or so of cleaning I got it to look more like this.


Not perfect, but at least I can walk around it now without needing to be an Olympic Gymnast.  I also wanted to test a few locos that I had scored on eBay so I turned the system and got them tested.  Then I thought:
"Why not see if I can get something running"?  I had a trio of units sitting on the mainline from where I left them set back in May.  

"Hmmm?  I wonder if they will even budge or not"?  Dialed them up and they began to move, not very fast, but they were moving!   After a couple of laps to warm them up and dragging the cleaning cars around, they were running quite nicely.


As evidence, I still have a lot to clear off the layout yet, but one thing at a time...