Sunday, December 31, 2023

The Barn's roof

One thing I wanted to do to this barn was give it corrugated metal roof.  

I found some online from a company that showed some, but was unsure of the actual size as they just said it for "HO & N".  So I took a chance and I got lucky.  Looks close enough for me.

I glued roof to the barn with the roof supplied by Showcase Miniatures so I had a good solid base to work on and to help keep the kit structurally sound.

I started by cutting the material into roughly 3' x 10' strips.  It's pretty heavy foil and it doesn't seem to flatter out like typical foil would.

So I got started, piece by piece....


Once I get it all glued on, painted and weathered, I'll come back and beat it up a bit and bend up some of the edges for an aged, wind blown looked.


Monday, December 25, 2023

Barn weathering

As always, I get ideas as I'm doing something and decide to strike out and see what I can do with the idea before the project is finished.

After getting the outer facade applied the structure, I got to thinking about how best to weather it?  I thought about washes but with cardstock I wasn't sure it would be a good idea to apply something wet on it.  So I dug out my trusty Pan Pastels and started playing around with some on the scrap portions of the kit.

After getting an unseen area coated, I decided to go for broke and try the facade.

Here's the raw facade.

Here it is after applying some Pan Pastels.

Here are the four colors I used:  

Orange Extra Dark    Neutral Gray

Raw Umber               Raw Umber Shade


I sparingly applied the Neutral Gray in a random pattern.  Then applied the Raw Umber in the same way but a bit more heavier and blended the two together.  I used the Orange Extra Dark along the roof overhang to highlight where the sun didn't beat down on it.  The Raw Umber Shade being a bit darker was used along the bottom to show dirt splatter.

I'm kind of thinking about dry brushing or using a sponge to add some remnants of white paint?  

I'm also kind of wondering if I should use a darker gray since the area I'm modeling is not in a dry, arid climate?  The darker gray may give it a damper look with a bit more moss?


Saturday, December 23, 2023

The barn

After a few months of a modeling pause, I tried to get started back on the barn (a kit by Showcase Miniatures) for the farm scene by Winnfield.  

I had ordered some Roket Glue by Deluxe that's supposed to be designed for Cardstock models.  This stuff is advertised to work on paper/cardstock kits and have a pretty quick bond?  We'll see...

Anyway, I got the first four walls up.


Sunday, October 22, 2023

The Farmhouse weathering Pt2

Found a little time to work on the farmhouse a bit more tonight.  I got the chipping done on the walls and shingles, touched up the holes in the roof and added some dirt to it.

While I still have some more details to add, I'm sticking a fork in the house for now, this way I can move onto the barn and get it a solid footprint.  This will allow me to start terraforming the foam where the farm will be.  


Saturday, October 14, 2023

The Farmhouse weathering

After getting the house looking like it's falling apart, I finally found some time to get back to it.

The first thing I did was to get a couple of holes in the roof and add some roof joists.  Then I used two shades of gray Vallejo to simulate the aged wood that will be showing through when I start chipping the final paint coat.  For the roof, I brushed on some Vallejo Tire Black.


Once that was done, I sprayed a couple of coats of AK Heavy Chipping Fluid on the entire model and I let it dry completely before I sprayed a final coat of Vallejo Off White for the house and some Vallejo Light Gray for the shingles. 


The shingles look a little light, but by the time I add some darker wash and rub some of the Light Gray off, it should darken down a bit.

I'll let it dry before attacking it with a brush and toothpick to get the chipped look for the paint and weather worn shingles.


Sunday, October 8, 2023

The farmhouse

After getting the foam glued down, I figured I should try and figure how much room I'm going to need for the farmhouse, the barn and the other little outbuildings before I start shaping the foam as I'd like to leave that area flat.

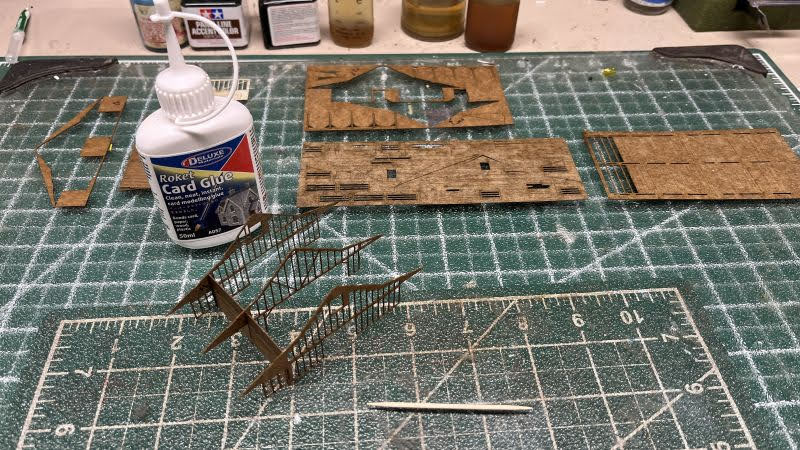
With that in mind I started working on Delony's Barn from Showcase Miniatures, but moved it aside as I ordered some Roket Glue Cardstock glue from Deluxe.

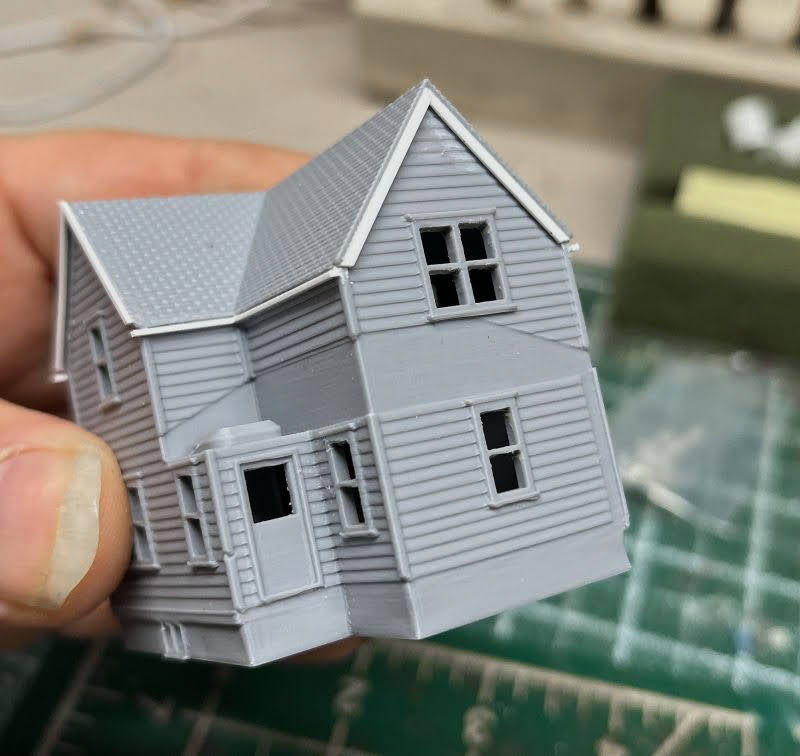
While I'm waiting on that to arrive, I pulled out the 3D printed farmhouse that I snagged off eBay recently.  It's not a bad model and it's my first 3D kit I've worked on.  I think it's a resin print?  It was under $20 with shipping so I figured it wouldn't be all that good, but it actually ain't too bad.

Even if the print quality wasn't very good, seeing how I plan to make this into an abandoned farmhouse, I'll be covering most of it with weathering and what shows through should add to the dilapidated appearance.


I started out by filing the inside of the windows, cleaned up some fuzzies that were left between the porch railings and spindles, sanded the porches and roofs so they fit a bit tighter, but like I said, since this will be in the process of deterioration, I don't see the need for perfection here.

I watched a video by Boomer who did an old farmhouse similar to this and tried to follow him for some ideas to add a bit of detail.  The first thing I did was to add some fascia on the gable ends and some gutters and will add a few downspouts as well. 

As you can see in the last image, the window frames are rather rough, but for what I plan to do to them, it shouldn't matter much, plus it should add to the deteriorating look.


As I mentioned earlier about the windows, I wanted them boarded up.  Not sure if I'll board the upper windows or not?   


The next thing I worked on was the porch railings, I wanted them in bad shape.  I cut and broke some of them, then glued them back in place. Some of the others I warmed them up with the help of a lighter so I could bend them slightly.


I have some plans for the roof, but I'm working on that now.


Friday, September 29, 2023

Terrafoaming between Ruston and Winnfield

Over the last week I've working on terrfoaming the section from Ruston to Winnfield.  I've been cutting and fitting the foam into place and gluing down a few sections at a time.  

The sheets are about 1.9" thick but I plan to carve them down quite a bit so they look like rolling farmland.  The edges along the tracks I'm hoping to make them look like an eroded cut with a tree line to help define the edges of the farmland.

I'm planning to have a road crossing in this location.  I'd like to have one come in from the lower left, cross the tracks just to the left of the turnout, then hopefully have it duck behind the end of the foam and the backdrop.  I figured this would be a good location for one as there will be a small depot that butts up against the short house track and make a small parking lot next to the depot.


Another crossing is planned here for the driveway to the farm, between the two turnouts on the ICG and across the Rock Island tracks, then off the layout.  


Again, while the foam is much taller here than I'll need, I'd like to keep it high enough to add trees to get the feeling that the ICG will be running through a heavily wooded cut.  The three narrow strips of foam and the chunks in the corner are yet to be glued in place.

Once I get the foam down in this location I'll play around with the scrap yard and decide if I want to keep the inner turnout and spur track on the left, then I can finish the ballast work.


One thing I've always wanted to do on a layout is to make use of a mirror.  If things work out, one that is strategically placed at the end of the ICG track may help to add depth here?


Someone asked me about the backdrop and if I was going to wait to add details until I finish the foreground scenery?  At the time I painted the clouds I didn't give it much thought as to how high the foam would be, so I just painted it and moved on.

But at this point, until I get it terraformed, I'm kind of planning to redo the entire backdrop, meaning repaint it blue and redo the clouds and painted tree line.  One driving factor to this decision is the clouds.  

They turned out OK for the most part, but after looking at them and comparing them to the clouds I did on the other side of the backdrop, these turned out almost too crisp and too bright. The clouds on the other side are more subtle and airy and not near as bright.  Once the foam is carved and painted, I'll probably take another stab at them.


Tuesday, September 26, 2023

First sheets of foam glued down

After doing some testing with the Elmer's glue the other night and seeing that it held up OK, I tried another quick test using a smaller chunk of foam and again, using Elmer's.  But this time I only ran three thin strips of glue instead of spreading out a patch of it.

My thoughts were that the patch was still showing some wet glue in the middle of the patch.  As the glue dried around the edges it sealed the inner bit of glue so it wouldn't dry.  I've seen this happen when others tried using Elmer's or Titebond to glue the rigid foam board together.  By running strips of glue, I figured the air could get between the strips and being thin strips, would stand a better chance of drying completely.

After letting the strip test dry overnight, it took quite a bit of pressure to break the chunk lose.  I actually started to dent the soft foam with my fingers while trying to dislodge it.  So I think strips of Elmer's will do the trick.


Tonight I got the first two sheets glued down.   


Saturday, September 23, 2023

Floral foam landscaping

Twice in the past I have used the Dry Floral Foam to model topography on the layout: once for a road crossing and the second time I used it to form the Whitewater Creek area.  

I chose to try this as it can be formed much easier than the Pink or Blue rigid insulation board or extruded polystyrene. Not only can this be shaped with tools, but it can also be shaped with nothing but your fingers. It is much more expensive per sqft but for small scenes it's a workable alternative.


Both times it has worked out very well for me, so I thought I would give it another try, this time on a much larger area.  For this scene I'm planning for low rolling pasture land for an abandoned farm scene.

With the ballasting done in the Ruston to Winnfield area, it's time to see what I can do with scenery.  I never really had a good idea of what I wanted to do in this spot until I was chatting with a friend.  Karl suggested a farm scene which sounded like a great idea!  

But I'll take it one step farther and make it an older farm scene with dilapidated buildings in disrepair.  So the next of kin who inherited it has decided to move a mobile home onto the property and let the farmstead continue to deteriorate.   

Here's the area that I'm working on.


I started laying out the floral foam to get an idea of what's needed.  If this works, I may need to repaint the back drop and raise the tree line?


My first objective is finding something to glue it in place with. As with the rigid insulation board, using white or yellow glue works, but as the edges of the glue dries, it seals the inner glue and it can stay wet for a very long time. In this case, with the floral foam being porous, I think the glue should dry much more evenly?

So I took a scrap piece and brushed on a thin layer of glue and sat it in place. Within a few hours it had dried pretty much all the way through, but there was still some wet glue in the middle. However it was thickening up and if I had let sit over night I think it would have dried completely.


So I think I'll run long narrow beads of glue or I'll use a comb and make grooves on the bottom of the foam so air can get to it better?  We'll see how this turns out?

In the past I've used plaster to make topography, but slinging plaster is not something I find enjoyable. It seems to get everywhere before your done.


Saturday, September 16, 2023

Wrapping up the ballast

As of tonight I have all the ballasting done from Ruston to Winnfield.  There's just a little left near the yard entrance and it will probably stay that way until I get the track and area around Union Scrap finalized.

A- Mainline heading South through the backdrop to Haskell.

B- Mainline heading North through Winnfield.

C- Is a cutoff I installed to bypass the yard, which I may remove from the crossing to the backdrop?

D- is the spur for Union Scrap


I think the Brown paint turned out nice and now with the ballast applied, it still shows up nicely.  


If you look closely you can see where I applied the black and gray Tamiya Panel liner to the look of sunbleached and fresh ties in this area.


It took very little work to clean the track after the ballasting was complete this time. I took care not to flood the track with glue and then I used a small square of #600 sandpaper and lightly wiped the top and inner head of the rails, then I came back with the Woodland Scenics track cleaner and polished it good.

The loco ran pretty good with the exception of a few spots and two of the points which I used the #600 paper again and inserted it between the point rail and stock rail and moved the paper back and forth a few times.

After wiping down the railheads, I quickly applied a couple swipes of my graphite stick and viola! the loco ran smooth as butter. The more I use graphite the more I like it.


Sunday, September 10, 2023

Ballasting the points

I stepped away from the tree painting for a bit.  I need to figure out where I need to paint them and until I get some scenery added in the area, I don't want to paint them and then cover them up with other aspects.

So I decided to start working on the ballast from Ruston to Winnfield.  Last night I started with the points of the turnouts in this area.


I wanted the ICG to have a different color of ballast, so I play around and decided to use just the plain gray, but later I added a bit of Light Gray and a pinch of Black just for a slightly speckled appearance.  Just like the color I chose for The Rocks mainline, I do not like ballast that is a solid color, for The Rocks main line I chose to mix WS Light Gray, Gray, Gray Mix and some Buff. 


I tried using some Gamblin Raw Umber powder pigment to dress up the tracks a bit and give some age to them.  I found this idea after watching some of Boomer's videos: 

 https://youtu.be/w3u39QM4t0M?si=60_qElJMh5PZgLA1

You sure don't need much or it becomes over powering on lighter ballast.  I applied this to each side of just the rails with a small stiff brush, then sprayed it with water to set it in place.  


Wednesday, September 6, 2023

Background hills

I decided to add some background hills like I have in the past, but this time I only used the darker green for what I called the "nearest hills" before.  I did this so when I paint the tree line I can leave gaps in it and you'll be able to see short patches of the hills in the distance.

Dubach


Ruston


Winnfield


After getting the hills painted, I went back with a medium fan brush this time and added a jagged edge across the top.  I did this for a little texture and to enforce the look of a tree line rather than just a straight line.


Once, and if I'm successful at getting the foreground trees painted on, I'll come back to the exposed gaps in the tree line  and add color and texture to the hills as I've done before with acrylics so it looks more like this.


The next process will be what is called "Blocking" in the trees.  This is done with acrylics and will be very roughly painted patches of the close colors.  In this case, greens and browns for the rough shape and color of the trees.

This is the basic idea of "Blocking".