Showing posts with label Construction. Show all posts

Thursday, March 26, 2026

DuBach track work complete.

All of the tracks are laid in DuBach, the only thing left to do is to drop the feeders and connect them to the bus.

The spur tracks are just tacked in place for now, this way I can easily adjust them as the industries get built and installed in case I need to move them to fit.  This will also allow me to work on the operations to make sure that things will work the way I'd like them to.  If not I can easily make adjustments.


North DuBach


South DuBach


Sunday, March 22, 2026

Progress in DuBach

It's been a few weeks but I finally got around to the track work in DuBach.

While there isn't much difference on the location of the tracks, I did move them away from the backdrop to allow for the new industry: Cajun Hydraulics.  This created a subtle sway in the tracks just enough to  reduce the long tangent I had before.

As before, the main track will be closest to the backdrop, this allows for a larger radius track and it also keeps one from reaching over the train while uncoupling. 


Starting at South DuBach, the mains sway away from the backdrop enough to allow space for Cajun Hydraulics.  The spur in front with only cork will be for A&A Cement.


The tracks are not too far from where they were before.  The radius has been reduced down from 28" to 24" on the main line.


Still working on the North end.  Where the new turnouts are is where Piggly Wiggly will still be, but moved just a tad, the spurs in front will be for ARKLA Plastics and the new Bayou GenTech track with a transfer crane.


Sunday, March 8, 2026

My long‑awaited DuBach re‑do has begun

The long‑awaited re‑do of DuBach is officially underway, and today marked the first real step into this next chapter. I focused on the stretch from the bog heading north, through the curve that leads into the south end of El Dorado. It’s a satisfying way to kick things off—if also a little destructive. There’s something about ripping out old track that feels like a true point of no return, the moment when the commitment becomes real.

Back on November 10th, 2025, I said it was time to completely rebuild DuBach. Now that the work has started, that decision feels even more justified. This will be the third—and hopefully final—time this section gets a full overhaul. After operating the layout many times over several years, you learn what works, what doesn’t, and what quietly drives you crazy every session. Things evolve. Ideas mature. Standards rise.

This redo will be my chance to get it right, third times a charms, right? With the old track now pulled up, there’s no turning back. And honestly, that feels pretty great.


Not more than a few hours after the last bit of track was ripped up, I got an email. Every year, the local train show rolls into town like clockwork - a weekend of diesel fumes, nostalgia, and more N‑scale temptation than my wallet can reasonably withstand. But this year, the show comes with a twist. When it arrives a small crowd of friends who’ve all said the same fateful words:

“Hey, while we’re in town, we’d love to operate your layout.”

And just like that, the sword was hung over my head.


Sunday, November 23, 2025

Assembling Cajun Hydraulics

With 3D printing hot and heavy these days, I'm still learning the old school ways I guess?

I got the Pike Stuff kit assembled and then started working on the middle building which I used sections of the DPM modular wall sections last night.  I dug through my styrene stash and first added a lip to support the roof section, then I kept working on it so it would be self supporting.  It might be a little overkill, but it should stand up for the long haul.

I also got the concrete pad finished up.  Since I didn't have any 0.060" styrene on hand, I used plain 0.030" sheets and with my homemade Dupli Cutter, I scored 10' squares.  After gluing two sheets together, I added a lip around the edges to make 0.060" so it sets up against the ties, but below the railhead.

Kit bashing is definitely not as easy as kit building, but at the same time it provides one with a challenge.  This is something that I'm going to need to learn from as I have a lot of kitbashing for the layout.


Next I need to start painting the buildings and concrete pad.  I'm trying to figure out how I want to attach the buildings to the pad?  Either with magnets or blocks, hmmm?


Friday, October 7, 2016

Kill switch


Several years ago I had an idea to have one switch that would kill power to the entire layout. Finally got around to it.  last night my electrician stopped by to finish a small project in the kitchen and had him tackle my kill switch for me.

I have four outlets in the basement for the layout, one for the main power supply and command station, two others where the circuit breakers for the layout are plugged into and one for the lights over Malvern.

So now with one flick of the switch, as AC/DC would say, the layout is on or off.  I took it one step further and had him add an outlet so when the stormy weather arrives in the spring and summer and there's bad storm coming, I can not only shut it off, I can also pull the plug and the entire layout is now unplugged from the rest of the house.

Not that this will be a sure thing if I get a good lightning strike, but it improves the odds of not having a bunch of puddles around the layout where my chipped locos were sitting or end up with a fried command station.  It's more of a piece of mind than anything. 


Thanks Jon!


Sunday, July 22, 2012

Basement remoldeing complete.


The final phase in the train room is complete.

In the last post I mention finishing the white areas of the basement where the shelving use to be.  I finished it off this past week

 I was given many options for the West and South wall:

Add an extended storage yard, a separate switching layout, even a continuation of the layout along these walls for a branch line and using the Electrical meter that is behind the curtain as a destination for coal trains [what's actually behind the curtain is a Gas meter, so the idea was changed to a huge LPG distributor!  LOL ]

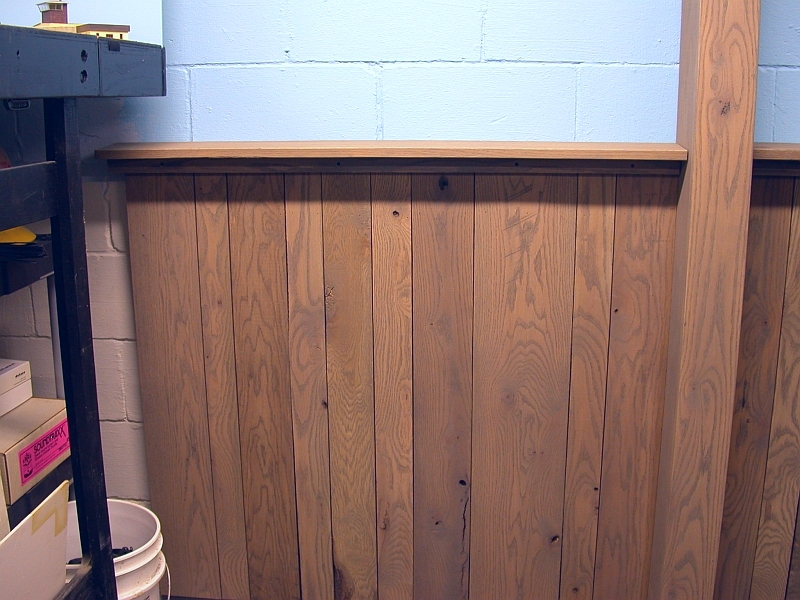
Keeping in touch with getting by as cheap as possible like most modelers do, the idea that went with was to simply cover the wall with a false wooden wall, similar to a fence.  Several years ago after I got my cabinet shop opened up, one of my old bosses stopped by to see if I had any use for some free lumber that he stored away after he had closed his shop.  About a 1000 bdft of red oak lumber.

It wasn't the best, but I  used the biggest share of the material up for making raised panel kitchen doors for customers.  What was left was basically good for nothing more than fire wood!   I did manage to rummaged through it a couple more times over the years for several jobs where the customers wanted that RUSTIC look.  I also made some pallets from time to time but it still left me with several hundred board foot.

I started out by covering the metal "I" beam that supports the bowing wall with a false column, then added stringers to the wall so that I could simply attach the "Slating"

Before & After shots:


Total cost:
$5.49 for a box of "Tapcon" screws [masonry screws] used to hold the stringers to the wall.
$8.49 for the curtain.
$150.00 for the 3 gallons of Sherwin Williams Porch and Floor paint.
$4.99 for the gallon of the blue Lucite paint for the walls [ $14.99 less a $10.00 rebate]
$143.18 for the 18 packs of the interlocking anti-fatigue floor mats.
Total - $312.15


As for the floor mats from the previous post, I had one comment from a follower who told me to be careful about getting Static Electrical charges from these mats and possible damage to the electronic equipment like the DCC system and chips.
After posting a question on TrainBoard, doing a bunch of research on the net and asking some friends, I have still not come up with any solid answers for ways to prevent any possible damage from the Static Electricity.

Here is a list of possible answers and preventative measures that I did get:

  • Spray a Anti Static spray on the mats before each Ops session.
  • Have everyone wear a Anti-Static cord on their wrists that can be plugged into a grounded plug in the fascia.
  • Use a copper wire and bolt or tape it the mats in several areas and have the other end attached to an earth ground such as a grounded outlet box or water pipe.
  • Place a wire mesh UNDER the mats which are then grounded to an earth ground.
  • Buy a portable humidifier or have one installed in the furnace.
  • Watch what type of clothing we wear that has wool.
  • Don't wear just socks.
  • Wear shoes that have rubber soles.

The best thing that I will be able to do is once the humidity goes away this fall, is to try a couple of different things and see what builds up any static and how much.  I'll just have to wait and see.

Monday, July 9, 2012

Another milestone...


Well I finally got the floor finished.  After three weeks of moving, cleaning and covering the flooring with the Thin Set I got it painted.
Then a friend sent me an email that gave me an idea that I couldn't pass up:

Allen,
The floor looks great!  Now consider covering the aisle space with the 2' x 2' 1/2" thick interlocking foam tiles that you can get from Costco or Sam's Club.  The tiles are easy to cut to fit odd spaces and they clean up remarkably well.  Our operators love walking on the foam floor.  It saves their feet from hours of pain on the concrete.
Dave...

Thanks Dave!

I started to look around to see what was available.  The cheapest ones I ran across a 4pc set of these at [Bottom Of the] Harbor Freight.  $9.99 [$7.99 online price]  So I stopped by the local store to check them out first hand and grabbed a set which was on sale for $7.99.  I got home and laid them out and was impressed.  Two days later I got a sale flyer which had a coupon for $6.99 each.  The next day I grabbed enough to cover the entire floor!

Over the course of the last weekend I got the floor covered.  Dave was right, they were easy as hell to lay out and trim to fit the odd corners.  All I used was a tape measure, marker, straight edge and utility knife.
I was worried about the narrow ends sliding about but since the Thin Set wound up with a slightly rough surface, even after painting it, they seem to stay put very nicely.

Looking down from the top of the stairs


Looking towards Calion


Looking back towards Haskell


El Dorado and the south wall


In front of  Dubach


Looking towards Winnfield & the head of the yard


Again, Dave was right, they make it easy on your feet and should help keep your tootsies warm in the winter!
All in all, the floor project cost me about $300.

To resurface the floor it ran me about $150 for the Thin Set and paint, then another $150 for the anti-fatigue mats.
Well worth the time & money!

After getting the floor finished I thought I should put a fresh coat of paint on the walls as well.

Before


After


I used the same color of paint that I used on the backdrop, as you can see the backdrop almost blends into the wall.

The final phase of this project will be to cover this white section of walls where the shelves use to set.
But that is for the next post! 


Thursday, June 14, 2012

A new floor!

Well almost new.
After tearing down the shelves and moving them all under the layout, a friend told me of a good way to get the floor looking better.

When I first moved in here one of the first things I did was to gut the basement and tear up the tile on the floor that was curling and chipping from age and minor water damage.  Once I had it up I seen that it had been stuck down with that gooey black mastic!  The only way to get rid of it was to dissolve it.  Since I had a Gas furnace and water heater at the time, that wouldn't be an option so I elected to try and paint over it at the time.

It held up pretty well over the years but with some more minor water leaks [which I have since repaired] and the combination of the mastic the paint started to peel and lift off leaving the floor looking like some sort of disease viewed through a microscope!  I had thought about getting some stair tread runners from Menards and cutting to fit so that it would cover up the portion of the floor that was not hidden by the skirting but just never got around to it.

The idea that my friend gave me was to scrape then mop the floor to remove the worst of it and then once it was cleaned he would come in and lay down a skim coat of  Thin Set.  It's what's used to level and prep a floor where ceramic tile will be laid.  It's similar to concrete but has an adhesive property to it as well.

After he got the first coat down it took about 6 hours to dry before I could paint it.  Wow! What a difference it's made.

Here are some before and after pics.


It has actually brightened up the area!

Now the trick will be to keep it clean.

While I have the brushes and rollers out, the next batch of painting will be the walls!  They are beginning to show their age as well.


Sunday, May 20, 2012

Reclaimed space...

...for the operators, not for more layout though.

The curtains that you see in the background are covering up several metal 5 shelf units that I installed years ago to clear out the basement so I could start on the layout.  Then I hung the shower curtains so things wouldn't look so cluttered.


After the first ops session I was told "Those shelves have got to go"!  Which I planned to do eventually.

If the El Dorado yard operator was working the yard, he would have to move out of the way to let another crew get past.
At El Dorado,  between the fascia and the shelves there was only about 27" inches of space, and around the corner there was even less, about 20"

Now with the shelves removed, I have about 43" at El Dorado and about 36" around the corner.


When I tore the shelves down, I re-built them into three shelf units and then slid them under the layout back to back like I had planned to do all along.  These will then be covered once I get the rest of the skirting installed.  In the last picture above you just can see one of the new plastic three shelf units that fit nicely under the south end of El Dorado. 

Here are some of the shelves under Haskell.

Now you see them


Now you don't


I plan to hang another curtain at a angle so as to cover up the gas meter and then plan to repaint the walls and clean the floor so I can get it repainted as well.  Slowly but surly it's coming together and another step closer to scenery!
Aaaaahh!

Friday, September 16, 2011

Fascia

In July I started applying the fascia. I finished in late September.
The process of applying the fascia took less than two weeks, but the rest of the time was spent painting the schematic!

I started out painting the Yellow first with a small roller, then taped it off with 1/4" masking tape.  The Blue came next followed by the Orange. Each color was followed by a stripe of tape. Once I had all this finished I sprayed a coat of Clear acrylic over the tape to help seal the edges so to prevent the black from bleeding under the masking tape.  Once the coat of Black dried, I slowly peeled all the tape off.

"Why did I do this you ask"?

I visited a NKP layout years ago and he did the same thing, but he used only Yellow for his schematic.  Since it was the first time seeing this layout, I had no trouble navigating the track plan when it was time to run trains.  All I had to do was to look at the fascia and I knew where each of the towns were located, as well as which tracks the industries sat on. 

I used Blue for The Rock mainlines, Yellow for the W&OV trackage and Orange for the ICG trackage.

I printed out little signs for each of the towns.  Avery labels work ideal for this.
Since my industries are fairly well spread out and not that complicated, I may forgo the industry labels for now.

It does look kind of busy and a little distracting, so once people get use to the layout, I can always pullout the roller and black paint!

I also got started hanging the skirting.  I just used Velcro to attach them to the back side of the fascia.


Tuesday, April 7, 2009

Backdrop and Sub roadbed

Once I got the benchwork completed, I made miniature stud walls from 3/4" plywood cut to 1" wide.  I then screwed them to the benchwork from underneath, This way I could remove them after the back drop had been installed if I need to make any changes.  
The back drop is 1/8" Masonite.

A few friends have used ceiling tile panels glued to the plywood sub roadbed. I took it a step further and glued down a layer of the 1-1/2" thick white foam board using PL300 so it wouldn't melt the foam. Then I glued the ceiling tile on top of the foam board.
This will give me enough room to carve out rivers, creeks, sloughs and depressions in the scenery without having to cut into the plywood base.


Once I had this was down, I started in on laying the cork and track.