Showing posts with label Kitchen. Show all posts

Wednesday, August 17, 2016

A New Kitchen part 23......DONE!!!


Finally, the kitchen is complete!
The only thing left is to install the under cabinet lighting and toe kick lighting. These have not been installed yet as we have not been able to find exactly what we want yet, but we're looking.

Last Saturday Lisa and I rounded up all the extra stuff we didn't need and spent the morning running to three different stores.  Once done, we headed for home and got the Refrigerator moved into place, then worked on the Microwave, that turned out to be the biggest challenge of the day!  As luck would have it, my electrician just happened to stop by during my second round of doing battle with it!  After getting it installed, he helped me get the pigtail connected to the stove so that we could bring it in.  


After getting the stove set into place and playing with it a little bit, we decided to put it to the test. We ordered a Papa Murphy's "Take N Bake" pizza!  It worked perfectly!


As a refresher, here is the before picture.


It's been a long time coming, and an enjoyable journey creating this kitchen.

The best part about it?  Being able to share it with Lisa!
Thank you all for following along and thanks for all the comments! 


Now!  Finally I might be able to get back to my trains before winter sets in...


Wednesday, August 10, 2016

A New Kitchen part 22


Two steps closer!

First step.
Last weekend I tackled the floor.  I tried a fairly new flooring product that is catching on around here. It's called Luxurious Vinyl Plank flooring or Floating Vinyl Plank flooring.  It installs a lot like Laminate flooring where it snaps together and lays lose (or floats) on the floor.  Unlike the Laminate floor, this is 100% waterproof and it's flexible, not rigid.  

You only need a few tools to install it as well: A sharp utility knife, a square, a tape measure and knee pads, well at least I did.

Here is a video for the brand of flooring I bought.
LVT Flooring   Skip ahead to 3:51 to skip all the prep work and instruction to see how it's laid in place.

After 5 hours on Saturday,  I had the main kitchen floor covered.  After 4 hours on Sunday I was done with the landing and two steps and the closet.  This included some baseboard work on the landing and steps.


It took me most of Monday before I could walk without hobbling along like a cripple, it really took a toll on my knees!

Second step.
Today my tile guy moved up the install date and was able to get all the tile installed and plans to get the grouting done tomorrow!   


The brown vertical trim in the last photo is edging for the tile, you can see it installed in some of the other photos.

Only four more things to do!
One - I plan to install the base shoe this Saturday.
Two - The electrician will tie up all the loose ends.
Three - Bring in the new stove, install the microwave and move the fridge back into it's new home and hook up the icemaker!!!!

Four - ENJOY our new kitchen.  


Tuesday, August 2, 2016

A New Kitchen part 21


One thing I forgot to work on while I still had the cabinet at the shop was to make the actual breadboard.

A few months ago Quin made several cutting boards for presents and for something to do.  Looking for ideas and techniques he stumbled upon a cool video where a guy built a beautiful cutting board and filmed his process.

After seeing this I thought I'd give it a go. I didn't follow his technique to a letter, but kind of wished I had as my end result wasn't quite as good as his but I learned the reasons why he did the way he did. Bottom line I just didn't have the time.  It's something I can always go back and do when I have a few extra hours.  I'll link to the video at the bottom.

I started with plank of Hard Maple and then made a pattern and cut it on the bandsaw.


Here are the first five strips of Walnut and Cherry.


Then the next three and the last single strip.


After letting it dry overnight, I ran it through the wide belt sander to smooth out the joints and size for thickness.


Seen here the board is in place place with the front trim on and oiled down with mineral oil ready to use.


As you can see, some of the strips did not line up correctly.  This was because I just cut a line in the board and added the thickness of the strips which slightly changes the radius of the lines.  But now I know how and why the artist did it the way he did.  

Here's the video:


Last night we got the curtains hung.  Starting to feel like a kitchen again!


The flooring arrived today, so I'll be installing it this weekend if not sooner.  The electrician should be here anyday and the tile is planning to start on the backsplash the 11th of Aug.

Soon, soon I can get back to the trains!!!


Jump to A New Kitchen part 22


Monday, July 18, 2016

A New Kitchen part 20


Finally!!!!  Light at the end of the proverbial tunnel.

Friday afternoon Jim and knocked off early as he wanted to help me get the Sink base, the Sink upper and the Micro upper installed so I could finish the install over the weekend, it was a big help!

By Sunday night I had all the cabinets installed, countertops installed and then we put the all the shelves in place, the doors on, the drawers inserted.  After that, Lisa got them all wiped down with lemon oil!

I still have a bunch of things to do yet before I can stick a fork in it and call it done, but the majority of the remodel is done!!!!!

Apologize for the crappy cellphone pics.
North wall


West Wall


East wall


Things left to do are:
Finish the wiring.
Hook up the plumbing.
Get the base and casing installed.
Install the tile backsplash.

These are waiting for the subs to get the time in their schedules. 

The last thing will be to lay the flooring.  I'm planning to install a Luxurious Vinyl Plank flooring and cover up that ugly yellow flooring!  Then I can get the appliances set into place and enjoy the new kitchen.


Jump to A New Kitchen pt 21

Tuesday, July 12, 2016

A New Kitchen part 19


Finally making some visible progress!

After a couple of weeks of tearing out the cabinets and prepping the room, Lisa and I were finally able to see some light at the end of the tunnel. 

Over the 4th of July weekend we got the drywall work finished up. Last weekend we got the ceiling and walls painted.  Last night we brought in four of the eight cabinets and got them installed.


Tonight we brought in the split pantry base and got it set.  


A buddy from another shop that I've been helping with lately has offered to help me bring in and install the last three cabinets this Friday if time permits.  These are the sink base, sink upper and the microwave cabinet.  The sink cabinets are bruisers and I'm gonna need some extra muscle to get them set in place.

Once these are set, I can get the countertops set and then start installing the crown and scribe trim and then get the doors and drawers back on!  

Jump to A New Kitchen pt 20


Sunday, July 3, 2016

A New Kitchen part 18


A little more progress, but nothing really good to show.
After getting the old stuff carted off to the dump, the next step was to get the electrical work done.  This included the re-wiring of the kitchen and putting in all new wiring with new circuits as well.

After tearing out the lower cabinets I was greeted with something I didn't want to see.  The waste line came out of the wall at an angle. 


This was going to cause a bit of a problem as it would interfere with one of the two drawer stack in the sink base.  I could have rebuilt a couple of the drawer and made them 18" deep instead of 21".  So I decided to call a plumber I know to see if this could be changed without a huge hassle?  Once he got a chance to see what was involved with the waste line, he said he could fix it easily.  And so he did, now I will not need to modify the base cabinet.


I'm also planning to have a tiled backsplash but the area on the wall where the tile will go needed some attention as well. It had several layers of wallpaper and old linoleum tile that had been papered and painted over several times over the past 64 years, so it was kind of lumpy.  My tile guy told me to remove that section of drywall and re-install new for a fresh start.


Before I replaced the drywall, my electrician said it would make his job much easier so I waited until he had the new wiring installed before I pieced in the new drywall.  I'm gonna have more outlets than I'll know what to do with!


Now I can get started on the final wall repair and painting.


Jump to A New Kitchen part 19


Saturday, June 18, 2016

A New Kitchen part 17


Another big push Friday night and Saturday Morning!
Friday night we removed all the cabinets that I had added to the old existing cabs years ago.  The Microwave cabinet above the stove and two uppers on the opposite wall. 

Then we moved the ugly green stove out to the trailer and rolled the refrig to the dining room for the duration.


Saturday morning the rest came out.
First the plumbing, then the countertop and sink then the base cabinets and finally the upper!

Going...


Going...


Gone!!!


Buh...By!!

Next stop, the landfill!


The original cabinets came out real easy due to the way they were built.  The cabinets were built from 1" x 12" Yellow Pine lumber.  The base had two boards laying front to back, the upper was made from just one.  All the shelves were nailed in place while the cabinets were being built in place on the job site in 1952. Not one drop of glue was used, everything was nailed together using 8d [8 penny] finish nails!

Next step will be to start cleaning, then the electrical, plumbing.  So this will probably be the last post until I get the cabinets installed or when I'm completely done...


Wednesday, June 8, 2016

A New Kitchen part 16


Last weekend seen good progress on the cabinets.
By the end of Sunday night we had all the doors and drawers installed in the boxes and the decorative hardware on!  Monday noon we moved them from the shop to the garage where they'll sit until the kitchen is ready for them.  I still need to make the breadboard and countertops.  The laminate is on order and should be here next week Tuesday.  Once I get them covered I'll add them to the pile.

Tonight Lisa and I started clearing out the cabinets of the unneeded items in preparations for tearing out the old cabinets, hopefully this weekend?

Here are the original plans I first posted along with the finished cabinets.


The refrigerator wall cabinets.


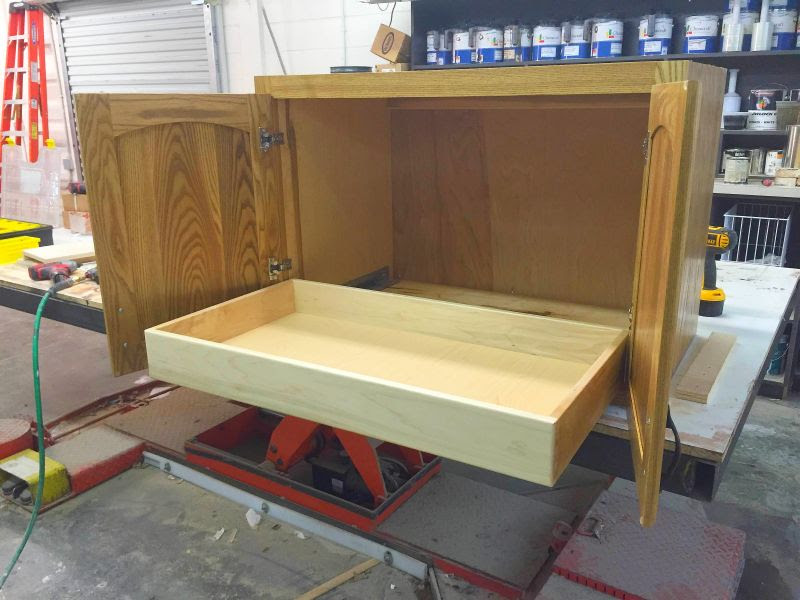
The over refrigerator cabinet has a roll-out and a shelf, the roll-out will make it easy to get at stuff in this cabinet.


The split pantry cabinets.


The sink base and sink upper.


The microwave cabinet.


There will be a few things that I will modify once they are installed like the cutting the top stringers on the sink base so the sink will fit.  Other than that, they are finished and ready to install...


Jump to A New Kitchen pt 17