Wednesday, November 23, 2022

The New El Dorado.

After getting the backdrop painted, I started to work on the track plan and building footprints for El Dorado.  As I said in an earlier post I want to keep things to a minimum if possible.  No yard, just the main line, a siding and a few industries.

The siding was shortened on the south end (right) but it will still hold a train with three locos, 21 car and caboose, which will probably be more than I'll ever need.

This is what I came up after a few hours of doodling.


I drew it straight but I kept the swing in the tracks as I plan to keep the depot as part of the scene. I also flipped the house track, mainly to balance out the switching moves between the NB and SB local.  This plan gives the SB local two moves: The house track and the Mill.  The NB local can service the Oil Co, Dr Pepper Dist and the Maytag Dist. 

The feed mill might be a little awkward to switch and may not be prototypical?  The track that is below the mill is an old track that went to another defunct industry.  Originally it was the drill track for the old yard, but I plan to keep it in place, model it weeded over and I may keep some MOW equipment parked there to add to the look of the town.  

I still need to get the mill track and the old lead in place and secured temporarily.  Here is where I'm at as of this posting.


Looking South.


Looking North.


Saturday, November 12, 2022

Clouds over El Dorado

I watched the clouds roll in over El Dorado this morning.  I did these the same way I did the others a few years back: 

  https://thelittlerockline.blogspot.com/2017/10/clouds.html


Tuesday, November 8, 2022

Foliage on the closer hills

Found some time tonight get the closer hills painted with foliage.

It took me a bit to find the pattern I used several years ago, but I think I got it pretty close to what I did before?

I left the foliage off the area right behind the bridge scene as I want to carve the river banks and then sling some plaster cloth and plaster to get the banks formed, then I can come back add the foliage.


Next comes the clouds... 


Monday, November 7, 2022

The Paint I used for the backdrop

Answering DandHColonieMain's question on the paint that I used for my backdrops.

To be honest, it's a little too rich, it could be a tad lighter. 


Sunday, November 6, 2022

The hills of El Dorado

After getting the pan head screws removed, filling in the seam, countersinking the new screws and spackling over them, I was able to recoat the backdrop with a fresh coat of sky blue.  Then I got the distant hills painted on tonight.


Once this dries and I get a little time, I'll start painting on the foliage of the closer hills using these craft paints like I did before.


Thursday, November 3, 2022

A clean slate in El Dorado

With my whirlwind of locomotives behind, I think I have had enough of the bench time for awhile?

It's time to get back to the layout.  My first target is El Dorado.

When I first started working on El Dorado I had planned it to be a busy location that had a small four track yard, two A/D tracks and the longest siding on the layout.  The plans were to have two locals work out of for the entire layout.  This worked well and we had a lot of fun with it and kept the sessions fun full of operations.

As I have mentioned before, time moves on things started to change.  The sessions slowed and the crews dwindled and I decided to reduce my operations.  With this a lot of changes have and are changing.  El Dorado  is on the list and I have decided to start here.  I am going to try to conform to and hold to the old motto "Less is More".

A few years ago, when El Dorado was in its prime it was hopping place.  Here's an image of what it use to be.


I decided that I want to go back to my original plans for the layout with it being nothing more than a backwoods branchline of sort.  This means a lot less traffic and nothing more than a string of small towns with only a few industries being served by a local.  So the yard had to go.

After doing a little doodling I came up with this new look for El Dorado.  Also as I have said in the past, I am not modeling the line exactly so I can make full use of my modelers license. It's not to scale, but it's close enough to get started with.


I'm hoping to get the feeling of a small town with a two lane blacktop running down the middle of town, with a few industries to work, and the tracks passing through the edge of town.

Over the last few days I've ripped up the majority of the tracks and have reduced it to the mainline, passing siding and the two A/D tracks, both of which will be removed in time.

I've got the industries pretty much decided on and their locations, but I need to get a feeling of their size before I can really get down to laying the tracks.  One of them; The Dr. Pepper Dist will be fairly large and will be made up of several building kits that have been added on to the original building over time.  The Depot will remain, but will be an actual kit this time.  For the Maytag warehouse, I'm thinking about using the DPM Wood Furniture kit and for the mill, well it's built and ready to install once I find a location for it.

Tonight I figured I'd better make sure the depot would fit the same location where the stand in has been sitting.  So I dug out the Walthers Clarkesville depot and set the foundation in place, and it fits.  So the tracks won't have to move now.


I started thinking about the Maytag building and where it would sit along the backdrop.  Well that got me thinking about the backdrop.  I should really get it done first?  That means I'll need to get it prepped and ready to paint so it look like this when I'm done.


So tonight I cleared things off and got a clean slate to work with.


The first task will be to remove the panhead screws I used to hold the backdrop in place and replace them with some #6 x 5/8" countersink screws, then patch them with spackling and repaint.  I'm also gonna have to do something with this seam?


Monday, October 31, 2022

Number boards

I'm making this post for a friend and follower who said he really like the way my number boards turned out on locomotives.  So here ya go Dave. 

Myself I do not like the way the number boards light up when the lights are turned on, most of the time they are way too bright and kind of diminish the headlight, so I completely blank them out.  Generally the molded number boards do not come out even with the face of the cab or rear, they are recessed into the openings a bit and if you try to decal them with numbers, a lot of the times they exaggerate the convexed look.  To be honest, there are a few different ways modelers have overcome this issue, but this is my way of doing it.

After the locomotive is completely weathered, I insert the window/headlight/number board glazing into the cab and in the rear of the loco.  Then I mix up a small batch of  2 part 5 minute epoxy and very carefully use a toothpick and fill in the number boards.  I keep applying it until it's flush with the outer surface.  It's self leveling but I keep an eye on it until it starts to firm up. 


Once the epoxy is completely dry, I paint it with a flat black paint, this will help to block any excess light.


Once the paint is dry I apply the proper number board decals that are supplied in the decal sheet.  I also come back a bit later and apply a decal solution set the number boards in place.  My choice is Walthers Solvaset.


The decals I use are ShellScale Decals, they can be had in several different styles, designs and scales.  For this loco I used "N-117" which came with black number boards and 8" white numbers.


If you look closely, the numbers are printed in a very clever way so that you only need to apply two separate decals to achieve a 3 or 4 digit number, instead of 3 or 4 individual numbers.
"01 02 03 04.....96 97 98 99"  To get the 9601, you cut out the "96" and "01"

For N scale this is perfect! 


I cut out the correct numbers and apply them on top of the number boards and when dry I apply the Solvaset and later a layer of Dullcote using a small brush.


Like I said, this may not be for everybody, but it works for me.

Here is the address for ShellScale decals


Sunday, October 30, 2022

Fading paint with Pan Pastels

Fading can be done with several different methods, all with good outcomes.

You can use the White Wash method where you spread thinned white Artist Oil paint on the model, then remove most of it with a "Q" tip.  Spray on an extremely thinned paint wash and build it up to a desired level or the Oil Dot fade where you apply several different colors of oil paint and then brush them altogether with a brush damp with mineral spirits.

I decided to try a version of the Oil Dot fade but with Pan Pastels.

I kept forgetting to get pics when I was working on the recent U33B and GP35 shells, but I did manage to get some shots on the last fuel tank I did.

I started out by painting the fuel tank with TCP Rock Island Maroon and then gave it a good coat of the Dullcote to give the surface tooth for the powders to grab on to.

In this case I'm using three colors of Pan Pastels: Yellow Ochre Tint for the fade, a rust colored Pan that is lighter than the Rock Island Maroon to keep the color close to the base color  and finally black.

I start by dabbing my brush into the Yellow Ochre Tint and lightly padding it on the surface of the tank.


Next I do the same thing with the light rust color.


Then using a scrubbing motion, I work the two colors together on the tank.


Now the lighter colors tend to fade and disappear when you shoot Dullcote over them to seal it, so I apply the pans heavier than I need and start by misting multiple light coats of Dullcote.  By doing this, the Dullcote is almost dry by the time it hits the surface and doesn't affect the Pans Pastels as bad as it would if you shot a full wet coat.  If you watch closely you can see some the colors disappear, if this happens, simply re-apply another coat of the Pans as you originally did and then keep misting the Dullcote and let it dry between coats.

Eventually the Dullcote will build up enough to seal off the Pans, once this happens, allow the Dullcote to dry thoroughly and then comeback and shoot a full wet coat of Dullcote to fully seal things.

After that I hit the tank with black to give it a sooty or oily look and seal it with another coat of Dullcote.  Eventually I applied some Tamiya Black Panel liner to give the tank an oily, greasy appearance.


This is how I did the fading on all of my recent U33B's and GP35's.


Saturday, October 29, 2022

Rock Island GP35 #330, the final GP35...

I finally reached the end of the tunnel without seeing a train.

While it seemed like a good idea at the time to just keep going while I had the Mojo and the supplies handy, I won't be doing this many locos at one time anytime soon.  12 was almost to many, I had to kind of push myself a little to get across the finish line with this unit and be careful that I didn't cut corners along the way.

I still have about four classes of locomotives to work on, including U30C's, GP40, U25B's and a bunch of GP7, but I need/want to get back to the layout and do some trackwork next.

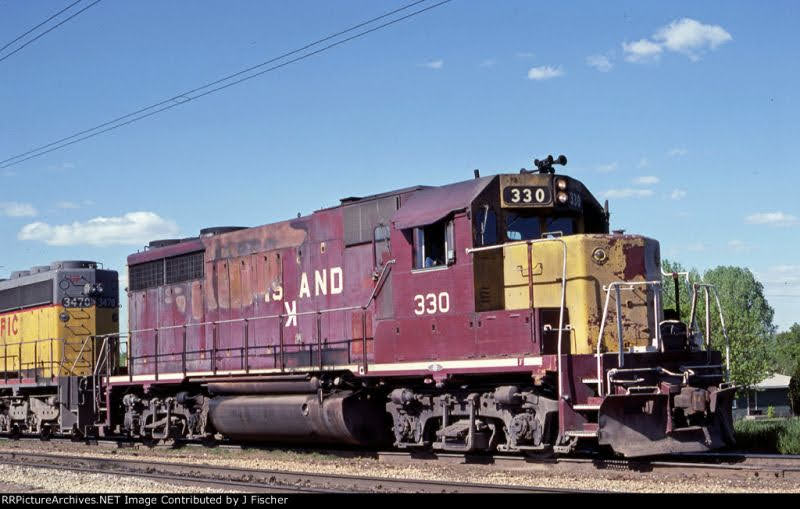
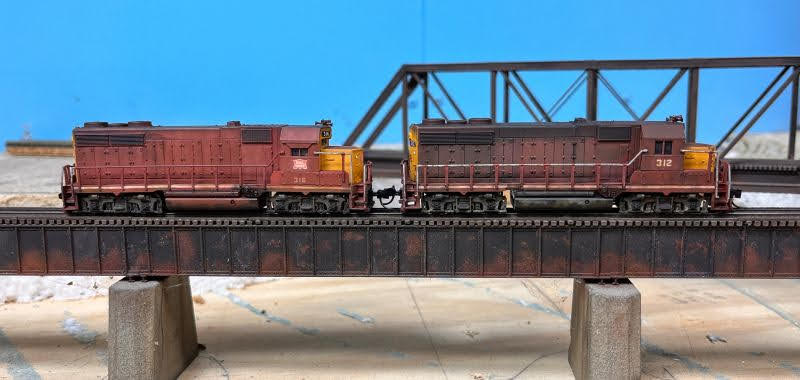
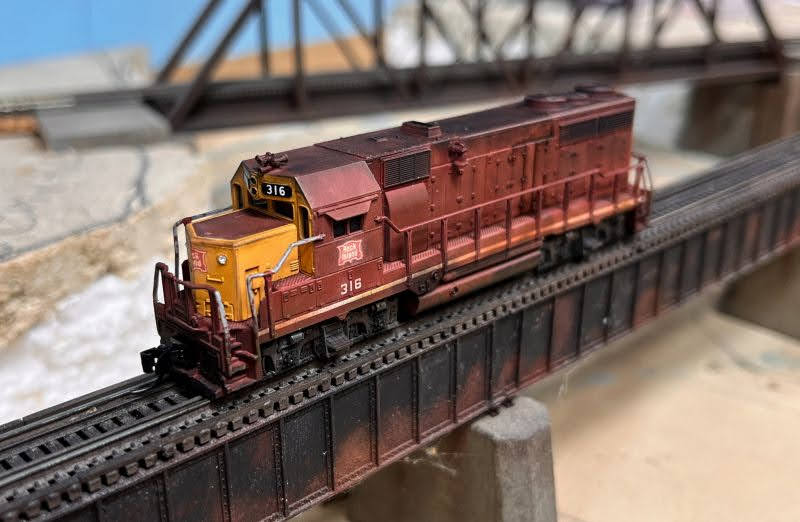
As I was looking around for some different GP35's to model, I came across #330 on Google and felt I just had to do this one, knowing full well that this would be pushing my abilities.  While doing the U33B's I wanted to make one that had burn marks, but chickened out at the last minute. This one caught my eye and decided to put my head down and charge forward.


Before starting with it, I watched several videos on YouTube and several made it look easy.  One guy used enamel and wound up with a nicely finished HO model, so I headed in the general direction.  Not having any enamel paints on hand, I opted to use Artist oils, but found out right away that it wouldn't be the best option because of the long dry time.  Instead of the colors blending, they mixed and I wound up with a brown sludge on the sample boxcar.

So I switched to Artist acrylic which fared better, but being thick, it wound up looking lumpy.  The enamels that the YouTuber used on his unit had lumps, but because he did it on an HO model, it scaled down ok.

Next I started off with some Vallejo paints, but I because it was drying so fast I was getting a lot of brush marks and I could see it the thickness issue arising again.  My last option was to use Pan Pastels and see what I could do with them.

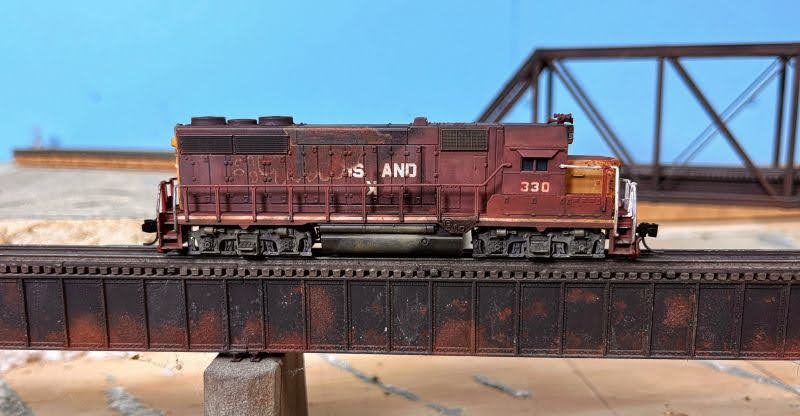
The first thing I did was to use a Vallejo color called Stone Gray for the primer.  I thinned it just a bit to help alleviate the brush marks.  Before it was completely dry, just tacky to the touch, i started applying some dark rust colored Pan Pastels.  I worked it into the gray and slowly added lighter and lighter colors until I achieved a look I was happy with.

I went back and added a few spot of black within the burned area and around it to resembled charred paint.  While not perfect, I was happy with the results.

The next issue was going to seal it all with dullcote without most of the lighter colors disappearing.  I did what I've been doing with the previous builds, which was to lightly mist on the dullcote, to point it was drying about the time it hit the surface.  Doing this several times, adding some touch up of the lighter Pan pastels, until it was covered enough that I could spray on a full coat without the color loss.

Still, the rich color was a trick to maintain, but I think it turned out ok?

I also tried to copy the prototype image this time; normally I use the image for a general idea and get close.


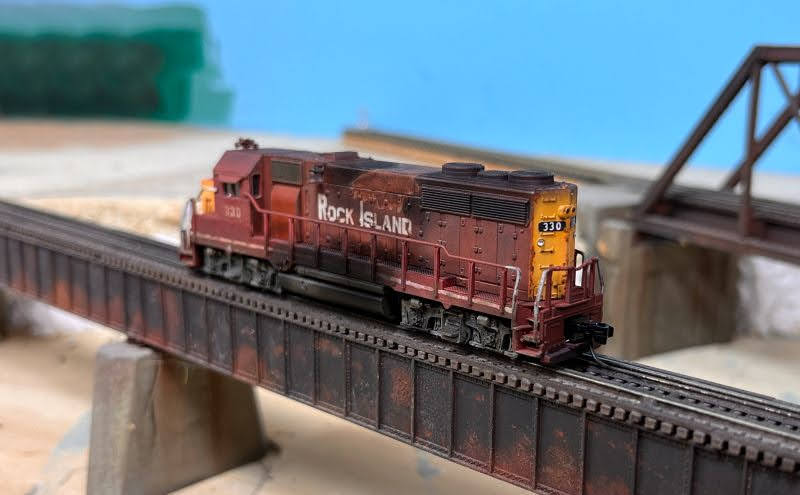
Like I said, I'm very happy with the way it turned out, much better than I thought it would.  The burn doesn't stand out much being on a Maroon unit, but that's ok.

I've had a lot of fun working on these 12 units, I've learned a lot and got a chance to give techniques a try that I've read about, and I must say I've been very happy with the results that I've gotten using the Pan Pastels.  The Pans will now be at the top of my weathering arsenal.

So what's next you ask?  More Locos?
While I still have four more classes of locos to go through and add to my fleet: U30C's, GP40's, U25B's and then the GP7's, I think I've had enough bench time recently and I'm starting to feel the urge to start working on the layout once again.  Scenery maybe, but I think I'm getting the itch to rip up and remove some more track work.

I think I hear the town of El Dorado calling my name?


Sunday, October 23, 2022

Rock Island GP35's #312 & #316

Two more GP35's have joined the fleet.

I caught the Plain Jane pair sitting on the Ouachita River bridge.


While there are a few subtle differences between the two,  they both were painted in the basic Maroon and Yellow scheme of the 60's with no lettering or logos on the long hoods.  


#312

The #312 carries just the road number under the cab window and the handrails were painted silver down the entire length.

This one got a little darker than I wanted, I tried to lighten it a bit but it's not out of the realm of realism considering the condition of the fleet at the time of shutdown. 

I applied some chipping of the yellow paint on the cab trying not to go overboard with it.  Some units I've seen while researching were pretty much covered with chips giving them a real freckle faced appearance.


This is a Rick Morgan photo of the #311 that I used as weathering guide for the #312.


#316

The #316 is adorned with a shield under the cab window and a smaller road number just below it on the sill but is lacking a plow on the front that most other GP35's carried.   The fuel tank is also showing some Maroon paint although mainly covered in an oily residue.

I don't think this was a typical scheme but rather more of a hybrid scheme as the road transitioned from its solid maroon with pin striping to solid maroon, to the maroon and yellow scheme in the 60's.  While there's not much of a difference between the two, I felt it was enough to warrant so as to set them apart.

The #316 was more faded than filthy.


Here's a Glenn Anderson photo of #316 leading a NB freight out of the yard in Alexandria, LA.   Also note the detritus in the yard and the telephone poles that are overgrown with what I'm assuming to be Kudzu.


One more to go...