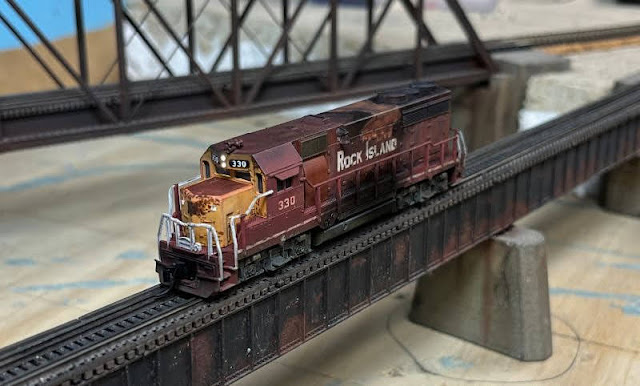
I finally reached the end of the tunnel without seeing a train.
While it seemed like a good idea at the time to just keep going while I had the Mojo and the supplies handy, I won't be doing this many locos at one time anytime soon. 12 was almost to many, I had to kind of push myself a little to get across the finish line with this unit and be careful that I didn't cut corners along the way.
I still have about four classes of locomotives to work on, including U30C's, GP40, U25B's and a bunch of GP7, but I need/want to get back to the layout and do some trackwork next.
As I was looking around for some different GP35's to model, I came across #330 on Google and felt I just had to do this one, knowing full well that this would be pushing my abilities. While doing the U33B's I wanted to make one that had burn marks, but chickened out at the last minute. This one caught my eye and decided to put my head down and charge forward.
Before starting with it, I watched several videos on YouTube and several made it look easy. One guy used enamel and wound up with a nicely finished HO model, so I headed in the general direction. Not having any enamel paints on hand, I opted to use Artist oils, but found out right away that it wouldn't be the best option because of the long dry time. Instead of the colors blending, they mixed and I wound up with a brown sludge on the sample boxcar.
So I switched to Artist acrylic which fared better, but being thick, it wound up looking lumpy. The enamels that the YouTuber used on his unit had lumps, but because he did it on an HO model, it scaled down ok.
Next I started off with some Vallejo paints, but I because it was drying so fast I was getting a lot of brush marks and I could see it the thickness issue arising again. My last option was to use Pan Pastels and see what I could do with them.
The first thing I did was to use a Vallejo color called Stone Gray for the primer. I thinned it just a bit to help alleviate the brush marks. Before it was completely dry, just tacky to the touch, i started applying some dark rust colored Pan Pastels. I worked it into the gray and slowly added lighter and lighter colors until I achieved a look I was happy with.
I went back and added a few spot of black within the burned area and around it to resembled charred paint. While not perfect, I was happy with the results.
The next issue was going to seal it all with dullcote without most of the lighter colors disappearing. I did what I've been doing with the previous builds, which was to lightly mist on the dullcote, to point it was drying about the time it hit the surface. Doing this several times, adding some touch up of the lighter Pan pastels, until it was covered enough that I could spray on a full coat without the color loss.
Still, the rich color was a trick to maintain, but I think it turned out ok?
I also tried to copy the prototype image this time; normally I use the image for a general idea and get close.


No comments:
Post a Comment