Friday, September 29, 2023

Terrafoaming between Ruston and Winnfield

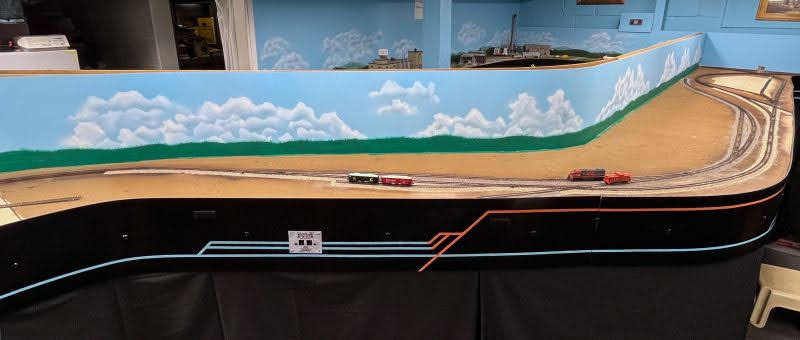
Over the last week I've working on terrfoaming the section from Ruston to Winnfield.  I've been cutting and fitting the foam into place and gluing down a few sections at a time.  

The sheets are about 1.9" thick but I plan to carve them down quite a bit so they look like rolling farmland.  The edges along the tracks I'm hoping to make them look like an eroded cut with a tree line to help define the edges of the farmland.

I'm planning to have a road crossing in this location.  I'd like to have one come in from the lower left, cross the tracks just to the left of the turnout, then hopefully have it duck behind the end of the foam and the backdrop.  I figured this would be a good location for one as there will be a small depot that butts up against the short house track and make a small parking lot next to the depot.


Another crossing is planned here for the driveway to the farm, between the two turnouts on the ICG and across the Rock Island tracks, then off the layout.  


Again, while the foam is much taller here than I'll need, I'd like to keep it high enough to add trees to get the feeling that the ICG will be running through a heavily wooded cut.  The three narrow strips of foam and the chunks in the corner are yet to be glued in place.

Once I get the foam down in this location I'll play around with the scrap yard and decide if I want to keep the inner turnout and spur track on the left, then I can finish the ballast work.


One thing I've always wanted to do on a layout is to make use of a mirror.  If things work out, one that is strategically placed at the end of the ICG track may help to add depth here?


Someone asked me about the backdrop and if I was going to wait to add details until I finish the foreground scenery?  At the time I painted the clouds I didn't give it much thought as to how high the foam would be, so I just painted it and moved on.

But at this point, until I get it terraformed, I'm kind of planning to redo the entire backdrop, meaning repaint it blue and redo the clouds and painted tree line.  One driving factor to this decision is the clouds.  

They turned out OK for the most part, but after looking at them and comparing them to the clouds I did on the other side of the backdrop, these turned out almost too crisp and too bright. The clouds on the other side are more subtle and airy and not near as bright.  Once the foam is carved and painted, I'll probably take another stab at them.


Tuesday, September 26, 2023

First sheets of foam glued down

After doing some testing with the Elmer's glue the other night and seeing that it held up OK, I tried another quick test using a smaller chunk of foam and again, using Elmer's.  But this time I only ran three thin strips of glue instead of spreading out a patch of it.

My thoughts were that the patch was still showing some wet glue in the middle of the patch.  As the glue dried around the edges it sealed the inner bit of glue so it wouldn't dry.  I've seen this happen when others tried using Elmer's or Titebond to glue the rigid foam board together.  By running strips of glue, I figured the air could get between the strips and being thin strips, would stand a better chance of drying completely.

After letting the strip test dry overnight, it took quite a bit of pressure to break the chunk lose.  I actually started to dent the soft foam with my fingers while trying to dislodge it.  So I think strips of Elmer's will do the trick.


Tonight I got the first two sheets glued down.   


Saturday, September 23, 2023

Floral foam landscaping

Twice in the past I have used the Dry Floral Foam to model topography on the layout: once for a road crossing and the second time I used it to form the Whitewater Creek area.  

I chose to try this as it can be formed much easier than the Pink or Blue rigid insulation board or extruded polystyrene. Not only can this be shaped with tools, but it can also be shaped with nothing but your fingers. It is much more expensive per sqft but for small scenes it's a workable alternative.


Both times it has worked out very well for me, so I thought I would give it another try, this time on a much larger area.  For this scene I'm planning for low rolling pasture land for an abandoned farm scene.

With the ballasting done in the Ruston to Winnfield area, it's time to see what I can do with scenery.  I never really had a good idea of what I wanted to do in this spot until I was chatting with a friend.  Karl suggested a farm scene which sounded like a great idea!  

But I'll take it one step farther and make it an older farm scene with dilapidated buildings in disrepair.  So the next of kin who inherited it has decided to move a mobile home onto the property and let the farmstead continue to deteriorate.   

Here's the area that I'm working on.


I started laying out the floral foam to get an idea of what's needed.  If this works, I may need to repaint the back drop and raise the tree line?


My first objective is finding something to glue it in place with. As with the rigid insulation board, using white or yellow glue works, but as the edges of the glue dries, it seals the inner glue and it can stay wet for a very long time. In this case, with the floral foam being porous, I think the glue should dry much more evenly?

So I took a scrap piece and brushed on a thin layer of glue and sat it in place. Within a few hours it had dried pretty much all the way through, but there was still some wet glue in the middle. However it was thickening up and if I had let sit over night I think it would have dried completely.


So I think I'll run long narrow beads of glue or I'll use a comb and make grooves on the bottom of the foam so air can get to it better?  We'll see how this turns out?

In the past I've used plaster to make topography, but slinging plaster is not something I find enjoyable. It seems to get everywhere before your done.


Saturday, September 16, 2023

Wrapping up the ballast

As of tonight I have all the ballasting done from Ruston to Winnfield.  There's just a little left near the yard entrance and it will probably stay that way until I get the track and area around Union Scrap finalized.

A- Mainline heading South through the backdrop to Haskell.

B- Mainline heading North through Winnfield.

C- Is a cutoff I installed to bypass the yard, which I may remove from the crossing to the backdrop?

D- is the spur for Union Scrap


I think the Brown paint turned out nice and now with the ballast applied, it still shows up nicely.  


If you look closely you can see where I applied the black and gray Tamiya Panel liner to the look of sunbleached and fresh ties in this area.


It took very little work to clean the track after the ballasting was complete this time. I took care not to flood the track with glue and then I used a small square of #600 sandpaper and lightly wiped the top and inner head of the rails, then I came back with the Woodland Scenics track cleaner and polished it good.

The loco ran pretty good with the exception of a few spots and two of the points which I used the #600 paper again and inserted it between the point rail and stock rail and moved the paper back and forth a few times.

After wiping down the railheads, I quickly applied a couple swipes of my graphite stick and viola! the loco ran smooth as butter. The more I use graphite the more I like it.


Sunday, September 10, 2023

Ballasting the points

I stepped away from the tree painting for a bit.  I need to figure out where I need to paint them and until I get some scenery added in the area, I don't want to paint them and then cover them up with other aspects.

So I decided to start working on the ballast from Ruston to Winnfield.  Last night I started with the points of the turnouts in this area.


I wanted the ICG to have a different color of ballast, so I play around and decided to use just the plain gray, but later I added a bit of Light Gray and a pinch of Black just for a slightly speckled appearance.  Just like the color I chose for The Rocks mainline, I do not like ballast that is a solid color, for The Rocks main line I chose to mix WS Light Gray, Gray, Gray Mix and some Buff. 


I tried using some Gamblin Raw Umber powder pigment to dress up the tracks a bit and give some age to them.  I found this idea after watching some of Boomer's videos: 

 https://youtu.be/w3u39QM4t0M?si=60_qElJMh5PZgLA1

You sure don't need much or it becomes over powering on lighter ballast.  I applied this to each side of just the rails with a small stiff brush, then sprayed it with water to set it in place.  


Wednesday, September 6, 2023

Background hills

I decided to add some background hills like I have in the past, but this time I only used the darker green for what I called the "nearest hills" before.  I did this so when I paint the tree line I can leave gaps in it and you'll be able to see short patches of the hills in the distance.

Dubach


Ruston


Winnfield


After getting the hills painted, I went back with a medium fan brush this time and added a jagged edge across the top.  I did this for a little texture and to enforce the look of a tree line rather than just a straight line.


Once, and if I'm successful at getting the foreground trees painted on, I'll come back to the exposed gaps in the tree line  and add color and texture to the hills as I've done before with acrylics so it looks more like this.


The next process will be what is called "Blocking" in the trees.  This is done with acrylics and will be very roughly painted patches of the close colors.  In this case, greens and browns for the rough shape and color of the trees.

This is the basic idea of "Blocking".


Monday, September 4, 2023

Southern clouds

It's been a fairly productive Labor Day '23 in the basement this year.

I got the rails painted, got the backdrop prepped and got the clouds painted behind Dubach, Ruston and Winnfield. 


Dubach


Ruston


Winnfield


Virtually driving around these areas on Google Maps, I've decided to do something a little different on the backdrop.  On the north end of the layout (also the North side of it) we're in Arkansas so I painted some distant hills.  In Louisiana, I have noticed that it is much more flat instead of having hills, it seems like there are a lot of trees that make up the horizon.

So I'm gonna try my hand and painting a tree line after finding some nice videos on YouTube showing a simple three step process.  We'll see if I can bring out my inner Bob Ross for this?


Saturday, September 2, 2023

Backdrop prep and Track painting

With a couple of sessions in the books and the new ICG track working like I want, I felt it was time to move onto the next phase of the area:  Painting the backdrop and track.

I did to the backdrop what I have done with it elsewhere before painting it, I first had to remove the Panhead screws that I used to secure it with originally and replace them with Flathead screws after countersinking them.  Once done I used lightweight Spackling to fill in the holes and the seams.


I also filled all the seams between the ceiling tiles with more lightweight spackling and painted the surface with my generic brown latex paint after the spackling had dried overnight.


There are a couple areas that did not get painted yet.  The area in Winnfield where Union Scrap is located at will get painted once the final location for the tracks have been decided upon and the area between the tracks and the fascia, which may get some excavation in time? 

Next up, painting of the track.
In the past I just used Rustoleum dark brown camo for the tracks, but afterwards I always had reservations about it in the fact that it was too dark for older, less maintained track?

So this time I did a little more soul searching and came up with a new idea.  After seeing what Greg did on his FreeMo-N sections and using his airbrush to paint groups of ties in different colors, I thought I'd try that?

Well I just don't have that kind of patience I guess?  So I did the next best thing.  I picked up a couple more rattle cans of lighter browns and thought I'd try painting everything with the three shades of brown.


The sample section I did, didn't turnout horrible, so I pressed on.  The first coat was with the Dark Camo, I covered the tracks with roughly a 75% coverage. I followed that with the Rustoleum Brown and misted it on patchy then followed that coat with the lighter Krylon Bark Corteza, misting it on with an even less coverage.  It may not be perfect, but it gave me a nice variation in color. 


Even though none of the ties are individually colored as of now, I plan to go back and use Tamiya Panel Liner to add some individual colors to the ties.

The sample track looked ok to me and considering that this is N scale, I don't think it will stand out like it might if it was HO or larger, but it does give me a subtle difference.  In the image below towards the center you can see where I used the gray and went back over it with the black to make some look like they are sun-bleached.


My next step is to repaint the backdrop to cover the screw holes then start painting the hills and tree line.


Op session Aug 19th, 2023

I'm a little late with this post, got busy with a few other things.

Aug 19th, Harvey, Tim and Ely came down from Omaha along with Willie & Ray.  Dave came up from Beatrice as well for another session.  Luther my old assistant manager decided to swing by as well to see what I've told him I do in my past time. Harvey and Tim couldn't make it for the previous session so we got together again.

Things went pretty good and all had a good time.

Harvey and Ely is getting train #776 underway as Luther watches the action.


Harvey and Ely are working Haskell, AR.


Tim and Willie ease train #775 into El Dorado as Ray waits for them on the main with the MKT coal drag.


With Ray out of the way, Tim and Willie are making the final moves at El Dorado.


Ray doesn't make it very far before he is required to dawn the "Asshat" after putting some cars on the ground at Winnfield.


Uh oh! Something's not right in Haskell, so Dave steps in to see what went wrong and offers a helping hand.


Before the session is over, Harvey gets his turn to wear the coveted "Asshat".


Thanks for stopping by guys!  Had a great time.
Looking forward to the next session...