Sunday, January 13, 2019

Progress at Gavilon Fertilizer

I found a little bit of time this weekend to get the main structures assembled for Gavilon.

The actual M.A.C. kit called for 4 sections between the two end caps on the larger building, but I opted for only three which gave me a bit more space for the small elevator shed in front.  This will be used for bulk loading of fertilizer trailers or trucks.

For now I used some "I" beams to support the downspout..... they look a little big but I need to add some more details and adjust the length of the downspout.


The next step is to paint the structure to match the unloading shed in the 2 tone gray scheme and add the roof, doors, windows and the other details.  Then I'm going to try and get some scenery down in this area, starting with the wood crossing planks into this facility so I can finally do some long awaited ballasting.  I've held off on ballasting as I wasn't sure exactly how the buildings were going to fit or where and I wanted to install the wood crossing first.  

The Riceland elevator and mill buildings that I have here now are just stand-ins, once I get the new kits built and situated I can ballast pretty much all of the tracks in Haskell. 


Monday, December 31, 2018

Gavilon's main building begins

Last day of the 2018, first section of Gavilon's main building has begun. 


Friday, December 28, 2018

Gavilon Fertilizer Dist.

So long 2018!
This past year was not a good year and I for one am glad it's over.  It's been a trying year with my knee injury lasting until March and the rest of the year was filled with a lot of personal work.  We finally convinced my mother to move to a retirement community and the rest of my summer was filled getting her house and property ready to sell, by the end of the summer we wrapped that up.  

I still need to get my garage organized as it's full of stuff from Mom and Dads garage that I inherited.   That will take some time yet, but little by little I hope to have that wrapped up by Spring or Summer.

The Fall and Winter months of this year I worked in the basement trying to organize that mess as well.  So I'm hoping that 2019 will be a little bit more relaxed.

After wrapping up some more of the Bench Projects I've been working on like the pulpwood flats and some tank cars, I want to get started on the layout once again.

Here's where I left off in March. 
In Haskell I was working on Gavilon Fertilizer.  I had planned that Gavilon was to be a fertilizer plant that made both granular and liquid fertilizer.  After discussing the idea with some friends, it was decided that a manufacturing complex may be too large for the real estate I had available.  What they suggested was to create a smaller fertilizer distributor.  So be it.

This distributor was actually served by another shortline railroad that had recently shut down and had abandoned the line which left Gavilon without rail service.  Rock Island had decided to add a shoe fly from their tracks in Haskell so they could restore rail service to Gavilon. 

Recently, I've been itching to get some ballast down in Haskell with the backdrop done and the tracks painted, but I first wanted to get the grade crossing installed before hand.  When I installed the grade crossing for Crushmoore Ind a few years ago, I did after I ballasted and found it was kind of a pain to get them installed properly.  I had to scrape a lot of the ballast out of the way first.  This time I was going to install the crossing first then ballast up to it.

But this meant I had to figure out where I wanted it first and in order to do that I needed to know where the buildings would sit so as to make things line up.  So I dug out a few kits that I had on hand and ordered a few more.  I got started on some of the buildings before March.  

First were the tank car loading platforms.  These are the Tomytec version I had picked up, but later I decided to try some platforms that I found on Shapeways.  They are still in the box and I need to dig them out and get them ready to paint.  They should be a little more to scale and a bit more prototypical looking, although these platforms aren't too bad.


I had at first planned to use several of the Tomytec Spherical tanks but decided to use a more traditional design since this would be a distributor rather than a manufacturer.


These two small corrugated buildings are made by Deluxe and will be the pump houses from the platforms to the tanks and from the tanks to the truck filling station.


I wanted a shed to cover the hoppers that unload the dry granules to keep them out of the weather while unloading.  So I picked up another Pike Stuff kit like I used for the chip loader at Crushmoore Ind.  These are great modular kits that can resized in several ways.  I made this one with only two wall sections unlike the one I used for Crushmoore where I used three sections.


Here it is sitting over the tracks on a platform made from MDF and covered with styrene for a concrete pad next to some PVC silos.  The tubes were scraps from model sprues and conical sections are LEGO parts.  The elevator is a Rix kit.


I plan to use the M.A.C. building from Pike Stuff for the main building.  This will be the next project, getting it assembled and painted.  I'll paint it to match the smaller pump houses and unloading sheds.  Once I get that far I can then get the buildings placed so I can know where the crossing will go and I can start ballasting.


I'm hoping that 2019 allows me a little more time with the layout so I can make further leaps and bounds on scenery, I'm getting tired of seeing the ceiling tile... 


Friday, December 7, 2018

A thorn in my side....now removed

One of the car types that is a staple on my layout is the Atlas 42' Pulpwood car.


I love these cars but they have always been a thorn in my side and a constant source of  aggravation due to it's light weight when it's ran empty.  Also I've never been a fan of the Atlas Accumate trucks and couplers.  They never seemed to roll as nice as MTL's and the coupler pins would work their way out and catch on the track and then the couplers would explode rendering them useless.

In the past I tried swapping the trucks with MTL trucks but their coupler boxes sat too high and rubbed on the underframe, then the trucks would sit tilted forward.  So I've gritted my teeth every time we had an Op Session hoping they would make it through without causing any issue.

In the past month I started on another project (ugh) that's been on the back burner for sometime as well, going through and thinning the herd.  While getting that under way, I also started swapping trucks and couplers over to some of my newer cars.  Once I got that done and got them put away in the proper drawers, my attention turned back to these pulpwood cars. The time had come to see what I could come up with.  I had an idea?

Recently on another quick project I tried using one of the TrainWorx #620 body mount couplers that they designed to use on the older Precision Master's and Red Caboose covered hoppers so they had body mount couplers.  I tried one of these to convert another Atlas tank car, one that Pat Sanders hadn't tried yet. Using this conversion kit gave me an idea for the pulpwood flats.  I decided to try the #620's on the flats, but alas the lids were too thick and the couplers sat too low.  I tried using a MTL 1015 and body mounting one to the pulpwood cars and after a little experimenting I found that this would work better.  Since the frames were metal, I didn't want to go to the trouble to tap and drill them.  On the #620's Pat Sanders used super glue to mount the couplers to the tank cars but I've never been a fan of super glue, to me it always seemed to get brittle and let loose after time, so I opted for a 2 part, 5 minute epoxy.   

I tried one out and it seemed to work just fine.  The coupler did pop off the next night while giving it a pressure test.  The epoxy had dried, but the issue I believe was due to the slick Derlin that the 1015's were made from.  I took my #11 blade and scratched the top of the coupler box and also the area on the frame where the coupler would be glued to.  This gave the glue a little more tooth to grab to and I wasn't able to get it to come loose.


After several nights of assembling enough 1015's to convert all of my cars (and allowing my eyes to uncross and my fingers to uncramp) I started gluing them to the cars.


In the last post, I weighed my IMRC 60' flats cars with small buckshot and after posting them, Rod Warren mentioned that I should try using a neat little product called Liquid Gravity.  It's basically very small, non lead based pellets that flows into and fills up the cavities much better than the buckshot I had used.

After doing a little research on the stuff I found a video from the manufacturer that showed the stuff and how to use it.


I found some on line and also picked up some super thin Super Glue.


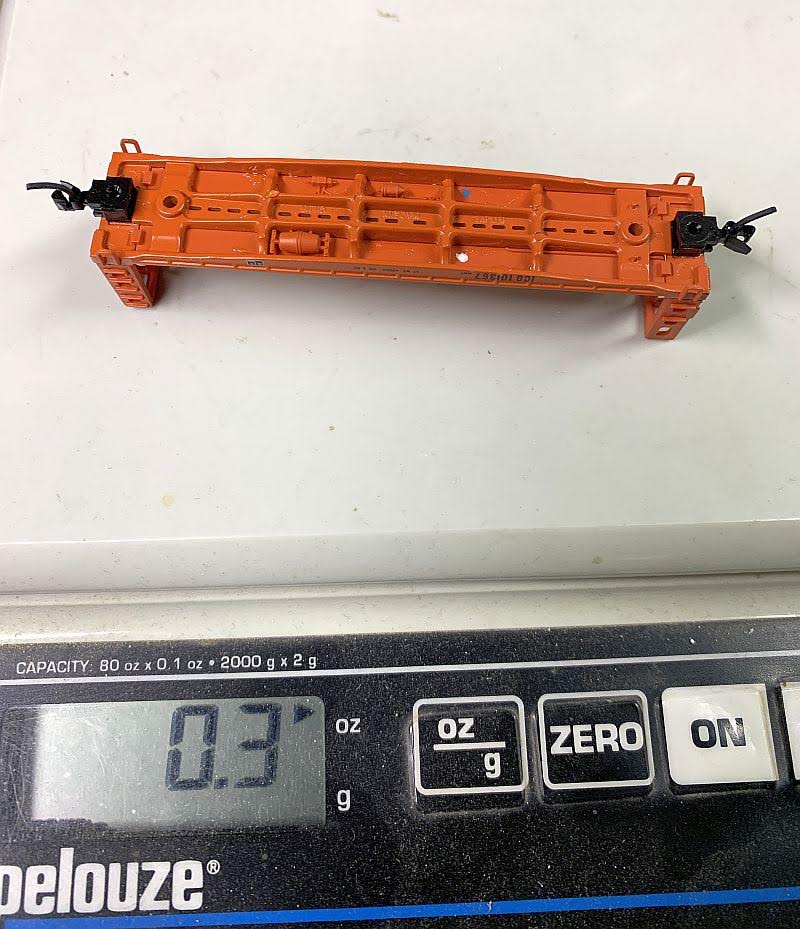
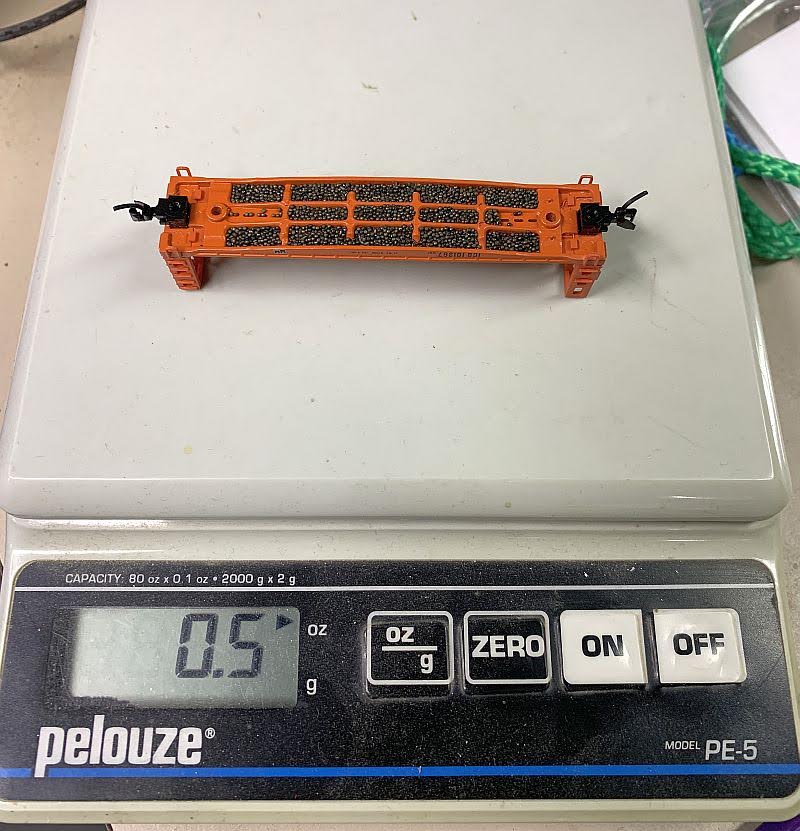
Once the stuff showed up I jumped at the chance to play with it!  It was a little hard to keep from having the pellets bounce all over, but I later filled the cars over a paper towel so that I could collect it and reuse them again.  Once I got the cars filled I then dribbled the thin super glue over the top of the pellets and it wicked right in and flowed out evenly.  Within 5-10 seconds the pellets were glued solid and I tipped the cars over to remove any of the loose pellets.

This added .2 ozs per car.  Not a lot, but enough to make a difference.


After adding the new trucks (without couplers) it gained another .2 ozs


One issue I had with the couplers is they sat too low when the trucks were installed, so I added one of the little shims that is supplied with the trucks.  This did the trick, yeah...they may sit a little too high for looks but now they work!  Yes, they'll be a heavy little car once I place the original pulpwood load on them, but that's OK with me.

Thanks for the tip Rod!


Saturday, October 27, 2018

Flat car woes...


After the dry run Ops session I held, I noticed an Intermountain 60' flat car wasn't rolling very good, come to think of it, these cars never have rolled very good. After closer inspection a buddy noticed how high the car was sitting, even the coupler was sitting higher than the adjacent coupler.


Still not being a big fan of the metal wheel fad, I ordered a set of the BLMA 70 ASF trucks. I know these have been used to lower the ride height of cars and of course improve the rolling abilities. So I figured it would be a good test to see if these actually helped.


Here's the offending car


Right away I noticed it did bring the height down, the BLMA truck is on the left.


Original truck:


BLMA truck:


It actually brought it down to match the MTL truck mounted coupler on the tank car.  The only issue was the BLMA truck was rubbing on two areas of the underframe, so I took a #17 chisel blade and removed the raised section.


Once that was removed the trucks swiveled properly. It now rolls much better, more like MTL trucks and wheels sets do and the couplers match in height as well. It admittedly looks better being lowered. 


God help me!  I've been infected with the dreaded "Ride Height Issue"!!

I know, I know! The tank car is sitting up like a 4WD monster truck, but this is on the bottom of my list of things to worry about. At least the flat car rolls better now. I've ordered four more of them to re-work my other IMRC flats. 


These flat cars also needed more weight as well. I think I might try Over-weighting these cars? I've been reading on the MRH forum where guys are taking this seriously and really overweighting their cars.


So I added some very small buckshot like I've used on my other cars, I glued them in using white glue into the areas where they would fit, trying to keep them above or below the sidesill of the cars, once glued in I might paint over them.


But even with low angle shot they are not even noticeable.


This brought the weight up from 0.7oz to 1.3oz. Probably not considered to be OVER weighted, but it's about what a 50' boxcar should weigh in at.


Sunday, October 14, 2018

First run of the new Ops

Well last night Quin and I got together and ran the dry run.  I must say that everything went as planned and we had a blast.  Unfortunately I didn't get any photos or videos this time as we were to focused on getting the train ran.  I apologize for that.

I have plans to hopefully get several small videos of the train while it switches each town in the future, kind of a like a mini series.  Gonna have to give this some thought on how to go about this?

The only train we ran was the Winnfield local which was staged in the main yard.  It was ran as an Out and Back turn starting in Little Rock and running down to the yard in Alexandria, LA.  

Since I just wanted to see how the local would go about it's chores, I planned not to run the W&OV switcher, the ICG interchange or the El Dorado switcher, thus saving time.

After I had the cars staged and tabbed to be picked up, I moved them by hand into position so the local could just pick them up. This included the cars from the W&OV at Malvern, the interchange cars at Ruston from the ICG and the cars that needed to be picked up from the yard in El Dorado.

It was then that I realized some of the cars would not be run from the staging yard.  For example, some of the cars from the ICG actually wind up in Malvern.  Normally these cars were picked up via the local and drug back to the yard in El Dorado where as before the W&OV would run a train from Malvern down to El Dorado and exchange cars and then drag them back to be set out at the industries in Malvern by the W&OV switcher.    So I sat those cars bound for Malvern on the ICG interchange track and had the NB Winnfield local pick them up.  They were then actually hauled all the way back to Haskell where they were set out on the siding there for them to pick up via the Hand of God and moved back into Malvern.  The cars at El Dorado was pre-staged sitting on the A/D tracks as well.

Next I was just randomly placing NB or SB white tabs on the cars to be picked up when I realized that I shouldn't be dragging these NB cars ALL the way south end?  They should actually be going North.

Let me back up a bit.  Since the local was going to be ran as an Out and Back Turn , it was only going to work the Trailing Point turnouts.  This would save me from having to make any Run Around moves to get cars off the Facing Point turnouts.  

This dictated that any cars sitting on a trailing point turnout that had a NB tab was going to have to be picked up and set off at the nearest siding or drug down to the yard at El Dorado, sat out and would then be picked up by the NB local.  This posed some interesting movements, ones that I hadn't thought of before.

Likewise, some of the SB cars that would be picked up by the local from the W&OV in Malvern needed to go to A&A Concrete in Dubach and the rest needed to go to the ICG at Ruston.  The Hoppers bound for A&A Cement wouldn't be an issue because the Pit Track in DuBach was a trailing point turnout that could be worked by the SB local.  But the ICG interchange track was a Facing Point turnout that would needed to be worked by the NB local.

There were several options.  Those cars could have been left in DuBach and worked by the NB turn, but they would have had to run back down the line from DuBach to Ruston.  The other option was to drag all those ICG cars to the yard at Alexandria, then placed in with the cars sitting there waiting to make the run North.  This was chosen as it gave us a little more work to do in the yard other than just swapping the power and caboose onto the NB cars.  Then as we worked our way North, we worked the interchange with the ICG by grabbing the NB cars for Malvern that were sitting there and moved the ICG bound cars back on to the interchange track and headed on North with the Malvern cars in tow.

NB cars that we had left at DuBach and El Dorado was picked up and hauled north by the NB local.  All in all it made for some very interesting moves to be made and really made us stop and think about how we were going to get the jobs done.

Bottom line......I plan to move forward with the new operations.  It took Quin and almost three hours to run just the two trains.  Of course this was due in part that we were dealing with some new situations that made us stop and think them through.  I think once we run a it a few times, the time required will be reduced.

It was also a lot more laid back, much more like the prototype that I had always envisioned.   

Another thing I plan to move forward on is rebuilding the staging yard.  I plan to rip up 90% of the tracks and make a much more smaller, simpler yard, something with maybe 5-6 tracks and small engine facility.

If and when the yard gets rebuilt, there should be enough room that I may include an industrial scene using some of the larger Walthers Cornerstone buildings that I've collected over the years.  This area could then be worked as a separate Minim layout if I wished or could be included in the operating session if there are enough people on board, or it could just be left alone.  Time will tell. 


Thursday, October 11, 2018

Preparing for the new session

I've got the layout all staged for the new reduced Ops, but I gotta find a better word for this, starting to sound redundant.

While doing so I knew I wasn't going to be running the W&OV, the ICG or the yard in El Dorado, but I wanted to setup cars to pick up in Haskell that came from Malvern, and seeing how I just got a new phone I wanted to play with the camera, so I shot a couple of videos.

The first one is just following the Winnfield local as I was testing the train and consist.


The second one is of the W&OV Switcher going about gathering up the cars in Malvern.

This picture shows the overall view of the area, Malvern is on the left and Haskell is on the right.


This is the track plan of Malvern.


I can see that I will need to replace the three little fluorescent lights above Malvern with LED's now.  It's really yellow compared to the rest of the layout!  Ugh...


Monday, October 1, 2018

Reduced Ops dry run.

Time has come to test the new reduced operation.  I have the layout staged and ready to go.

The plan is simple, one train will work the entire layout.  The W&OV, the ICG interchange and the yard at El Dorado will remain, but will not play an active part of this test session. 

Two strings of cars have been blocked and tabbed on track #1 and #2 in the staging yard. Track #1 (right) has the cars for the southbound train #773, track #2 has the cars for the northbound train #774.


The locos will be pulled out of the engine house (the ladder track for now) with the caboose.  


The local's crew will attach the crummy to the cars on track #1 and then run back and tie on to the head end of the train.  It'll leave the yard (Which represents Biddle Yard in Little Rock) counterclockwise and head south upon entering the layout at Haskell.   
As it traverses south as train #773, it will work all the trailing point turnouts.  Once the run is finished, it will re-enter the yard to the same track from which it left.  This time the yard will represent the yard used in Alexandria, LA.  
The crew will then place the crummy on the rear of the cars sitting on track two and tie onto the head end of that train and head back north as train #774 entering the layout at Winnfield.  Again it will only work the trailing point turnouts as it runs north.  When the it's done it will re-enter the yard (this time Biddle yard) and run clockwise back to track #2.  The crew will then cut off the train, grab the crummy and tie down at the engine facility.

The drawing below is only for illustration purposes only,  I have no plan to reduce the physical size of the layout at this time.  


As I was sitting up the cars to be picked up it hit me that some of those cars will not need to go back to the yard, as they are captive service cars that run between two locations on the layout.  These can just be dropped off as they go past their destination.  Likewise, some of the cars that will be picked up off the trailing point turnouts will need to be taken back in the opposite direction.  These can be spotted on a siding or hauled to El Dorado yard and spotted so they can be picked up by the opposite train.

Some of these car movements only become obvious once I started placing tabs on the cars.  It looks like this could result in some interesting actions.   The overall goal for this is to reduce the amount of trains and crews needed and allow me to focus more on the switching.

If all this pans out, the next goal will be to rip up the entire staging yard and replace it with some better track and a much smaller yard and engine facility.