Sunday, July 28, 2024

Tranquility base

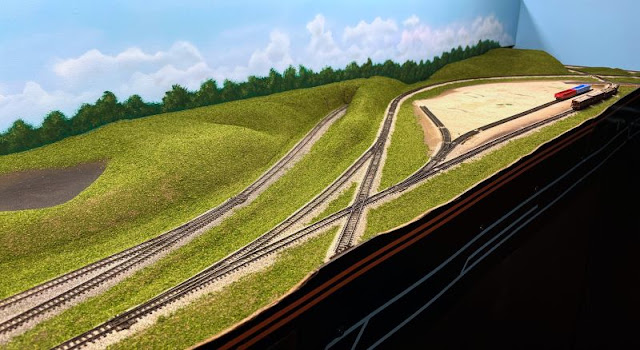
This morning I went down and sucked up the last of the base ground cover.  This looks so much better than the flat, grey ceiling tile that I have looked at for the last 15 years.  I'm excited to start getting some static grass, trees, bushes, shrubs and Kudzu in place.

While it probably looks way too green at the moment, overtime it'll change as I add different shades of greens and a variety of ground coverings and trees.


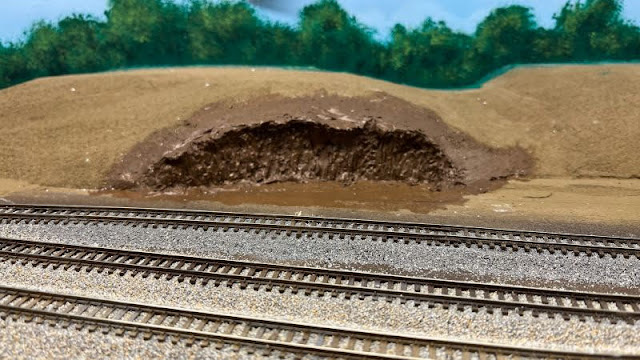
I think the eroded hillside came out pretty good?  Now to get some static grass, trees and exposed roots in place.


I want to take my time and experiment with some different methods that I have read about over the years and see which will work and how to go about them.  In the meantime, there's another project that I've been wanting to work on as well, so I might get sidetracked a bit;  the backdrop for the yard.

Especially since getting the trees and clouds done behind Ruston and Winnfield, the yard backdrop looks too plain, but at least it's blue.  My original thought years ago was to paint it blue with clouds, then kitbash some 3D building flats from kits to set against the drop.  Over time I have founds several ideas that I want to explore.  One being printed paper building flats that are glued to foam core.

I found the guy on eBay several years ago and found out he has a webpage as well.  You can buy individual buildings that are pre mounted on foam that you can just stick on your layout.  Or you can buy two full sheets from him that you can cut out and mount them yourself.  You can leave them as they are printed, or cut them out and rearrange them to suit.

My thought is that these are mainly images of the backside of the buildings, which you would normally see from the rail yard.  The print quality seems to be pretty decent, but for a backdrop, I wouldn't want any high res prints that could distract your eyes from the layout.

I think I'm going to order the sheets and play around with them and see what I think?  In them meantime, I'll start noodling and adding some greenery on the base.   


Saturday, July 27, 2024

A little more ground cover

I'm progressing a little bit with the groundcover trying to get the brown hills covered with some vegetation.

Using one of those cheap $0.99 chip brushes, I spread some thinned glue over the areas I want covered, then I just liberally sprinkle some green turf mix over it and pat it all down.  Once dried I'll go back using my Red Devil vacuum and suck up the majority of it. I'll rub my fingers over what's left to get any foam that is only partially glued down removed.

To get away from a solid field of green, I'll also come back and apply some of the earth colored grout to give some patches of dirt here and there.

Why do this?  Well this gives me a solid base to start applying static grass.  Ground foam is much cheaper than static grass and with the ground foam covering the majority of the surface I won't need as much static grass to get a decent looking effect.

Once I get the static grass down, the trees, shrubs and bushes will come next followed by Kudzu to cover the remaining areas.


Wednesday, July 24, 2024

New lights over Malvern

I was going through some pics of the layout tonight and found some images that I never got around to posting on the blog.  yes, they are some real exciting images, let me tell you...

Several years ago I switched out all my shitty fluorescent light fixtures with some cheaper LED shop lights.  It made a big difference.  Here's the post:    

https://thelittlerockline.blogspot.com/2018/09/a-bright-idea.html

Anyway, the lights over Malvern were also smaller fluorescent lights and they were always a bit on the yellow side, I finally got tired of it and picked up small cheap LED lights from Amazon. 

Malvern now looks much better.


Sunday, July 21, 2024

Erosion

I had left a spot of untouched foam on purpose; I wanted to see if I could make part of the foam hill look like it was eroding.

Here's that spot.


This afternoon I cut it back a bit deeper and then added a thick coat of plaster to it.


Then I started carving it a bit while it was still somewhat wet.  After it dried I did a little more carving and chipping.


After it dried, I painted it with a bit darker brown.  I think I'm going to apply a coat of flat Mod Podge to it and blow some brown earth colored grout on it for some texture? 


I'll put down a layer of ground foam and some static grass like I've done elsewhere and bring the static grass right up to the edge where there's a bit of an overhang.  Like Boomer did on his river bank, I'm going to try and find some fibers from leftover SuperTrees and try my hand at making some roots to glue up under the overhang.


Sunday, July 7, 2024

Highway crossing at Ruston, LA

With my visitor gone and the Fourth now past, I had some time this weekend to get back to the layout.

The first thing I did was to work on the private farm drive by adding some earth colored grout for the drive and crossings.  It's drying as I write this so I'll see what it looks like tomorrow.

The next thing I worked on was the highway crossing at Ruston, LA.  Now like most things on my layout, this in not the prototype location as the depot and ICG diamond was in the middle of Ruston.  I have this set just outside of Ruston, so this is my rendition of a two lane blacktop.

Checking on road widths, I came up with a road of 24'.  That's two lanes of 10' with 2' past the outer lines, plus I'll add rock or dirt shoulders when the time comes.  For now it looks pretty close.

I started off cutting some cardboard to 2" wide to mock it up and then I found some cork that I used for the roadbed to keep the road elevated to match the track so there was little to no incline to the rails.  I cut the cork 2-1/2" wide so I could add some shoulders to the highway. 


This width seems to match up pretty close to the Blair Line crossing I chose.  My plan is to use some 0.30" styrene for the actual road, much like I did on the scrap yard driveway.


Monday, July 1, 2024

Another visitor!

This afternoon I had the pleasure of hosting another visitor to The Little Rock Line.

Alan B (some of you may know him as badlandnp on other train forums) and his wife Dorothy were on their way to Iowa to visit some friends & family and asked if they could stop by for a visit.

I've known him for a number of years through several model railroad forums.  Alan models in N scale and owns the Northern Pacific & Black Hills.   He brought along a couple of his favorite models to run on The Little Rock Line.  Both are BLI: a Pennsy T-1 and BLI Pacific that he lettered up in his own road, the Northern Pacific & Black Hills #104

Both had sound and both ran as smooth as silk as I've seen them run on his layout.


Thanks for stopping and thanks for an enjoyable afternoon, please drop by anytime Alan.

When I get a chance I'll get a quick video together of the Pacific and post it.