Sunday, June 23, 2024

Roads less traveled

I got some roads worked on this weekend.

I started first with the farm crossings.  I got them cut, fit, stained and then sealed them with a liberal coat of  Dullcote. After they were dry I added more ballast in to fill in the gaps left between the floral foam roadbed and the tracks.  Eventually I will tape things off and start applying some brown sanded grout that I used for dirt in the main yard.

I will use the grout to cover the road, the driveway leading up to the farm and around the buildings at the farm.  I'll also try to cover some of the areas between the tracks and the foam hills.  Once that is done I can continue covering the rest of the area with the mixed turf ground foam.


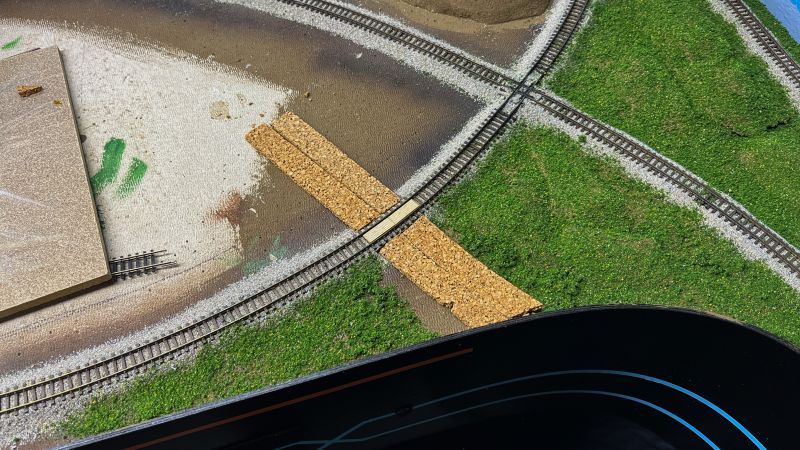
While the farm crossings were drying, I set about to add the crossing for the scrap yard.  I only added the planks between the rails as the styrene would sit right up the outer rails.  After getting it installed, stained and sealed, I worked on painting the styrene road that leads into the scrap yard.  

I shot them with a gray primer for a base coat.  Then using a sponge and several shades of gray and some tannish yellow craft paint, I dabbed the roads with different shades working dark to light, then sealed them with a heavy coat of Dullcote.

I wanted this road to look well used and non-maintained, full of cracks and patches.  The cracks and patches were done using a black fine tipped Sharpie.  For the patches, I used several things: Black Pan Pastels, a gray Sharpie marker and some Tamiya Black Panel liner.  These all gave me different shades for the patches that were put down at different time.

Once everything dried, I started lightly brushing some different colored Pan Pastels across the road.  I used a dark gray down the middle of the road for stains, medium brown along the edges to look like dirt and dust.  Finally I took a small stiff brush and dipped in the Panel Liner and using my finger, I pulled back the bristles so the Panel Liner lightly splattered the road.  Then everything got a heavy coat of Dullcote to seal it all.   I think it turned out ok? 


I originally I had cut the styrene to 1-1/2" wide, but after looking and thinking about it, this is more of a driveway and not a main road, so I cut it down to 1-1/4" wide.  Once I cut the cork with a slope for the shoulders and add some dirt and weeds to each side, I think it'll be fine?  At least that's what I'm telling myself...


Friday, June 21, 2024

Spring is in the air

 ðŸŽµ It's beginning to look a lot like springtime...   ðŸŽ


Continuing to apply the base layer of ground foam. That area is about 5' long.  I brushed on lightly diluted Elmer’s glue, then hastily sprinkled on the mixed turf blend from Scenics Express.

When this dries tomorrow, I go over it with a vacuum and reclaim the lose material.


Thursday, June 20, 2024

Union Scrap crossing

I started to get some ground foam down and then realized a little too late that I needed to get the crossing installed first.  While the glue was still wet I swept the ground foam away from the area where the road was going to go.   A couple of nights later I gathered up the tools and the wooden crossings needed and started the process.  I wanted to try using styrene for the road.

I've always been impressed with the look of the roads that Dave Foxx made on his layout, so I thought I'd give it go.  I did use styrene on another crossing in Haskell that worked out pretty good, I got it painted but never finished it off for some reason?

I first removed the inner spike heads in this area of track so the crossings would fit.  I used two single width crossings.  I angled the ends a bit to account for the radius, then I removed the ballast next to the track.

I planned to keep the road pretty level leading up to the crossing from the fascia and then let it slope down into the scrap yard.  I used the same thickness of cork that I used for the track roadbed and then chose 0.30" styrene which will keep it just under the railhead so I won't be so apt to scrape and scuff it when I clean the track.  However this section of track will be modeled as track that hasn't been used in years, so I shouldn't need to clean it much.

This is also the same section of track where I leave some MOW cars sitting during Ops and they won't block the crossing, so it shouldn't be a problem.

The following images are just for pictures, nothing is glued down other than the cork.

Removal of the spikes and ballast shoulder.


Crossings laid in place.


Cork positioned and glued.


Styrene cut, fitted and laid in place.

It's kind of hard to see, but if you look close at the front rail, you can see the top of the railhead protruding above the styrene.


Sunday, June 16, 2024

Fascia cut and ceiling tile painted

I was able to get back down before bedtime and I got the fascia cut and painted the carved ceiling tile this evening.  I do believe I'm ready for the base scenery this time?

I know I have one small area that needs some attention before I get too far.  It's the area where the railroad dump will be, near Ruston.  I need to apply some plaster then carve it to make it look like an eroded hill, but I can work on that later. 

It's a little hard to see in the images, but the slope between the outer track and fascia drops about 5/8", it's not much but it should make a difference when it's covered in weeds and Kudzu.


A little more terraforming

"I finally got the last of the mainline ballasted in Winnfield.

With this done I think I can finally start working on the scenery, I'll start by applying the base layer of ground foam."


Well I guess I need to back up a bit. 

Things are moving pretty quickly here lately and I kind of got ahead of myself a bit.  One thing my layout has been lacking is terrain that is below track level, not that this is a requirement, but is sure adds to the look and feel of a scene.

Several months ago I picked up a Milwaukee multi tool to aid in cutting my fascia.  It also occured to me that it should work to cut through the ceiling tile and underlying foam of the subroadbed.

So before I got started on the scenery base and getting it covered in dust, I decided to get after with it multi tool and the round blade.


This is what I had before I started, the tile was just below the fascia.


Being careful not to disturb the existing track and ballast, I held the tool at a slight angle, just close enough to the edge of the ballast and pushed it down towards the fascia.

It worked like a champ.  After clearing out the cut material I used my fingers to rub out any major imperfections, followed by several passes with the vacuum.  I was also happy that there wasn't as much dust as I thought there might be.


I'm hoping with a different blade installed, I can also cut the 1/8" fascia to somewhat follow the new contours?

If this all works, I'll sand the fascia edge smooth and paint the top edge black then seal the exposed ceiling tile with a good coat of earth latex.   Then maybe I can get started on the scenery base?


Winnfield is ballasted

I finally got the last of the mainline ballasted in Winnfield.

With this done I think I can finally start working on the scenery, I'll start by applying the base layer of ground foam.  


Tuesday, June 11, 2024

Tree line

Got the tree line painted tonight, now I can start working on the base scenery. 


Sunday, June 9, 2024

Adding leaves

So I tried adding the leaves on the dark green this afternoon, much like I did on the other portions of the back.

While these are more distant hills, the process was the same.


First I applied on the black for depth.


Then the different shades of green, keeping the lightest shade to the left.


In most places along the backdrop, there will be varying amounts of 3D trees, so I'm hoping they will all somewhat blend together.  At this particular location, I'm not planning any trees, but there will be something along the base to hide the line between the backdrop and ground.

I really need to get some basic scenery down to see how this will look, but I think this has enough details to pass?

I am a firm believer that unless you're using a printed backdrop, the detail should be less than the foreground scenery so it doesn't draw your eyes away from the layout. 


Saturday, June 8, 2024

New Clouds

I think these came out much nicer, they are lighter and a little more wispy than the ones I had before. 

I did something a little different this time, before adding the clouds, I spray some high thinner clouds on first before the main clouds went on.  I mixed white paint with some blue and sprayed it in pretty much a straight line at a slight angle to help tone down the blue paint to help make a slight transition from all blue.

This was to simulate higher thinner clouds in the higher atmosphere.  Unfortunately the main clouds did manage to cover it up somewhat. 

This by itself looks good and I may use this technique elsewhere on the layout. 


After that was dry I mixed up more white paint and added a touch of gray and drop of blue for the main clouds.  It only discolored the white slightly so it wasn't so stark and then I grabbed the stencils and started working on the main clouds.

After getting the clouds sprayed I followed up with some light gray and sprayed under some of the clouds to give them a little bit of a shadow.

While they are not exactly what I was hoping for, I think they'll do just fine.


Next up, I'll go back and repaint the green tree line.  I have an idea on how to make this tree line look a little closer than I have before so it hopefully blends with the 3D trees.


Sunday, June 2, 2024

Clouds be gone!

I was just not happy with the way the clouds turned out this last time.  They were just a little too solid for my likings and too well defined around the edges.

I'll try to make them look a little wispy and transparent the next time around. 


Saturday, June 1, 2024

Foam painting

I got the first thick coat of earth brown latex paint applied to the floral foam.

When this dries, it'll help strengthen the foam so it won't dent and scratch so easy, but I'll be able to poke holes in easily for planting trees.