Monday, August 29, 2022

Rock Island GP35's

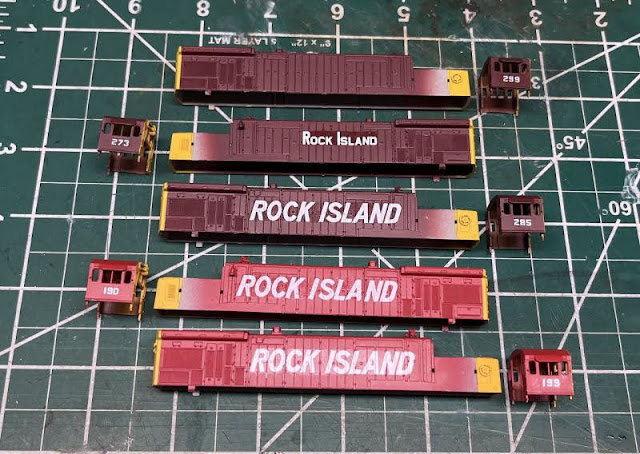
With the U33B project wrapped up I had planned to get back to the layout and work on a couple areas.  But I just don't seem to have the interest built up enough yet.  When I was prepping the U33B's I also laid aside five GP35's so I could them added to the fleet.

So last night I got them stripped down and ready to attack.


After taking the image I got to thinking about the two GP35's that I painted and weathered years ago.  I was never really fond of them after what I've been doing with weathering over the last several years and what I've learned.  When I dug them out last night and took a long look at them, I decided to strip down two more GP35's and add them to the "To-Do" list, so now I've got 5 new ones and two re-do's on the bench.  This will also allow me to correct one mistake that I did to them before I knew what some of the correct details parts were.

One will be the only Rock ISland GP35 to wear the 70's distinctive Red and Yellow livery, the rest will be painted in several different versions of the solid Maroon dip and the Maroon and Yellow schemes.  


Friday, August 26, 2022

Let's follow train #34 SB from Biddle yard.

Today we're going to follow train #34 SB from Biddle yard in Little Rock, AR. south to Whitewater Creek, just north of Fordyce, AR.  Today’s power has 5 U33B's.  
Although 16,500 hp might be a bit of overkill for this train, it sure is neat to see.


Monday, August 22, 2022

Rock Island U33B #273

Put the wraps on my fifth and final U33B.

This time I actually had the presence of mind to take a couple of "Before" pics this time.


As I've done with the previous four, all the weathering was done with several Pan Pastel colors.  In this case I used Raw umber tint to fade the paint, Raw Umber to tone down the fade so it was so stark and then Black for the soot.  I also used the same colors on the trucks and fuel tank.

I did not use the Tamiya Black Panel Liner this time for oil and fuel spills, but I may go back and add a little?


With this project wrapped up, I'm not sure what I plan to do next?  While I do have 5 GP35's on deck next, I may start working on the next scene on the layout.  This would be one of two things:  1) The Ouachita River Bridge scene (the bridge in the images above)  or 2) Reworking all the tracks in the town of El Dorado.  Basically removing most of the existing yard tracks and the A/D tracks.

One thing I do plan to do this fall is to start listing a lot of the extra stuff that I don't need anymore: Rolling Stock, Locos and some building kits.  Since eBay started with their nonsense of the $600 limit, I plan to start listing stuff on several of the Forums and probably Facebook.    


Saturday, August 20, 2022

804 LED installation in the U33B's

Been meaning to post this for a while now.

The Atlas B23/30-7's have a different type of light glazing over some of their other locomotives which presented a problem that I needed to overcome in order to get the bright lights like I did on the GP18's earlier in this blog. 

Here is a closeup of the two front cab glazings.  The one on the left is from the B23/30-7's, the one on the right is from a GP40, this one has a "U" shaped area (where the red arrow is pointing to) molded into which is where the early 3mm LED would roughly fit in place when the model is assembled and for the most part, this design works pretty good.

However on the other one you can clearly see the light tube that lowers it so that it sits in front the newer surface mount LEDs that are now being used on the newer drop in DCC boards.  The trouble is that for whatever reason this tube does not carry the light very well?  Maybe because it's bent?  


So I wound up using some .030" clear fiber optics that I found on eBay after a friend told me about them.  I think they cost me around $12 with shipping?  They are just a bit smaller diameter than the light tube openings, but when I flared the outer end, they'll seat snuggly in place.    I now have enough to light my entire fleet up and then some.


I first flare the ends carefully, it doesn't take much heat at all!  Just few quick swipes of a lighter flame is all that's needed.  Then I cut these to 3/8" long.  It's hard to see the flared end.


Once flared, I stick them in the light holes.  One small thing, the 804 LEDs are not quite big enough to cover both fiber optics because of the little bit of space that separates the two light holes, so I that's why I cut them at 3/8" long and when inserted, I can sit the fiber optics right on top of each other with no space.  I still have to be careful when positioning the LED to the ends of the two fibers as its still close.

So to hold these in position someone suggested that I try Bondic Glue.  Bondic Glue is a glue that is cured using UV light within about 5 seconds.  It was advertised to glue ANYTHING!  Well to a point it will, it's not a wonder glue but it does hold the fibers and LEDs in place good enough for this application. 

Next I spot glue the LED to the fibers and check the positioning, if I get the LED is off center just a bit, one light will be a bit dimmer than the other.  If needed I can take a knife and pop the LED off and pop the excess glue off the fibers and try again.  

 .


With the fibers secured, I'll spot glue the LED to the ends of the fibers and apply power to see how well I they're both lit.  If it looks good, I'll encase the LED and fiber ends with a larger glob of Bondic glue and cure it with the UV light, then I'll paint the blob black.  This helps keep the maximum amount of light contained in the tubes.


Here's the end result, 10x better than the factory lights!


Friday, August 19, 2022

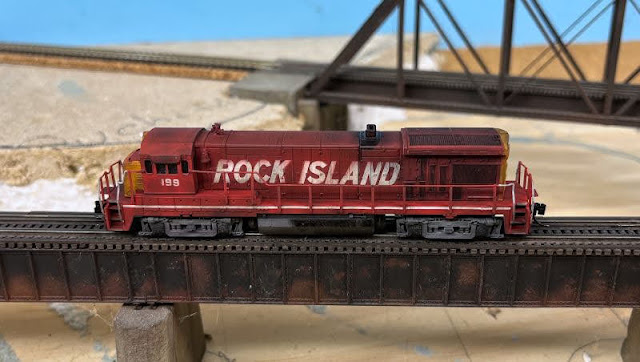
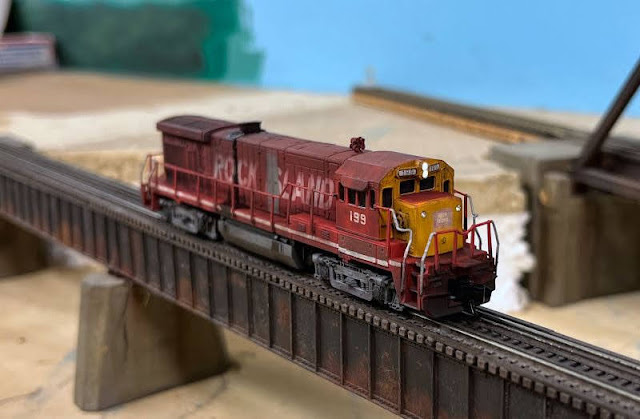
Rock Island U33B #199

This is the fourth U33B to join my fleet.

Nothing very special about this one over the others, however I did find out the other night that the #190 & #199 were the only two U33B's to wear the Red and Yellow scheme.  I did not know this when I was planning for the U33B build, the only reason I wanted two of the Red and & yellow units is because my fleet is lacking units wearing the this scheme.

I tried to keep this one from being too filthy.


Here's a comparison of a weathered and freshly painted loco to give you some idea of the amount of weathering I'm applying.  They both started out looking like the one on the right.

I picked up the fresh one from eBay a few years ago.  Even though I knew it was a foobie just like the ones I'm working on now, I was happy to get it until I got it home.

It had no details applied, the walkways were left black, it didn't have a 5 chime horn, but the biggest thing I didn't like was that this is a B23-7 and most of those IIRC included an Anti-climber on the front porch, which Rock Island never had.  So it'll be going back on the chopping block soon.


One to go...


Sunday, August 14, 2022

Rock Island U33B, #285

3 down, 2 to go...

This 3rd U-Boat carries the Maroon and Yellow scheme with the large speed lettering that was common on the Red and Yellow scheme of the 70's, I always thought this to be a interesting combination, because looking at Black & White pics of the Rock Island, it was sometimes hard to tell what colors the locos wore.

Also noteworthy, this loco has had it's trucks replaced with new ones.  Evidently this was done after the road decided to switch to Red & Yellow scheme.  In the Maroon era, trucks and fuel tanks were painted black, in the 70's with the change to Red & Yellow the trucks and fuel tanks were now painted in a medium gray, which is very close to UP Harbor Mist gray or SP Dark Lark gray, but after a few months of service, they got so dirty they began to look black.  I tried to keep mine a little cleaner so the gray showed up.


Here's a shot of the three I have done so far, we see them crossing the Ouachita River bridge.   I really need to get this area sceniced...


Wednesday, August 10, 2022

Rock Island U33B #299

Just finished up the second of five U33B's  #299

This one is a Plain Jane unit with just a couple of letters on a few doors.  I'm not sure if this unit was initially fully lettered and the majority of the lettering wore off, or if it started out with no lettering and some doors got replaced with the "Is" intact?

I'm really enjoying playing around with the Pan Pastels for weathering, it's a much easier process and much more forgiving.  For this unit I wanted it faded quite a bit so I started with an off white color I had, but it changed the colors too drastically to the point it looked like a Mauve.  So I did some searching and found a color called Yellow Ochre Tint that resembles a Pastel Yellow.  I did try the straight Yellow Ochre but it had a slight greenish hue to it.


As with the #190, the grills and oil spill is done with black Tamiya Panel Liner.  


2 down, 3 to go...


Friday, August 5, 2022

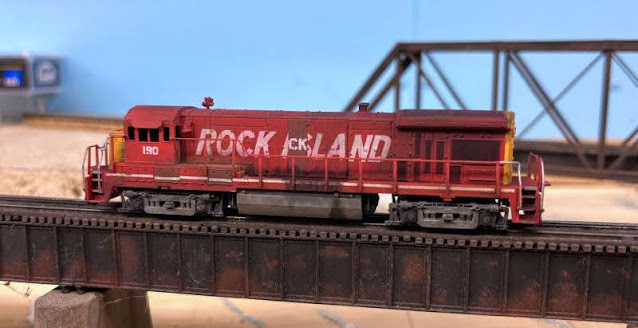
First of the 5 U33B's #190

Been steadily working on the U33B's.

I got all of them decaled, had a good fight on my hands with the sill striping though.  They all wanted to break apart in and out of the water.  Applied three coats of Microscale Liquid Decal Film which helped a little.  The decals were kind of old, but only the striping gave me fits.  Which is why the sills are not shown yet.

Finally picked up some new 1/32" white stripe decals and they worked better.


Finished the first of the five U33B's tonight.
It still needs couplers and the front headlights installed, but the weathering is complete.


The weathering was all done with Pan Pastels. The oil and fuel leaks and all the grills were darkened with Tamiya Black Panel Liner.
I sealed it with several light misted coats of my dulling agent. Had I covered it with a single heavy coat, most of the powders would have faded away.
Pan Pastels do not fade as bad pastel chalks, but they do fade, especially the lighter colors.  I had to go back and reapply the pans on the trucks and fuel tanks a couple of times.