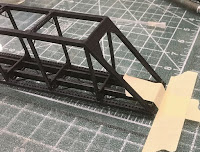
Made more progress on the Pratt Truss bridge today. It's just about about ready to paint.
When I went to glue the end portals on, I ran into a small snag. After getting them glued, the bridge had a bit of bow in the floor. I had to pull the portal tops to the upper frame and in doing so, it pulled the bottom joint up causing the ends to flex upwards. It was an easy fix though, I added another drop of MEK to the bottom joint of the end portal until they released. Then I taped the ends down to the work surface and applied another drop of glue and pressed the bottom of the portals back towards the center of the bridge and held them until the glue dried. Bingo! It's flat once again.
Next came the "X" lattice bracing on the top, this wasn't too bad.
The part that about had my goat now is the 16 vertical angled bracings. These need to poke into a slot at the top and bottom of the bridge, then they recommend to leave them loose as atmospheric conditions may cause them to bow or flex and actually pull the bridge out of square! I can't see this happening seeing how flimsy they are. So after getting them installed and centered, I'm only gluing them on the top so they don't drop out.
Trying to get these little devils inserted into the corresponding slots is worse than threading a needle! Some of them drop in, others are a little thicker or the slots are smaller. So I've been dragging the ends placed under my fingertips across some fine sandpaper that I have glued to piece of 1/4" MDF. This seems to work good but man is it time consuming.
The next step was to thread the black thread they supplied into the upright supports and then down to the lower railing. The first problem I seen was I didn't see a hole in the upper end of the support. I thought about drilling a hole, but then the lightbulb went on!
When I was reading through a thread on NSN, Michael Whiteman suggested using a brass rod instead of the thread because it wouldn't attract dust like thread will over time. Well this was the checker! I was able to slip the rod through the bottom of the bottom railing, between the two angled vertical bracings and was able to poke it into the upper support column. Once I had them measured and cut, I placed a small drop of CA to secure them in place!
Viola! Done!
Thanks Michael!
Now all I have left to do is to get the rails and guardrails installed and then I can get it painted.


Good tip about the brass wire. Looking good.
ReplyDeleteRod.
Again, thanks Rod.
DeleteYeah, I'm glad I read Michaels post. It worked out slick.
That looks great! Can't wait to see it on the layout!
ReplyDeleteThanks! Neither can I...
Delete