Monday, December 9, 2013

More ALCo's!


I hope everyone had a good Thanksgiving?

Since the last post where I got a shot of the new ALCo's sitting in Malvern, I heard that the W&OV has acquired a few more, but have yet to see them around the shop.  From the scuttlebutt I've heard they scored two more RS11's.  One's in the Central Vermont green scheme and the other is an older maroon Lehigh Valley.  The last one is suppose to be another red Lehigh Valley C420.  It would seem as though they fetched a pretty penny for the two large Centuries?

With all this color, they are going to give The Rock a run for their money who has always seemed to have rainbow consists.  Once they arrive I'll get some shots.

*****

Nothing new on the construction in Malvern but I would assume it should be starting again here shortly. 

Since the last ops session in Nov, I took a bit of a break and got some other things done that has been piling up on the workbench.  A friend wanted an HO boxcar weathered so got out the weathering supplies and got after it.  While I had the stuff out I decided to get a few cars of my own weathered up and put them on ebay to see if I could bring in a little extra dough for the holidays.

Just the other day I heard that KATO has announced a new loco, they're F2 A&B's.  One of  the sets that I have my eye on is a pair of Rock Island F2A's in the Red and Black scheme!  I've always been a sucker for this scheme.

While it's from a much earlier time frame than what my layout is focused on now, they will look good with some of the other Red and Black units that I've picked over the years.

This had prompted me to rethink the layout a bit.  No, I'm not tearing things down or changing era's completely, but I do think I'll be thinning out the herd even more than I have been.   With the acquisition of the F2A's I should have almost enough older locos to run within a earlier era, say the early to mid 1960's, the time of my youth.

If I do not have enough locos to fill all the needs, I can always call upon some of the maroon units that I have like GP's, RS's and even a few steamers that are in storage and let them stretch there legs a bit.  I have gaggle of LifeLike FA's in the Red and Black scheme as well as some undecs that will be painted in the solid maroon or maroon with stripes for more variety.

I don't think I will have to swap out any buildings or signs as the era will be close enough that it shouldn't matter.  The only thing that might look kind of funny would be seeing FT's pull some modern 5800 cuft plastics hoppers, but such is life.  Who knows, you might even spot a Blue and White geeps mixed in the consist with some FA's?

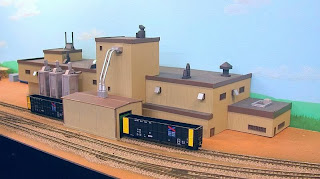
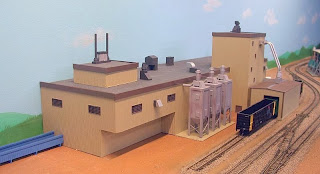
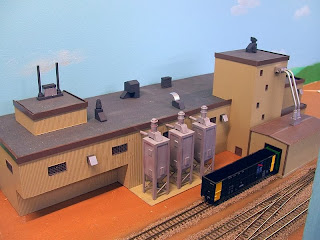
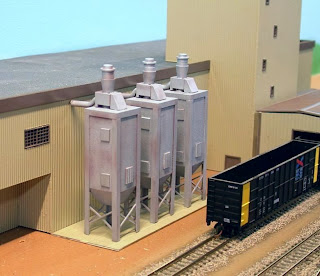
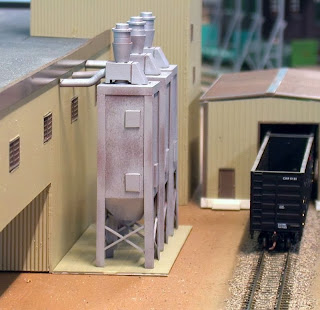
Back the layout, my next major project will be to finish a few more buildings so that I can get their foot print figured out and I can some grass down.  I just about have the Heavy Metal building ready and the next will be the Olin-Chlor plant in the corner, followed by Frump Gas & Supply in the middle of the old Wye just outside of town.

Stay tuned...


Sunday, November 3, 2013

The rumors were true.


During the last couple of trips to Malvern, I had heard rumors that the W&OV was looking to replace their two large ALCo Centuries [a C628 & C630] with three smaller ALCo B-B units.

Yesterday I heard some chatter coming over the scanner that there were some new visitors in Malvern.  I grabbed my camera and made a mad dash to the engine shop.

There..... sitting on display were three smaller B-B ALCo's.  One RS11 bracketed by two C420's!  They are of course all second hand units, but what a sight for ALCo fans!  These were so new they haven't even received their new markings yet.  The first one is a Lehigh Valley yellow jacket, the RS11 is a Maine Central and the second C420 looks to be an ex Lehigh & Hudson River with CR paint-outs still in place.


The two big ALCo's are still sitting on the far track and I wonder how long they will be around or before they get shipped off to their new owner?  Better try to get some shots while I still can.

I got talking to the engine house foreman who let it slip that the old D&H RSC-2 might also be replaced.  He said they were looking at a smaller ALCo switcher, he mentioned something about it being an S-2?

An added surprise was the yellow caboose tacked on behind the L&HR unit.  It looked like it might be an ex-MoPac caboose that got painted in the Borg colors?  I didn't see any markings on it other than the road number.  This should make a nice replacement for the old North Eastern style crummy that they had been using.  I bet the crews will be happier.


 *****

I've always been a fan of ALCo's and thought this would be a good chance to show my love for them.  I had the two Centuries for some time now and they worked fine but they just seemed to be just a bit too big for the little short line.  

I picked up the L&HR from a buddy who was thinning his herd and thought if I could find a couple more that these might be the ticket.  What I really wanted was an RS11 in the Lehigh Valley Cornell red or maroon scheme, but I stumbled across the Maine Central and since yellow weathers real nice, I thought I would give it a try.

I plan on weathering them up pretty heavily but leave the original road names & numbers in place and add a small stenciled W&OV  under each cab.

The caboose is a Bluford Shops ex MoPac that got repainted after the merger.  I thought a yellow caboose would look good instead of the typical "Red Caboose" plus these are super nice models!

I suppose in the real world time frame that I'm modeling [1983], the Lehigh Valley Yellow Jacket would have not been the proper scheme for a second hand loco as this was not the last scheme that these wore, I believe it was the Cornell Red.  But then again the Rock wasn't around in 1983 either! Maybe I'll have to keep my eye open for another LV C420.  I think Atlas has announced a C420 or RS11 in Cornell Red or Maroon.

If anyone has one of these that they'd like to part with, I bet the W&OV would be interested.


Saturday, November 2, 2013

Sounds of Construction in Malvern, part 8

 After a month of working on the Crushmoore building I think I've reached a point where I can call it good and move onto the other buildings in Malvern.  There's still a lot of smaller details left to be added such as piping, weathering and misc items which I can do at a later time, but at least now I can get it located and start in with ground cover.  I still need to add a small parking lot on the right side by the office, this I want to try using some roofing felt for an asphalt lot.


The last thing I added was the rooftop details.  These were all made with LEGOs except for the Air Conditioning unit on the office, I think this was a Burt Industries detail. After gathering all the pieces I wanted, I glued them together and painted them an SP Lark gray and added silver to some of them for a bit of variety.


Using LEGOs for details is a great alternative to buying pre-made details and the possibilities can be unlimited.  What a great idea!


While this may not be a masterpiece of a model, it has taught me that scratch building is not as hard as I once thought.  It can yield a unique structure that you can't otherwise find on the open market and one which you can fit the area that you have.


This was a fun build and I'm looking forward to doing more of the same throughout the layout.


Thanks for following along.


Wednesday, October 23, 2013

Sounds of Construction in Malvern, part 7

 Some guys who go through their second childhood buy expensive sports cars or motorcycles, others buy boats, but no, not me..........I buy Legos!


I finally got a chance to use some of the Legos for detail parts as Rich has done.  I wanted to get a motor and cyclone put on top of the collectors to finish them off. 


At first they looked a little strange with all the bright colors, but with a little imagination and assembling them in an unconventional way [gluing them] I came up with something that could pass for what I was looking for.


After the the glue dried I sprayed them with an Oxide Red for a primer and base coat.  The second coat was Floquil's Old Silver which I didn't cover with a solid coat.  I wanted just enough silver on so that the Oxide Red would show through in areas to give it a look as if the silver was wearing thin.  I also painted the pad with a concrete color.


The duct work was made with sprues from old kits.  I heated them with a lighter just enough to stretch and bend them into shape so they would enter the building just under the facade.  I just glued the duct work into the square holes on the back side of the Lego. 


Monday, October 21, 2013

Sounds of Construction in Malvern, part 6


Things have slowed a little in Malvern since the last post; Chores on the home front and waiting for some parts.

I did manage to get started on the dust collection system.  I'm waiting for some parts to arrive so I can finish these and get the canopy built over the conveyor. 


I need to get a concrete pad in place, the motors placed on top, run some tubing into the building and then try to come up with some kind of a discharge chute so I can empty them into a truck.


Tuesday, October 15, 2013

Sounds of Construction in Malvern, part 5


Along with all the new construction on the Crushmoore plant, Heavy Metal Co. is finally getting their canopy erected.

While some of the paint was drying on the Crushmoore loading shed, I turned back to Heavy Metal Co. to see about raising the canopy over the unloading platform, which is where I left off before the last ops session.


I added to one of the original sections of the upright bases on the right side so I could have a larger concrete pad where I can have fork lifts and stacks of coiled steel.  I used more Evergreen sheet stock for this that was scored with 1/2" x 1/2" grids to simulate a concrete pad.  It's kind of hard to see in the photo though.


The next thing I need to add are the two rails that the overhead crane will ride on.  It's unfortunate that Walther's never included a gantry crane with the N scale kit like they did with their HO version.  They offer one, but it's no where near the right size for this kit [or at least the one I got years ago is not].  I guess I'll need to scratch build one or kitbash one out of the so-called "N" scale kit I have.  I don't think it should be too hard.

Once I get that done I'll be able to glue this section in place.  Then I can get after the main building;  Add the roof and also cutout a section for a double garage door on the left end of the building, you can see where the two windows are missing.  This will be where the raw material will enter the building with fork lifts once it's unloaded off the railcars.


Monday, October 14, 2013

Sounds of Construction in Malvern, part 4


This was a good weekend for me, I got quite a bit done at Malvern!

After getting the main building to a good stopping point I decided to tear into the chip loading shed.  I got it partially assembled and then painted Saturday night. Sunday after I got the chores done I found some time to get it assembled and test fit.  I still need to get the roof painted and then I'll need to add a foundation to the bottom of the base of the building,  There is no cork under the siding so I as it sits now the cars just fit under the opening! I also got some blocks of wood cut and shaped for a couple of dust/chip collectors, that will be another small thing to tie up.


While waiting for it to dry I got thinking about the conveyor I needed that will bring the logs into the plant.  I jumped on my old friend Google and started to research conveyors and came up with several ideas.
I went back down to the laboratory and started to rifle through some styrene.

I started with a strip of balsa wood for the base and then added a couple of  styrene "U" channels to each side so that I would have something to glue the sides to.  After getting the sides glued on and knowing that the unit will be sitting back away from the front edge, I thought I might be able to get away without building an actual conveyor bet.  Once it was together, I just painted the balsa wood floor with a dark gray acrylic and viola!  Instant conveyor belt!  Once I put a few logs on the belt, you'll never even see it.
I also need to make a small shed to house the power unit for the conveyor or maybe just a small power unit to sit next to it like  a small gas or diesel generator?


Now I need to look at building a small canopy over the conveyor to keep the weather out. 


Friday, October 11, 2013

Sounds of Construction in Malvern, part 3


After getting the siding glued into place, I decided to use a spray bomb of Rust-Oleum to paint it with.  I found a nice neutral color called "Fossil", it looks like a sand color with a tinge of yellow.  For the windows, doors and facade I chose a chocolate brown which I thought would be a nice contrast to set things off a bit.  At this point, I'm not sure I will add trim pieces to the corners of the building or not as it might be a bit too much.

I glued the windows, doors and facade to the building using the same Loctite glue I used to for siding.  The Rust-Oleum has a Satin finish so I will need to spray the whole building down with a nice flat finish before I can start any weathering.

For the roof I used some Wet/Dry 320 grit sandpaper and glued it down to the roof


The next thing I'll need to work on is getting all the roof and building details ready to assemble and attach.  I think some vertical storage tanks might be in order as well.

Overall I think this will work very well for a building technique.  I'm not sure if it's that much cheaper than buying a commercial kit or not.  So far not counting the plywood and my time, I've got close to $62.00 in the glue, styrene, paint, windows, doors and the Legos.  But at least I have a unique building that I can make fit to an area that have.

If you have a bunch of old building parts laying around that you can put to use, then it might be cheaper.  Unfortunately, I didn't.