Saturday, January 26, 2013

Malvern - A 2nd attempt

  . 
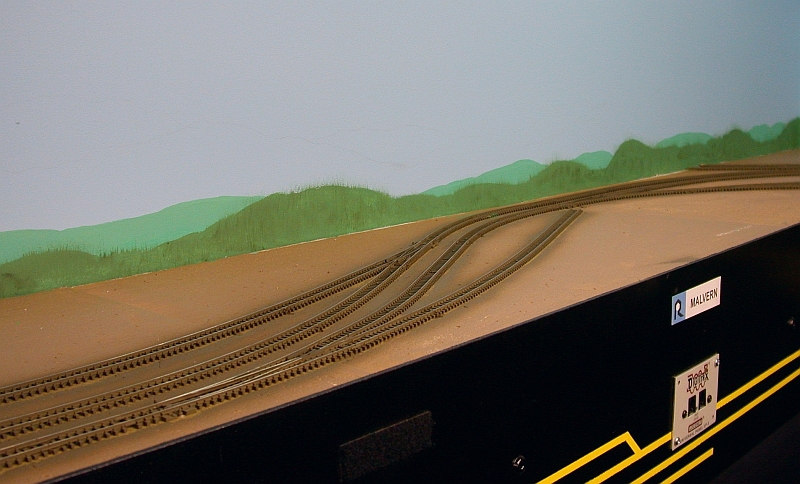
OK this time I tried a couple of different things.  I started with a much lighter green but still had to add a bit white for the distant hills.  Then I added some yellow to bring back the green and finally added a touch of blue to fade it a bit.  For the closer hills I just added some darker green to the color I used for the distant hills.

I also wanted to give the closer hills a bit of depth, so I stippled the darkest green I had into the fresh paint of the closer hills.  Using a medium stiff fan brush, I pulled the darker green upwards, blending it into the fresh paint.  In a few places I accidentally pulled the paint onto the lighter distant hills!  This actually turned out to be  OK, as it got rid of the crisp line and made it look like a jagged tree line.     
With the Fiancée standing behind me, uttering a few words of encouragement, I felt that I was getting somewhere so I continued on.

I think by keeping the hills lower and using lighter colors panned out this time. Please forgive my photography, I need to get some better lighting equipment.

I went from this


To this


Someone commented that once a few buildings and some foreground scenery was in place, the hills wouldn't be so dominating.  I placed a few structures on the layout to give the eyes something else to look at and almost immediately the hills seemed to fade into the distance.

This is the paint and brushes that I'm using.


I'm still no Bob Ross, but I'm feeling happier...


Wednesday, January 23, 2013

Target - Malvern! ...continued


Steps 1 - 4 are complete.  Even after 16 years since the last time I've done any substantial scenery, it's coming back like riding a bike.

I inserted the sleeper ties and glued them in place with white glue being careful not to let it glob up around the ties, next came the paint.  Before painting, I wanted to protect the switch points so scraping wouldn't be needed.  I've read and seen where a strip of tape was placed across the points and frogs and then paint was applied latter by a brush to keep it off the points.  I wanted to try something different.

I took a small piece of napkin, rolled it between my fingers until it was big enough so I could pack it in between the point rail and the stock rail.  This should keep the paint off both surfaces.  This also held the opposite side tightly closed so that no paint could get on their surfaces.


I also took a small drop of oil and placed it in the joints of the switch points where they hinge on the Peco turnouts, my thought was this would keep the paint from insulating the switch points which has worked very well in the past.  Please forgive me, by the time I got the picture snapped the oil had puddled.  You only need a small drop.


Now I'm ready to paint.  I decided to use Floquil Rail Brown.  In the past I've used Floquil Roof Brown, but since this was more of a branch line and didn't get heavy traffic, I wanted a lighter brown.  Rail Brown has a tinge of green so I added a few drops of  Roof Brown to offset the greenish hue.  After the ballast is in place I plan to take a wash of some lighter brown and/or gray to maybe try and give the ties a sun faded gray look.

Here is Malvern with just the sleeper ties inserted  


After painting the ceiling tile with a brown latex for a base coat and to seal the ceiling tile and the tracks painted with Floquil Rail Brown


Since I used Atlas C80 and not C55, painting the track with a single color helps to hide the over sized rail.  I'm still deciding whether or not to use a Paint Pen to darken the rails a bit.  My concern is if I darken the rails with a darker brown or weathered black it will make them stand out and appear taller again, thus defeating the purpose.
For now I think I will just forgo painting the rails and just continue to ballast.  I can always come back with a Paint Pen if needed.

Getting tired of seeing nothing but blue skies on the layout, I got the itch to paint my background.  Having never done this before  I wasn't quite sure what it would turnout.  I have read through books, scanned through layouts on the internet and have used Google Earth to get some idea of what the terrain of  Malvern, AR looks like.  Much to my surprise, it's a lot flatter than I recall from a trip I took  through Tennessee, Arkansas and Missouri back in 1991.  I remembered more low rolling green hills than what I have seen on Google Earth.     
One layout that I came across that has a backdrop that I was looking for is the Housatonic RR in N Scale.  It's set in Southwestern New England.  It's a simple, yet effective backdrop that gives an illusion of distance using three basic colors with no major details.  To me, it does what a back drop is suppose to do;  It gives the scene depth, but does not draw your eyes to it.  In a few of the pictures where the owner has placed the buildings, you can just catch a glimpse of the rolling hills in the back ground.

So with a pencil in hand I started to sketch out the horizon.  First I drew the close hills and then when back and added a second horizon, above and behind the first.  I used some of the cheaper acrylic paints like Apple Barrel.  I started with a lighter green for the distant hills, then grabbed a darker green for the closer hills.

This is what I ended up with.


While it's not terrible, it's not quite what I had in mind either.  With this first attempt I did manage to get the feeling of depth and distance with the two colors.  I also was able to blend each color of paint a bit so as to vary the shades of those colors.  This helped to add a little depth within each color.  You can kind of see this on the dark green hill in the middle, the left side is a little lighter that the right side [Something I did pick up from Bob Ross]. I think a little yellow will help this even more.

A few things I need to correct;
First, the hills are a little too tall, they should be shorter to help convey distance better.
Second, I think they are too bumpy, they need to be flatter and smoother according to what I've seen on Google Earth.
Third, the colors are way to green and way to rich.  To my eyes, I have the feeling that these hills are not that far away.  I need to lighten the colors quite a bit and while I'm at it, the one thing I forgot to do is to mix some blue to the greens, this is suppose to add a "Fog" to the background colors and help them fade away in the distance.  
Another thing that didn't help was the dark green paint dried darker than I expected.

The next night I pulled out the can of blue paint and covered the "not so distant hills" so that I could start over.  I also went out and picked up a few more lighter colors of the acrylic paint, along with a bottle of  Yellow to vary the shades of the greens and a bottle of Blue to help fade greens.

Bob Ross I'm not, but this has given me a chance to get my feet wet and gave me a feeling and an idea of what I need to do the next time...

Practice, practice, practice


Saturday, January 12, 2013

Target - Malvern!


Well Since the Mayan's didn't bring around the end of the world, I thought I might give it a try.

Tonight, with most of my recent weathering projects and experiments finished and out of the way, after almost four years of construction, track work and wiring,  I commenced with the first steps of scenery!  Since Malvern, AR is kind of set off to one side of the layout and it doesn't take up much real estate, I thought it would be a good choice to get started with. 

Step 1.
After clearing out the cars and what building were setting around, I grabbed some old flex track and began by filling in the gaps between ties where the rail joints were made.  A simple project, but what a difference it makes.

Now let me see if I remember what comes next?  
Hmmmmm.....                                                                                          
Aaaah yes!


Step 2.
Fill in the joints between the ceiling tiles with lightweight spackling compound, then sand smooth.

Step 3.
Paint the ceiling tile with a latex brown to seal it up and give some good base color.

Step 4.
Grab the airbrush and spray paint the track with tie brown.  Acrylics of course!

Step 5.
Paint the backdrops.  This one will be new to me as I have never painted a back drop before I guess I'll see if I can find some old Bob Ross videos on YouTube and make some Happy Trees.

Stay tuned...


Tuesday, January 8, 2013

Second hand locomotives


As you can see, I haven't been doing too much to the layout lately.  After getting El Dorado yard rebuilt I've kind of taken a break from the layout so I could work on a few other needed projects.

One was getting a bunch of cars re-trucked.  A few months ago I made a swap with a friend who wanted to trade his Micro Train trucks and couplers for my Accumate trucks and couplers.  I think we traded in the neighborhood of  200+ pairs.  I'm still not quite done with that project as I have about 30 cars to go because I'm waiting on some wheel sets.

Also still working on a DCC problem.  Once I get a couple of locos speed matched they run fine.  When I shut the layout down and come back in a night or two those loco are still matched for speed, but they both run about 15-20% slower than I had them set for.  I'm running a bunch of different tests trying to get to the bottom of this.  I think I have it narrowed down to the Command Station or my programming skills with JMRI. If anyone knows how to cure this, I'm all ears.

The other was to get more Rock Island power chipped so I could return several leased chipped locomotives that Quin had loaned me to fill in so we had enough power to commence operating sessions.

So, continuing with my allure of  Rock Island oddballs, I recently scored a couple of locomotives pretty reasonable from the Bay that I've always wanted to add to my roster.  A pair Kato E8A/B in UP colors, even though they are a little older than the time frame I'm modeling.  After getting the resurrected "F" units finished and the Ex- Rio Grande GP7 completed, I started in on the E's.

This was my inspiration;


On the GP7  I used a light gray oil paint for the fade since black will normally fade to gray.  On the E's I wanted them to look very faded from years of use, so I started out with a white oil paint.

These units both started out as factory painted UP units.  I removed the lettering and logos, applied new decals and gave them a flat coat of Model Masters Flat.  Then I used a slightly thinned white oil paint and applied it with a brush, working it into all the nooks and crannies.  Using a "Q" tip and a small brush I removed what paint I could.  The oil paint has a tendency to stain the flat coat leaving a white-ish film.  After letting them dry for a day or so, I sealed it with a another flat coat.


The next step was to apply the colored washes; I used Burnt Sienna on the B unit and Davy's Gray mixed with a little bit of white and touch of Burnt Sienna for the A unit.  The A looks more faded with the gray wash while the yellow on the B unit look a little richer.

The "A" unit is on the right


The "A" unit is on the top


After the paint has dried, I attacked them with weathering powders and some black wash on the grilles, then sealed them up with a final coat of flat.


The snow shields were fabricated from sheet brass.  JnJ Trains has UP Snow Shields listed on their web page in a etched, folding brass kit but I have never been able to make contact with them.   So I did the next best thing, I made my own.

I think these are gonna look great pulling a string of  TOFC's!

Now I need to get back to the layout...


Friday, November 23, 2012

Rock Island [ex-D&RGW] GP7 #4206

Just in time for "Black Friday"

I've always been a fan of the “Oddities” and “One-offs” and one fairly easy project that I've wanted to add to my fleet was one of the ten ex-Rio Grande GP7's. The Rock acquired these to help supplement their power when they ran their large fleet of 125 GP7's through their CRP [Capital Rebuilding Program]. 

Two notable features of these units were, as far I can tell, the only units that The Rock ever owned that had Dynamic Brakes. The other thing was that they were not MU capable.

This delegated them to transfer runs and local switcher service. The only thing that Rock Island did was to paint out the logos, hastily apply a few shields and cab numbers and slapped their asses into service. They eventually entered the CRP and had the Dynamics removed and MU ability added.   NOTE:  See addition at the bottom of this post.


Not much work was needed for this loco.  I picked it up second hand at a swap meet since it was already decaled for Rio Grande. 

I swapped out the chassis with a newer DCC ready chassis and installed a TCS ASD4 decoder.  I removed the small logos on the side, painted out the lettering on both ends with a splotch of orange, and applied the Rock Island heralds and cab numbers and number boards. I added a typical 3 chime horn to the top of the short hood, the spark arrestors and cab shades.

I used an oil based light grey for the fade coat and an oil based  burnt umber for a wash.  Finished it off with some Bragdon powders for the soot and rusty areas. 

One thing that didn't turnout like I had hoped it would was on the side sill, Rio Grande added six red [what looks like] round reflectors. I picked up some 1mm red jewels to simulate these, but the indoor lighting doesn't make them stand out more than just black zits.


I plan to keep this stationed at El Dorado for a sweeper loco.


Here is the scoop on the 10 ex D&RGW GP7's  This is taken from the soft cover book: 
ROCK ISLAND Diesel Locomotives 1930-1980  by Louis A. Marre

"The second hand GP7's acquired directly and not via CRP exchange were 
ten decidedly decrepit Denver & Rio Grande units. bought with traded F units
in November of 1972.  Exactly half were later traded to Precision National and the 
roster completely, as detailed in the CRP roster.  While still in their original condition
they were nearly useless, as they would not MU with standard Rock units due to
incompatible brake systems"  

Over the years of collecting photos of The Rock Island, I have come across several pictures showing these Geeps in a lashup with other Rock Island units in action.  So there's always the possibility that a few of them might have been modified if needed, before they entered the CRP.  Here are several shots of the GP's in action.

Grouping of like units were common.


Note in these two shots unit #4602 is in a consist, possibly modified at one time.


Monday, November 19, 2012

First Video!

WooHoo!  My first video.

OK, so it's not the best and the quality is kind of crappy, but you have to start somewhere, right?

A friend gave me a little FlipVideo camera to play with and got me setup on YouTube [another first].  So I thought I would see what I could do with it.

So without further ado:


I know one thing, it won't be up for any nominations...


Monday, November 12, 2012

Resurrected Power

Back when Kato first introduced their F units I grabbed a few and worked them over for Rock Island units.  Nothing says Rock Island like a freight with hood units and a covered wagon thrown into the mix!

These units racked up a lot miles when we had the Bend Track modules set up.  But in 1997 when we switched over to DCC, I never had the nerve to attempt to mill and hardwire any decoders in them.  So they set on the shelf in their cases until last year when I contemplated selling them off.

After reading on one of the forums where someone mentioned something about swapping the shells over to the new KATO F3 chassis......the light went off !  A buddy of mine had once mentioned doing this very thing.  So I did a little research and latched onto several newer Kato F's and proceeded with the project.

There is only two minor modifications needed for this: 

1]  The side glass is what holds the shells on to the chassis, you need to keep the new side glass with the new chassis and the old side glass with the old chassis.  Some folks have reported that after swapping the shells, the older shells are a tad bit loose with some up and down play, so far mine seemed to be nice and snug.

2]  On the A units, you'll need to widen the coupler pocket just enough to accept the MTL 2004 coupler box that comes pre-assembled in the MTL 2000-1 coupler kit.  This coupler conversion on these newer Kato A units are a breeze compared the original A units.  You just un-clip the coupler box and it slides right out.  On the original Kato A unit front coupler, you had to un-clip or un-screw the coupler box and then try to wiggle it out of the Pilot hole before the shell could come off.  A real PIA!

When Intermountain came out with their "F" units, they were designed so that you just un-screw the front coupler and it slides right out.  A much nicer design!  So I bought a few of these to replace these older Kato "F" units.  [So now I guess I'll have a few more Covered Wagons to add the fleet in due time].

The rear couplers and the "B" unit couplers make use of the MTL 1128 kit.A fairly simple conversion.

Since I had "welded" some of the side windows over on a couple of the units, I just needed to shave off the little molded protrusions on the glass so they set flush with the inside of the shell.

I picked up two more Digitrax DN163K0B decoders to go along with the one that I had on hand.  Then I got them installed and speed matched.

The last thing I did was to weather the new trucks and fuel tanks to match the shells and Viola!  


Rock Island F7A #120


Rock Island F7B #25


Rock Island F2A #42