Saturday, May 28, 2016

A New Kitchen part 14


I made good progress today despite having a few minor setback this morning.  I got started around 9am this morning gathering up the parts for each cabinet and preparing them for assembly, then getting the tools lined up.

The first cabinet I started with was a drawer stack. 


Then the upper cabinet that goes directly above it.


By lunchtime I had six of the cabinets assembled, stacked and drying. 


After lunch I got the last two cabinet assembled, the two biggest ones.  The sink upper [which is upside down]


And the sink base which is freshly clamped and drying.


I might try to go back over tonight and get the nail strips added in and then flush routered and fill the nail holes so that I can get them sanded and stained on Sunday.  But I don't know, the couch feel pretty good right now...

Jump to A New Kitchen pt 15


Friday, May 27, 2016

A New Kitchen part 13


Well almost 4 months later and I'm finally ready to get back to the cabinets.
I left off the progress after I most of the most of the components ready.  The next step was to get the cabinet boxes cutout and built.

This afternoon I finally found some router time!  Within 2 hours I had all the parts cut out and ready to assemble for the 8 cabinet boxes I need to build.  Damn!  The time saved and the accuracy of CNC routers is incredible, doing this by hand on the table saw would have taken a day or more to get the same results.  

The material list called for 7 sheets of 3/4" C3 Maple plywood, 2 sheets of 3/4" Ash plywood and four sheets of 1/4" Birch plywood for the backs.


After the router was done I ended up with this cart of parts and a few parts stacked up waiting for assembly.


With the 3 day holiday weekend I'm hoping to have all eight cabinets assembled, sanded and ready for stain bu Monday night.  If things go real good I'm gonna try like hell to get the boxes stained and finished as well.

Jump to A New Kitchen pt 14


Thursday, May 12, 2016

"What am I supposed to do now?"


Another project off my list of things to do while I'm waiting for time to get back to my cabinets.

I've been thinking about this for some time now, ever since the first few full blown sessions, before most of the crews had any ideas of what to do after having a throttle thrown in their hands!

Normally I would get a "Deer in the headlight look" or the first question was "What do I do now?"  In the past I've explained how and what each train does and what's expected of the crew and their responsibilities were.  But there is a lot to digest and to retain.  

Several weeks ago I was chatting with Greg in Texas (as he was thinking about a possible trip). During the phone call he asked if I had some sort of rule book or instructions?  I said no, but have been thinking of trying to come up with something.

So after discussing it with a few of the crew, Greg and Steven I sat down and came up with this.  These are printed on 3-7/8"w x 6-7/8"t  pieces of paper.  I picked up some clear plastic ID badges off of eBay and also grabbed a few lanyards with swivel snaps so we didn't need to carry them in hand.

One side has the general Operating Rules of the layout, the other side has the basic instructions for each train.  The instructions only explain what each train does during the session.  I left it up to the crews to decide how the cars are to be switched once they reach the industries.  

As a bonus, the four lanyards matches the colored tabs that each train works with. The Winnfield Turn works with Blue tabs so it's lanyard is blue. The Haskell Turn is green, The W&OV Razorback is Yellow.  I chose Red for the Main Yard operator. The rest will use velcro to keep them near there needed location,   I also added roads logo to each of the instructions.


We'll see how this works on the next session...


Saturday, May 7, 2016

New Tabs


So far the Tabs have been working very well for us, everyone loves them.  It has reduced the amount of paperwork I need to print off per session and now there is no need for the crews to carry anything around but the throttles.

One issue I've been struggling with however are the captive service cars.  One of the problems is that some of those cars do not reach El Dorado yard in time before one of the Turns leaves El Dorado yard.  Likewise the W&OV Razorback makes it to El Dorado and leaves the yard before some of the captive service cars can return to Malvern as well.  

So what we've been doing is to keep a supply of these captive service cars in El Dorado on a track we've designated as the "Pool Track"  Basically there is a day delay before these get switched on to the proper train.  Now when these cars are called for, the El Dorado crew collects them from the Pool Track.  

I also, while staging the layout, have to go through and make sure there are enough of these cars on hand that I can tab for that session.  It can get a bit confusing at times, both for me and the crew as the tabs we are using now are some of the same tabs with the same color and designations for where they are coming from and and going to.

After our last session a month ago, Quin started thinking about how to correct this as we had a few issues with misplaced cars.

What he came up with was to make a new Tab, color it orange for El Dorado and place a "Y" on it.  After further disscusion we decided to go a bit different route.   Since pick up tabs are WHITE, I would keep these new tabs White as well.  Instead of a "Y" I would use the designation "EDY" for El Dorado Yard.

So now when I stage the layout and I start placing the WHITE pickup tabs, I'll place a white tab with "EDY" on the captive service cars that will be picked up.   Now I can tell the crews WHITE tabs are the tabs you pick up from and industry, period, regardless what designation is on the tab. In Malvern this gets kind of confusing as there can be three colors of tabs that need to be picked up: White, Blue and Green!

When the white tabbed cars get to El Dorado, the yard crew can now easily separate the white NB, SB and EDY tabs and not worry about which track to put them on.  Likewise, when I stage the layout I can easily remove just the EDY tabs and can reload the captive service cars with the proper destination tabs for that session.

Clear as MUD?  Hopefully it will be.


In this case, the pulpwood flat is empty and sitting on the Crushmoore pulpwood spur and will ultimately return to the ICG at Ruston, LA.  The Malvern Switcher will pick it up because it's a WHITE tab.  When it reaches Malvern later, the El Dorado yard crew will just place it in the yard along with everything else.  Then when I restage the layout, if needed I'll place a BLUE ICG tab on it so the yard crew can add it to the Winnfield Turn.  If it's not called for, it will just sit at El Dorado without a tab until it's needed in a future session.


We'll see how it works on the next session, which will be shortly I hope...


Thursday, April 28, 2016

ICG woodchip hopper project


Earlier this winter I was browsing eBay for deals when I stumbled across a seller who was listing a slug of the Bluford 70 ton woodchip hoppers.  Most were going for a relatively low price so it caught my attention.

Up to this point I had used mostly the Deluxe Woodchip hoppers for loading at Crushmoore, but these little guys kind of caught my.  They were a little bit older than my era I suppose, but damn they really started to look good.

Bottom line I picked a few..........then a few more.  Before long I had acquired a decent fleet of these little beauties.  The seller would list a good batch each week and I just couldn't help myself and then one week he listed a pair of the Illinois Central black cars that I was able to win.  Upon getting them home. the gears started turning.  "I wonder if I could come up with decals so I could paint a couple in the Orange ICG scheme?"

I did a little searching on Google for pics of them, but came up empty handed.  But by this time I found myself fixated on seeing a couple of these orange hoppers sitting at Crushmoore.   So I started rounding up the supplies.  I found a couple of Undecs, ICG Orange TCP paint and a few decals. Microscale didn't have a whole lot of ICG decals but they did have the round Split Rail logo used on the locos. This meant I didn't have to print white decals and could print the decals on my inkjet printer which made this project a whole lot easier.

Once the supplies had arrived I set about stripping the cars of the details and got them painted.


Next I scanned one of the cars so I could import it into CorelDraw and I could start working on the lettering for the decals I couldn't buy.  But first I returned to Google and searched for a font similar to what the ICG used.  Jackpot! I found a TrueType font that someone had made for the Railroad Sim game.  This just got easier.

After copying the font into windows I could now select it in CorelDraw and start overlaying the lettering.  Even though I could find decals for the ACI label, COTS labels and the Wheel inspection DOT I still created them so I could position everything on the image to see how things would fit.


Now that the sizing was done I copied the images and compressed them into groups to fit on the paper.


Next I ran a couple of test prints on plain paper to see how legible the printing would be.  Satisfied, I grabbed a sheet and made a print and sealed them with a couple of thin coats of Model Masters semi gloss clear. 


The decals laid down really good over a coat of Dull Coat. They were a little bit thicker than Microscale decals, but several coats of Solvaset made them snuggle right down over the details.


The last thing I did to them after getting the decals sealed and rail ready was to tone down the load that Bluford provided with the cars.  I mixed up a little bit of cheap acrylic paint for a wash coat.  I used an Umber, Orange and bit of Antique White and thinned it a bit so it settled down into the chips to bring out the details a bit more and tone down the bright molded color.  I need to experiment with the color a bit more as this might be a little too dark?


Another small project done...


Tuesday, April 26, 2016

Need to shed some light on a subject?


Having operated for several years now on the Little Rock Line, one issue I've had to deal with was not being able to see the couplers, especially the ones that couple very close.
I use fluorescent lighting in the basement so it's pretty bright, but it can still get dang dark between those cars!

I've always had several of the Rix Pix on hand, a very handy little tool.
Several months ago after enjoying a meal at Hu Hot, I grabbed a couple pairs of Chopsticks to see how they would work?  They were a little too big in diameter so I found some cheap skewers at the local Wally World.  


While these worked much better, one thing still bothered me.  Not just trying to get in between some of the closely coupled cars, but actually seeing the black couplers!  

Hmm? I needed something that could light up those little areas, but it had to be small? 

Tonight a package was waiting for me when I got home.


Tuesday, April 19, 2016

Rock Island Rockets.


Now that I have a few more E's and F units in the works and being painted I had a thought to replace my Amtrak set with an actual Rock Island passenger train?

My thought was to do something similar to this, a west bound Cornbelt Rocket in route to Council Bluffs / Omaha while passing the diamonds at Joliet, IL.


This is what the mighty Rocky Mountain Rocket had been reduced to by 1966.
Basically it was nothing more than a glorified mail train with a few baggage cars and coaches thrown on the end behind a few TOFC's.

I grabbed a few cars to see what they might look like and to see if they would fit the sidings or not.


As I was trying to justify a couple of these trains on the layout, I just couldn't get things to sound legit.  The kicker was most mail and package express service ended around 1969-1970.  So after quite a bit of fussing and discussing I opted not to go quite this route.

What I think I will do though is something even more forlorn. I think what most mail trains eventually became were nothing more than solid TOFC's?  At least it sounds more legit and looks a little better.  Since this section of track is Dark Territory, I might even require a crummy on the end?

I think I'll keep the same size of train with 8-10 cars behind a pair or trio of units and assign them as a Red Ball or Rocket Freight.  This will keep it as a priority train. Now as for passenger cars, I will toss on a 1-3 coaches and a converted baggage car with HEP.  This will eliminate the need for home road cars that needed special piping to carry the steam or power to the coaches like they did on the Cornbelt Rocket. Yeah, I could have placed the coaches on the head of the train, but...

By the end, The Cornbelt Rocket was reduced to the Quad Cities Rocket running from Chicago to Rock Island, IL.  and The Rock was running this train for nothing more than a convenience service for the state of Illinois.  With that in mind, I think I will just say that the states of Arkansas and Louisiana required some sort of minimal passenger service to be maintained as well.  So a few tired old coaches were tagged on to the end of the TOFC's and were called good.

This will still require a station stop at El Dorado adding a bit more operations on the layout as well as a possible meet on the line?  A stretch, but it works. 

I think I might also try to pick up a couple of special cars that I can place on the trains from time to time or when I back date the session once in awhile.  

These would be a converted troop train car like this from Skytop Models.


And if I can still find one, a Wheels Of Time 70' HW Arched roof baggage car.


So will the Rockets still defy Discontinuance?  Stay tuned...


Monday, April 4, 2016

Bulkhead flats anyone? Let's load'em up! pt3


The other day while shooting some action shots of W&OV's S2,  I noticed they had several bulkhead flats loaded with plate steel.  I've seen a lot of the coil cars delivered, but not many bulkheads.  So I setup the tripod and got a few shots of them being spotted. 


*****


With the bulkheads on and the decks weathered, I wanted to get the actual cars weathered but found myself heading off on another tangent, loads!

Again this is something I've been wanting to do for a long time but never really had the need to do so until now.  Since we're operating now, one of my crew suggested that we need loads for two reasons, one for aesthetics and the other for operations.  Quin mentioned that with loads the cars would be easier for the El Dorado yard crew to tell where they are going; To the industry or from the industry.  Makes sense.

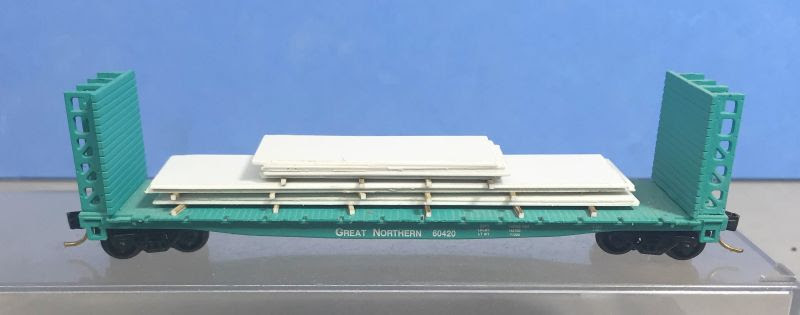
Heavy Metal Ind takes raw steel in and manufactures a lot of different items, mainly pipe and tubing. I have a lot of the coil steel loads but also wanted a variety of raw material.  So I decided my first load would be steel plate loads.   

I started out with .030" styrene sheets and cut out strips measuring a scale 8' x 20', 30', 40' and 45'.
I then glued and stacked them together in piles of no more than 4 high.  between each pile I wanted cribbing or stickers to separate them a bit.  First I grabbed some 1/16" x 1/16" basswood strips but they looked a little too big.


I found some .030" x .030" strip styrene strips and tried them.


These looked to be a bit more proportional.  With the wood stickers I was going to toss them in a jar of old paint thinner to give them more of a look of wood, but I couldn't do this with the styrene.  I didn't want to dig out the airbrush for a couple strips, then the light came on!  What a brown marker? Didn't have one but I found this, an old Floquil Paint Pen!  I think it was Rail Brown?  This worked pretty slick!


When they were dry I used my Chopper II to cut them to length.  I used a Touch -N-flo applicator to glue them to the bottom of each pile with MEK.  I'm really starting to like the this applicator for small pieces like this.  Just a small drop to spot weld them into place and then I can come back with small brush to really lay on the glue.


After getting them painted and the stickers glued in place, I gave them a quick test fit.  I used a mixture of old Polly Scale paints I had laying around and brushed it on.  I used a gray, a black and some beige and mixed until I had a good color that resembled fresh steel. 


Now I needed some strapping to keep the sheets from sliding around.  I grabbed some black thread and glued one end to the bottom with CA glue, let it dry and wrapped the thread around the piles and glued the other end and trimmed them.


Once the strapping was good and dry I used some weathering powders, Old Rust and Soot and gave the tops and edges a light coat and then sealed everything with a good coat of Dull Coat to lock everything in place.


It took me about two nights to get 8 stacks done, which should be enough once I get some other types of steel loads made.


For the next type of loads I'm gonna make some square rod and "I" and "H" beams...