Sunday, November 27, 2016

Initial weathering tests for the Deck Bridge

Now that the deck bridge is assembled, I want to get it painted and weathered before getting the track assembled to it.  At first I wasn't sure of what color I wanted it to be: Silver, Red Oxide or black?

While scouting the net looking for examples I stumbled upon a blog where the owner was building a similar deck bridge and he also covered how he weathered it, Bingo!  It was just what I wanted.

He painted his black and then showed a decent step by step method of weathering it fairly heavy.  He used a product from AK Interactive called "Heavy Chipping Effects"  I've heard of the product, but never looked into it.  After a few hours of surfing I found out it was basically nothing more than using the Hairspray method to resemble chipped and worn paint.

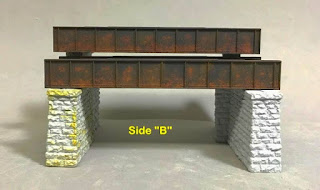
I set about to recreate this using a couple of El Cheapo Atlas plate girder bridges I had on hand.  The first thing I did was to paint them with Floquil Oxide Red, then went back over the ribs with the same Oxide Red but added a bit of Floquil Roof Brown to make a shadow rust color for a little variance of color.


Then I added some Bragdon Rust powders to vary the rust color further, then sealed it with a lacquer Gloss coat.


Next I sprayed on a good heavy coat of some El Cheapo hair spray for a the "Chipping Effect" later.
The next step was to add the salt for the "Salt Weathering technique.


Now I've done both sides of these two bridges, but I was a lot happier with Side "B" so that is what I'm showing, both side "B"'s. I had too much salt on the "A" side.

Once the salt dried, I knocked off the excess that was loose and I brought out the Flat Black acrylic paint and shot a decent coat over the remaining salt and let it dry (I'm showing side "A" because I failed to a shot of side "B" with the paint).


After the black paint dried I used a stiff brush to remove the remaining salt.


With the paint dry I grabbed a medium stiff brush and some water.  Now to see if the Hairspray technique was going to work?  I dipped the brush in the water and brushed it on the areas of the black paint and started lightly scrubbing.  Within a few seconds the black paint started to chip right off!
Look at the previous picture and you can see how much I "chipped off".


YES!  I was heading in the right directions with this!  But it was a little to stark of a contrast so I drug out my new Pan Pastel powders to work them over a bit to see if I could blend things together for a better contrast.

I used three colors, Black, Rust and Dark Brown.  This is what I ended up with.


I think this is what I'm looking for!  I might try to go back and touch up the black on the test bridges with a bit more black powder, or I'll use less brown on the actual bridge.

I got the actual bridge painted and ready for the weathering steps I listed above.


Wish me luck...


Thursday, November 24, 2016

The Deck bridge

Happy Thanksgiving All!

Getting each bridge assembled was a PIA compared to getting them joined!  Don't remember them being that hard to assemble years ago?


Last night I was able to get the three bridges assembled into one 240' span.
I made a simple jig at work that would help me keep the bridge as level and square as possible.  I just cut a chunk of MDF and glued a piece of solid wood even with one edge.


Another piece was used to sandwich the bridges against the first piece.


Once I had all three bridges assembled, I sanded all of them on one side to flatten the top edge of the girders. I also sanded the mating ends with a "True Sander". After testing them for a good fit, I applied liquid cement to both ends and place them in the jig, two at a time. 

I was pretty happy with the results.  Then after letting them sit a bit, I went back and added four little strips of 1/8" x  0.020" styrene over the joints on the inside of the bridge and glued them into place to strengthen the joints.


I started working with the supplied bridge shoes but wasn't real happy with them. There was a lot of flash on them.  It wasn't the easiest to file them so I started looking for a replacement.  I found some on Shapeways, but wasn't going to spend $20 for a small batch of them. Thought about using some C55 rail snipped into 1/8" sections, but wound up finding some tiny Evergreen "H" channels.


While these don't really resemble bridge feet, once I get them painted and weathered, I think they'll look OK.


I think they'll pass?
I still need to work on the girder joints some more, clean things up and get the bridge painted.  Then I can work on the bridge flex and guard rails and finally the piers and abutments.

The last picture will be about the right height of the bridge.  I have a layer of 5/8" ceiling tile then a layer of 1-1/2" white foam to cut out for the river.  I'll need to make some slight adjustments to the piers and abutments so things line up properly.


Saturday, November 12, 2016

The B&B Gang arrives!


This seems to have taken years for them to get here, it's been 8 years come to think of it?

When I first laid out the tracks between El Dorado and Calion, AR I wasn't really sure what I wanted other than a bridge scene.  So I laid the tracks straight hoping some idea would come along.


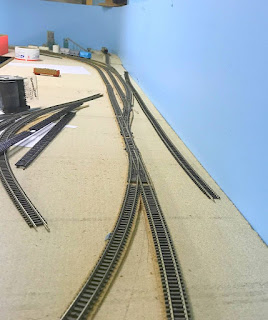
A couple of the crew remarked that I shouldn't have the tracks parallel the benchwork and suggested a slight curve in the main to break things up a bit, sounded good to me.  So what I'm planning is to have the main line curve towards the backdrop at a slight angle as it comes out of the yard in one continuous curve. It'll straighten up and cross the bridge and swing back towards the existing "MQ" siding at Calion.

The second track between the main and the backdrop is the drill track for El Dorado.  Which in my books is an old branch line that has been abandoned but is now used for the drill track.  The bridge was left in and is used for the drill tracks if needed when making longer cuts.  There's no real reason to have left it in other than I wanted it in the scene (see rule #1).

The drill track will follow the curve of the main being just a bit sharper so it doesn't cross the river at the same angle.

I plan to install this Central Valley bridge on the drill track and add at least one or two of the Micro Engineering deck bridges to lengthen the span.


For the main, the plan is to use three of the Micro Engineering deck bridges for a 240' span across the Ouachita River.


Tonight I got started on the first of the three deck bridges!


It's been years since I've built one of these, I hope I remember how to do it? 


Wednesday, November 9, 2016

Slight adjustments at DuBach


After staring at the trackage in Dubach, something just wasn't rubbing me right.  

The rule of thumb is to keep as many turnouts off the main as possible, right? With this plan I had two RH turnouts coming off the main.


I drew up several plans the other night and tried to make something look and sound plausible.  Here is how the tracks changed in Dubach.  The top plan was the original.  


The back story so far......The feed mill originally had two tracks in it's heyday.  As business dwindled, the second track never got used.

Several years ago ARKLA came to town and set up shop just outside of town. Instead of adding a new turnout for ARKLA from the main, the RR decided to refurbish and extend the second siding at the mill.

So I set to work tonight to see what I could come up with?

Above is what I started with and here's what I ended up with.... looking North.


And looking South.


Now to get it wired and I'll be off to work on the river scene between Calion and El Dorado next.


Sunday, November 6, 2016

Ruston Re-visited......again (sigh)


Ever had one of those times where the harder you try, it just gets harder?

I took another look at Ruston again tonight and just decided to try a LH instead of the RH turnout. Well it snapped into place (I had to snip a bit off the rails) and then I just drug the three tracks closer to the fascia and viola!  everything lined up.


The tangent behind the turnout is straight enough to uncouple easily.

Time to move onto the next project...


Saturday, November 5, 2016

Ruston Re-visited


Well the track gang foreman got the pink slip today!

Quin came over for lunch today and took a look at the new trackwork.  After a few minutes of discussion it was decided to modify the tracks at Ruston in a way that was very close to what Greg B. told me to do the other night.  I should have listened to him, but I didn't have a large RH turnout in my stash.  After lunch we picked up a large RU turnout.

I removed all the mainline track from the South turnout at DuBach to just past the diamond at Ruston. Then I pulled up the junction track.  Quin had the idea that if I curved the ICG track further to the South of where the old 45° diamond was and installed a new 60° diamond that it would give the illusion that the ICG was heading off in a Southerly direction away from Dubach if you looked at the whole picture.

So I pulled out the rail nips and cut the mainline a few inches South of the old diamond and began to gently curve the mainline back towards the backdrop.  I did the same with the junction track.  This moved the junction turnout about  3" closer to the backdrop and gave me a much broader curve leading into DuBach. 

The only thing that kind of bugs me is the track takes a sharper curve through the turnout as it takes the diverging leg.  But if you look at the overall area it does have a much better flow through Ruston than it did in the original plan or the more recent arrangement.

Thanks for the input guys!

The original design


The recent design


The latest design


In this shot you can see how far I moved the new 60° diamond South, look at the two black marks just above the new diamond and after the track splice.


Another thing it did was to give me a much broader curve between Dubach and the junction turnout.
Looking at the black marks, you can see where the old main was located at.


Now I just need to re-drop the feeders and file the track joints and I can move the next section.


Friday, November 4, 2016

Track gangs arrive in Ruston and DuBach


Back in the early Spring when I was talking with a one of the crews in El Dorado, they mentioned there may be some trackwork scheduled for Ruston and DuBach, but wasn't for sure where or when.


Long about late September while heading to Winnfield to get my tires changed on the Ol truck, I noticed a bunch of track equipment sitting on one of the junction tracks at Ruston. Evidently they were planning to get started before winter set in?


This past weekend I decided to head back south and see what if anything had changed at Ruston.  Sure enough, they'd been busy!  They had removed both tracks at the junction and replaced them with a single track.  They also re-aligned it and got rid of that kink coming off the ICG.  I was always amazed that nothing ever jumped the track at that point!  I'm sure the crews will be a bit more relaxed when switching Ruston now?


After seeing all this I wondered what if anything had been done in DuBach?   Upon arriving I was shocked at the amount trackwork that had been done there as well! They had lengthened the sidings on the south end!  But the real shocker was, they reinstalled the old spur that had been ripped out years ago when the old feed mill closed down due to a fire?


But now it looks as if someone had bought the old feed mill with plans to reopen it?  Awesome, that means a little more switching action in DuBach!  I might have to hang out down here a little more often?


*****


It's been so long since I've done any track work I had to stop and think about which tools I needed and more importantly, where they were.

I figured I'd start with the easiest project, and that was Ruston.   When I first laid the tracks there in Ruston my plans were to have the ICG drop off cars to be picked up by the Rock and visa versa.  It worked good and it also served another purpose.  It was a simple switch job where any newbie could get their feet wet with operations without feeling overwhelmed.  There were several of my crews who were a little apprehensive about taking the throttle of one of the work trains but readily tried their hands with this.

But as time went on and everybody got the hang of it, it became kind of mundane. Then one day I ran across this video that DJ of (DJtrains) posted on Youtube


Well I applied that to Ruston and came up with this.


This worked great and everyone gave it a thumbs up.
Well that has been 4 sessions ago and during those sessions it was decided that Ruston didn't need two sidings anymore. After several conversations I decided to finally Ruston Jct. to the "To-Do" list. 

The options I toyed with was to leave the two sidings in place and park Maintenance equipment there, leave one in place but have the rails ripped up and leave the ties or rip it out and relay it with a single track, I chose the latter. 
Here's the before and after's.


It's fairly long for a junction track, but we also use it for a temporary storage. Once the Winnfield Turn is done at Ruston, the ICG pulls the cars onto the siding where they will sit until the Turn comes back from Winnfield.  Winnfield has a very small siding so leaving the cars at Ruston is a good option.


With Ruston done for now, it was time to move into DuBach.
DuBach only has three industries, but it has turned out to be one of the more complex towns to switch.  Most of the crews who have switched DuBach have said there never seems to be enough room.  Much like Ruston, we have figured out that since Winnfield has a very short siding, it's easier to switch out the cars in Dubach and then leave the empties on the siding to be picked up when the Winnfield Turn comes back through town heading back to El Dorado.

To make things even more interesting, the Turn needs to switch out ARKLA Dist. on the return trip as it's now a trailing point turnout.  So as one can see, DuBach can be a head scratcher to work.

To compensate for the lack of space, after the first few sessions, I added a small double ended siding next to the backdrop to help alleviate the lack of space.  It helped, but at times there was still a lack of space.  Here it was giving Coy a tough time a few weeks ago.


What I came up with was to extend the two sidings to just past past the RH turnout that leads into ARKLA Dist.  This added almost two feet of storage.


I also decided to add another industry in DuBach.  This track will serve the refurbished feed mill.  LOL, this will probably just add to the issue I tried to solve. 


All I need to do now is to the re-connect the feeder wires and adjust the alignment a bit and finish the siding.

Next on the hit list is The bridge scene between Calion and El Dorado, Fordyce and finally Winnfield.