Monday, December 20, 2021

Engine house tracks pt2

I had a pretty productive weekend.
I worked on the engine facility on and off, 10 min here and 20 minutes there. I got to where I feel this is a presentable stopping point.  I still have a few minor things I want to do yet and I have on order a couple of detail parts then I'll put a wrap on it. Hopefully they'll be here next weekend?

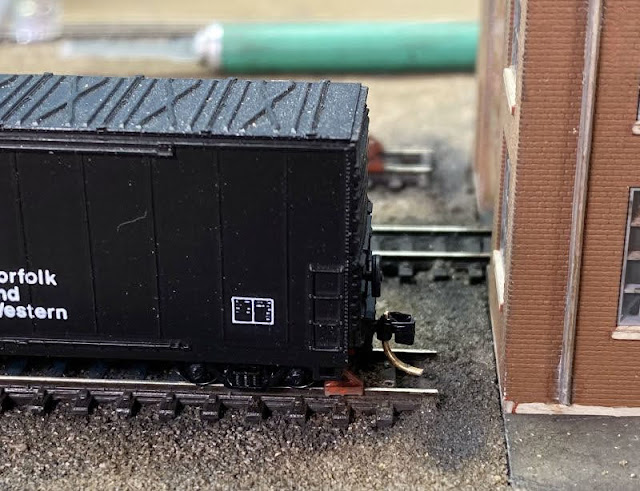
The first thing I did was to adjust the wheel stops. I had a some folks mention that they were too close to the end of the rails and they felt that the couplers would hit the building? They didn't but they were a little close so I moved them. Luckily they popped right. Did I ever tell you I hate CA glue? This time I used a small drop of 5min epoxy.


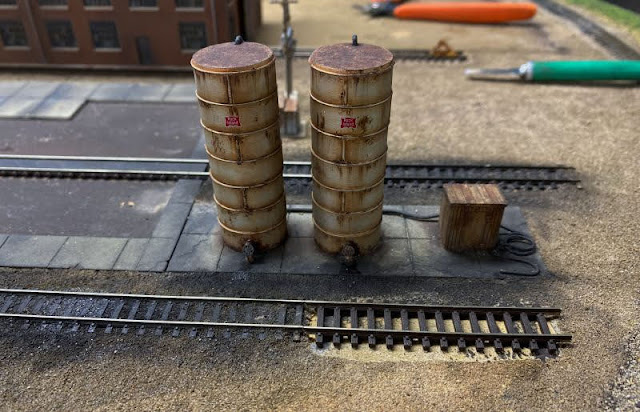
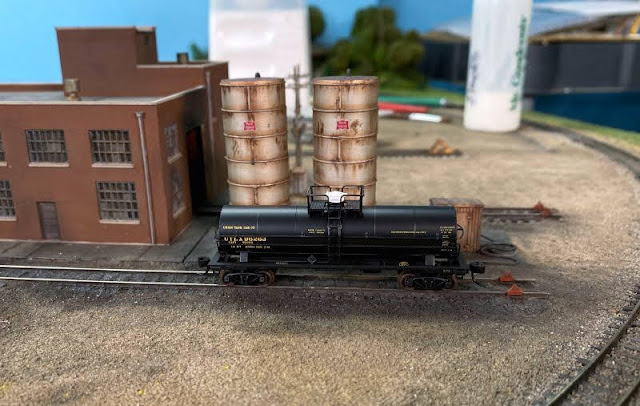
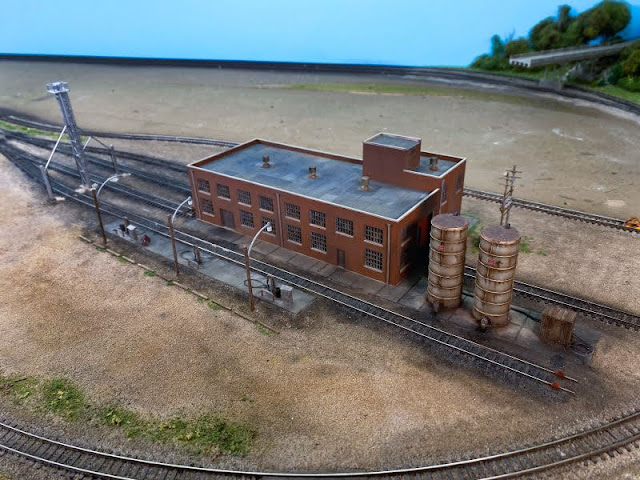
The next thing was the track next to the fuel storage tanks. My original plan was to have them filled by a truck, but after thinking about it, there was no reason not to shove a tank car in there and have it fill the tanks, mainly due because of the size of the storage tanks. But this would mean I'd have to extend the track and I already had the groundcover down. siiigggh....


"Well here's goes nothing!"
I measured how much track I needed and then grabbed my Exacto with a #17 blade and started in. I was quite pleased as it popped right up once I got a small area open. Then I just worked a little at a time until I had enough room for the track to sit in place.


I glued it in place and tried to line it up the best I could. Once it was dry I started to replace the ballast and ground cover and last night I was able to blend it in with the rest of the grimey and oily track. Then I added another coat of thinned gloss Mod Podge and walked away.


With a tank car sitting here, I can still squeeze three GP's on the fueling track.


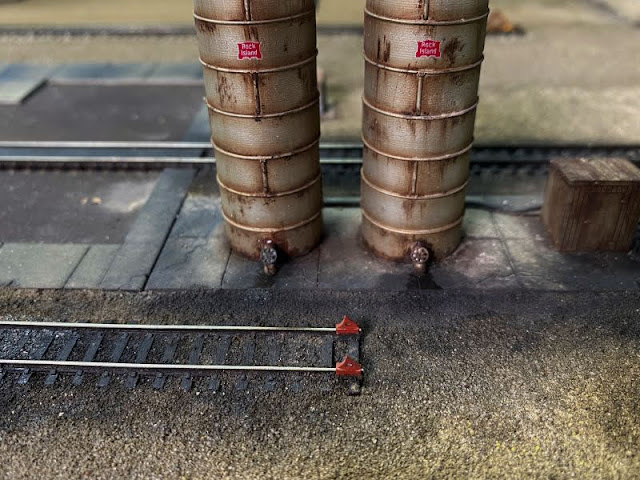
This morning I added some ties in front of the fueling pad and added some weeds around them. I added more ground foam base on the parking lot near the tracks leading into the facility, and along the edge of the parking lot near the mainline as well as around the building.


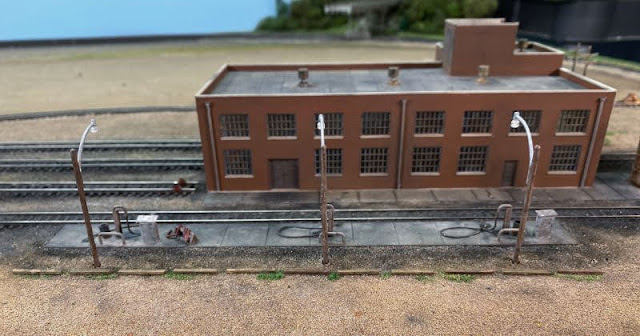
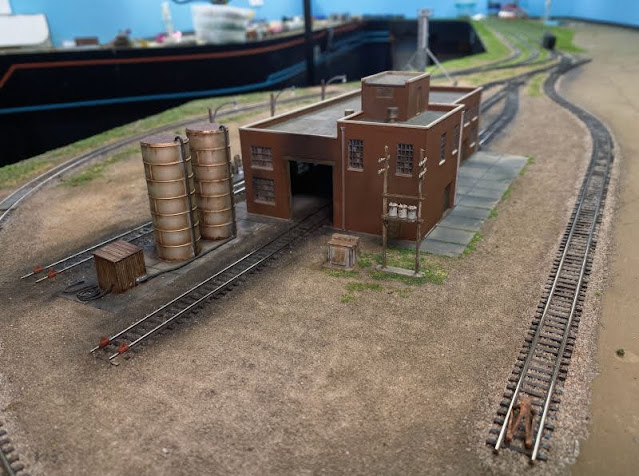
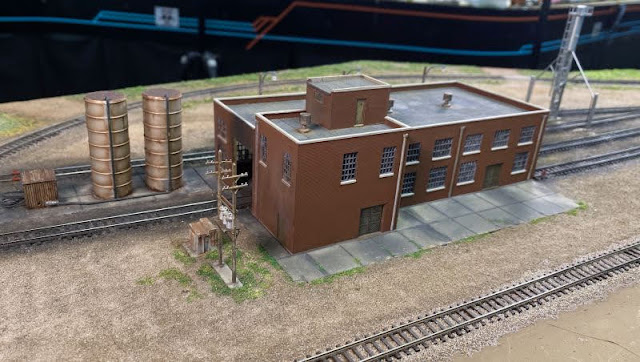
When the parts show up, I'll get the rest of the static grass added to the foam base and start adding some of the weed tufts.  Here's a couple of overview shots of the scene as I left it tonight. I still need to weather the sand tower...


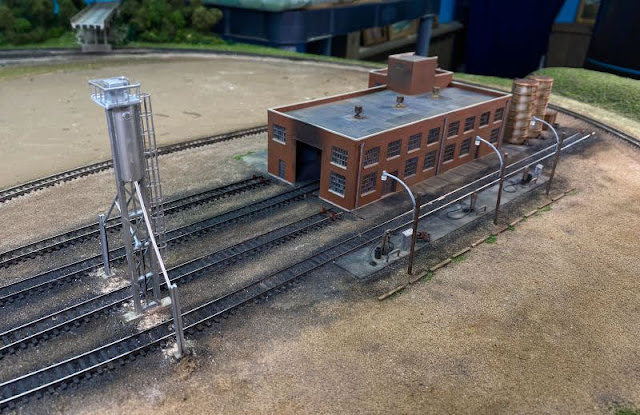
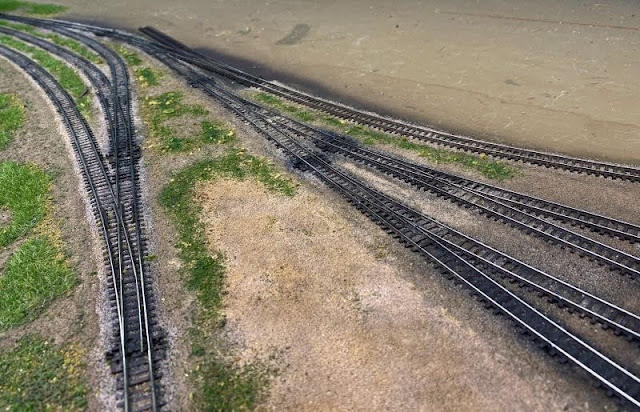
Oh yeah, I also glued down the yard lead to the right of the building, this will be for the industrial tracks once I get them installed.


Thursday, December 16, 2021

Engine house tracks

I've been working on the tracks around the facility lately, mainly weathering them.

I used some black and brown Bragdon powders to make the tracks look dirty and oily.  In a few spots I wanted to make it look wet from fuel spills.  I achieved this by using a small dollop of  glossy Mod Podge and thinned it to a wash and then applied it to the areas where spills would likely be.  It soaked in and when dried it looked wet.  I also did this around some of the piping and hoses.


The other thing I added were some wheel stops.  These were purchased off of Etsy from a guy who makes some N scale 3D printed items.  These are pretty nice little wheel stops.


Tuesday, December 7, 2021

Dead Weeds Update

I sat down tonight to start removing the dead weeds and to my surprise, they popped right off.  I rolled the parchment paper back and used a tweezers to grab an edge and off they came.  I'm not sure if using Elmer's glue over Mod Podge was the trick, but whatever it was it worked.

After staring at them for about 30 minutes while I peeled them, I actually kind of like the darker color.  This color is Mud, the lighter is Dirt.  But I think both will work just fine, once they get installed they should blend right in.

The yellow grass worked and looked much better than the light green did which is what I suspected.  As I said before, these are made from a mix (2:1 ratio) of 4mm & 7mm grass.  I did this because I thought a dead weed might stand out a little better next to the 2mm & 4mm green that I used elsewhere, we'll see what it looks like after I get a few installed. 

As I was placing them in the tote, it looked like I had a bunch of Sandburs!  


The only issue I saw was some of them had flakes of paint that stuck to them, but they come off with a quick flick of a fingernail.

Overall I think these will work just fine.


Sunday, December 5, 2021

Dead weeds

After getting the foundation for the engine facility pretty much finished up I went back to making some weeds, this time I wanted some dead and brown weeds to spark a little contrast with the grass that I covered the yard with.

I looked online for for brown static grass and only found a few places that had it, none of which really had what I thought looked like dead weeds.  On top of that, what I did find one came from the UK and wanted $15 to ship a couple of bags to this side of the pond, the other was stateside, but the shipping was still about the same.

Not long ago I remembered watching a video where a guy was placing some grass tufts and as he peeled them off the paper it looked like he had sprayed them with brown paint?  Sure enough, I went back and watched his video again and he used Vallejo.  I didn't have any of that but I did have some TruColor browns.

The other thing I didn't have was some 4mm & 7mm Yellow Straw grass until it arrived in the mailbox today.  So I figured I'd try painting some Light Green grass that I had on hand until the Yellow Straw arrived.

I started by applying dots of Elmer's glue full strength to some parchment paper.  Then grabbed the three brown TCP colors I had on hand.


The Paint bottles line up with the painted weed tufts.  The Dirt and Mud are Matte and the Lt Brown Stucco is Gloss, so I shot a coat of Dull Coat over them all.

Later after the my Yellow grass arrived I quickly made four sets of tufts and set them aside to dry. This time I only used the Mud & Dirt and sprayed two sheets each.


I think these will look good and will definitely be cheaper to produce, I just hope I can get them to release of the parchment paper.  The first time I tried making tufts, they stuck so tight that it ripped the paper.  At that time I used Mod Podge Flat, so I'm hoping Elmer's isn't as tenacious? 


Wednesday, November 24, 2021

Engine house foundation pt2 and fuel tanks

Last week the light bulb came on about making the foundation around in engine house so I could make it removable after I get the scenery down.  Over the last couple of days I've been able to get it weathered and installed and was able to get a base of scenery down around it.  It worked like a champ!

Once I got it weathered and glued in place it hit that I needed to get another concrete pad installed before adding more ground cover.  I needed to make another pad for the two fuel storage tanks.  So I dug out the styrene and got it going.  While I was at it I worked on the tanks and a small pump house. I also added a strip 0.015" styrene between the rails as part of the floor and weathered it accordingly.

Here is how the engine house foundation turned out.


The fuel tanks are part of an older Walthers kit and the shed was from the Bachmann fuel and sanding kit.  The piping from the shed to the tanks is a section of brass rod, the hose to the right of the pumphouse is 1/32" solder painted grimey black and the large piping at the bottom and front of the tanks are some leftover Plastruct elbows and the valve wheels are extra rolling stock brake wheels.


The tanks and pump house were painted with TruColor Galvanized Metal and sealed.  Then I used two colors of artist oil paints for the overall rusty look and rust spots.  Each color was sealed before applying the next color.  The tops were done the same way except I added a dusting of  rust colored pastel chalks to them while the paint was still wet.  The chalk was made from scraping some Orange and Brown and dash of Black, mixed together and dabbed into the wet paint with a paint brush and then sealed with yet another coat of Dullcoat.

The concrete pads were painted using TruColor Concrete and then sealed with Dullcoat.  Next I used some cheap acrylic paint, Med Gray, Dark Gray and some Sandy Beige. I then took a cosmetic sponge and mixed them together and dabbed them randomly on the concrete pads to give a nice mottled look for the concrete.  After I sealed it with another coat of Dullcoat I attacked them with Pan Pastels for the rust and grimey look.  The seams, cracks and oil stains were highlighted with black Tamiya Panel Line Accent Color.

I ballasted the tracks, then covered everything with the earth mix that I made from mixing Woodland Scenics fine Earth ground foam and a Mocha colored unsanded grout, the same stuff I used for the dirt patches in the weeds throughout the yard.

I still have a lot to do to this scene.  I need to build a power pole and get it installed then I can finish applying the earth mix around the engine house and fueling pad.  Once that's done then I'll come back and start making the ground look oily and greasy around the tracks and the facility. 

In the meantime I manipulated the scene with my photo editor so I could get an idea of how it'll look.


Wednesday, November 17, 2021

Engine house foundation

For months I've been stumped.  I wanted the engine house removable so I clean the tracks and fetch anything that would get derailed.  What's had me stumped was to find a way to scenery up to the foundation, glue it and still allow me to remove the building easily.

Tonight while staring at it I decided it could use some concrete pads in front of some of the doors.  I figured I could use some .040" styrene to simulate the pads and butt them up to the building.  The building base is about the same thickness.  

About that time the light bulb came on!  Why not just add a concrete pad all around the building?   So I marked the shape of the building and cut the styrene to fit the footprint of the building.

Once painted and glued in place I should be able to scenery up to the pad and still be able to easily remove the building.


Tuesday, November 16, 2021

Wood Chip foobies

Since wood chips are hauled on the Little Rock Line, I have collected quite a few of the Bluford Shops converted wood chip cars.  They're just a 3 bay 70 ton open hopper with homemade extensions welded on by most roads.  Bluford has came out with a lot these hoppers and I've had a hard time resisting them.

One version I've always wanted was the newest black scheme that Rock had with the Blue "R".  I've made my own decals for this scheme already but never got around to actually applying any. 

Bluford just released this scheme on their hoppers so I picked up a 3 pack.  I also scored a few other cars and stole their extensions and repainted them black to place on the Rock hoppers.

Rock Island had the 3 bay 70 ton hoppers like this in the black scheme, but not in wood chip service, so they are foobies, but they now have them on the Little Rock!

While I was at it, I also added an extension for another ICG version.


Monday, November 8, 2021

Applying the weeds between the tracks

As I was adding more weedy patches to yard, I thought I'd shoot a quick video.  It's nothing that probably hasn't been seen a 1000 times already on YouTube, but I had my phone handy.

If you look closely you can see a silver machine screw that's bouncing around inside the bottom of the hopper, I added it to help keep the grass from clumping up.  

What you can't see is the window screen that I added to the lid.


The molded plastic screen in the lid of the WS Static King is kind of coarse and when using the 2mm & 4mm grasses they can fall through pretty easily. The piece of screen mesh reduces the flow of the grass and the screw in the hopper helps keep the grass broke up and just gives you a bit better control.


Thursday, November 4, 2021

The weeds be growing

I'm finally getting around to weeding the yard.

I started by applying a layer of fine ground foam made from several colors to serve as a base for the weeds.  This was done mainly to give the weeds a thicker appearance without needing to use a lot of static grass to cover the brown paint.

And yes, eventually I'll get the nails pulled.


Once it was dry, I dabbed on full strength flat Mod Podge with a 1" sponge brush directly to the ground foam base to glue the static grass.  

After getting a stretch down I was happy with the result but, I noticed that it looked to even, almost like a golf course, save for the ragged edges between the weeds and ballast.

BTW, this is 4mm grass made up of four different colors: Dark, Medium & Light green with a pinch of Straw tossed in.


So I grabbed the fine Earth ground foam that I had mixed with the Mocha colored grout and started applying it randomly over the foam base to make patches of bare dirt.  I sprayed it with water and then applied the 50/50 glue to secure it.


Once it was dry, I again applied the Mod Podge with foam brush on the foam base only, carefully avoiding the dirt patches and started applying the static grass again.  After it had set a bit, I vacuumed up the excess grass.  Yeah, this looks better.


After the areas on each side of the yard were covered, I started working down between the tracks in the same manner, but I used a smaller 1/2" foam brush to apply the glue in smaller patches.  The areas to the left are just the ground foam and the areas on the right are after the static grass was applied.


I'll continue doing this until everything is covered.  Then I'll come back and start randomly adding some of the weed tufts that I made as well as in weeds between the ties throughout the yard.  I'm planning to come back and adding some coarse foam over the grass/weeds to help break up the uniform look, my plan is to give it a look of larger leafed weeds? 


Monday, October 18, 2021

Static grass applicator extension

Awhile back when I was contemplating buying or building a static flock box, I contacted a friend of mine: Michael W.  I told him how I had seen videos of modelers who built their own in order to facilitate making their own grass tufts.

He told me instead of buying or building one, that in fact I already had one.  He explained that my Woodland Scenics static grass applicator should work just fine with some minor modifications.  Basically I just needed needed add some wire extensions to the unit and I would be golden.  He was right.

However after trying it out, I was just not satisfied with the results, not because of the modifications I made, but because I had troubles getting the tufts to release from the wax paper or any other type of paper I tried, so I put things on the back burner.  Then after doing a little more research via YouTube, I ran across a guy who made his tufts by applying the glue dots directly to a non-stick cookie tray, which I posted about and this worked so much better.

http- Static grass tufts and weedy tracks  

Now I was ready to start getting some grass and weeds applied to the yard and between the rails and ties.  I loaded up the WS Static King and got after it.  The first thing i realized is the WS hopper is quite large and wanted a little more control of the grass as it comes out of the 2"+ diameter hopper.

My first try was to make a paper disc insert and slice off one edge or cut a smaller diameter hole out of the center of the paper disc.  This worked, but not as well as I would've liked it to.  So I sat down at the computer and started surfing with Google to take another look at the PECO or WWS Micro grass applicator again.

The hopper and handle is only about an 1" diameter and I felt that this smaller diameter would give me better control of the grass coming from the hopper.  The problem was with the WS unit being 2"+ in diameter, I wound up covering an area several tracks wide.  Then I'd come back with a vacuum and suck it all up from all those tracks, not to mention it laid the grass on thicker and heavier than I wanted and wound up pusing more grass than I needed.

But there were two issues I had with the micro applicator 1) The price of the unit and 2) It was powered with a 9v batteries and I loath batteries as they are usually dead when you need them.  So I figured that I could find a 9vdc, 1-3amp wall wart that I could connect to the unit so it was AC powered and I wouldn't have to rely on the batteries.

Another call was placed to Michael to confirm my idea and he told me NOT to buy anything!  Again he said I had everything I needed except a few small parts.  What he told me to do was to make my own Micro applicator by using my WS Static King for the power supply.  I needed to find a suitable tube and some screen and a couple of longer wires and make it out of.

After brainstorming with Michael on the phone, I bounced it around in my head overnight, this is what I came up with.

The applicator is made from a 7"- 8" length of 1"ID PVC tube.  A threaded adaptor.  A small circle of screen from an old kitchen sieve.  Two sections of 18ga wire and three alligator clips.

The screen was cut to the inside diameter of the threaded adaptor.  I drilled a hole in the side of the adaptor to insert the wire.  Since the screen was aluminum or stainless steel I couldn't solder it to the wire.  So I tinned the tip of the red wire to thicken it a bit, stuck it through the hole, slid the screen down into the adaptor so that it laid over the tip of the wire.  Once I had it set in place, I inserted the PVC tube into the adaptor and tapped it snuggly down onto the screen so it made good contact with the wire.  I tapped it with a hammer to set it, but did not glue it so I could make changed if needed.  Then i cut off most of the threading.  I added one red alligator clip to the screen wire and made a black wire extension as well.


I still need to make some minor adjustments to the unit but overall it works quite well.  It has more than enough juice to work properly, It's small enough that I have more control of the grass so it doesn't several at once, and it's easy to load the hopper.  Once thing to mention about the PECO/WWS version, the hoope is a very small cap and can only hold about a cubic inch of material at one time, so you wind up adding more quite often if you have a lot to cover.

Here's how it connects to the WS Static King.  Michael told me to attach a small wire to the little screw that holds the brass crown in the hopper back when he told me how to make the flock box. 


The red wire of the PVC tube attaches to the small wire in the hopper and the black extension wire clips to the black lead coming from the WS Static King.


I still need to make some adjustment to the tube, mainly something to hold the wire in place.  I have also got a couple of zaps from it as well, which I think it came from where the red wire enters the tube and was jumping back to me?  Maybe need to wrap some tape around the unit to help insulate me?  It would be nice to find some large diameter heat shrink tubing.

Overall I think this is a winner and want to thank Michael for his insight and help.

I have played with it a bit and will be posting some pictures of the results when I next get a chance.