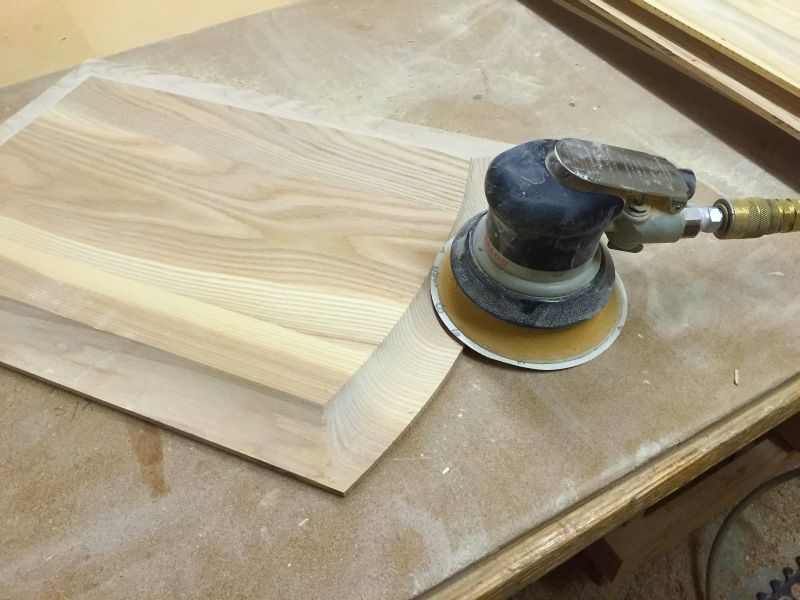
With all the panels shaped and raised, it's time to sand the panels.
I use a pneumatic Dynabrade random orbital sander for this job. The pad is flexible enough to mold to the convexed shape. #180 paper makes quick work of this job. I sand both the shaped portion and the back of the panel. The front will get smoothed up when I run the doors through the Wide Belt sander later.
Once all the panels have been sanded, I stained the outer edges of each panel. Doing this will keep from having an unstained lined appear months later when the panels expand or contract with the seasons.
All stained and stacked up in an ascending order ready to be mated up with the stiles and rails.
Before mating them with the panels, I insert a 5/16" x 5/16" x 1" Panel Buddy. These are made of fairly stiff, but flexible foam rubber and is used to keep the panel centered in the frame. It also allows some expansion and contraction of the panel. Some guys do not use these and only make the panels about a 1/16" to 1/8" less than needed. Buy my OCD tells me to use them as not only will keep the panels centered in the frames, it also keeps them from rattling inside the frame.
I guess it's a personal choice...
A completed frame ready to match to the panel.
A short while later I have them all mated and stacked, ready to assemble.
I grab the first two doors, a pair, and lay out the pieces prior to gluing.
Assembled, ready to go to the clamp
The first door is done.
30 minutes later I have all 16 doors on the cart, drying.
Next up, running them through the Wide Belt sander...
Tonight I found time to get the panels for the doors worked on. First thing to be done was to mark and cut the arch on the top of the panel.
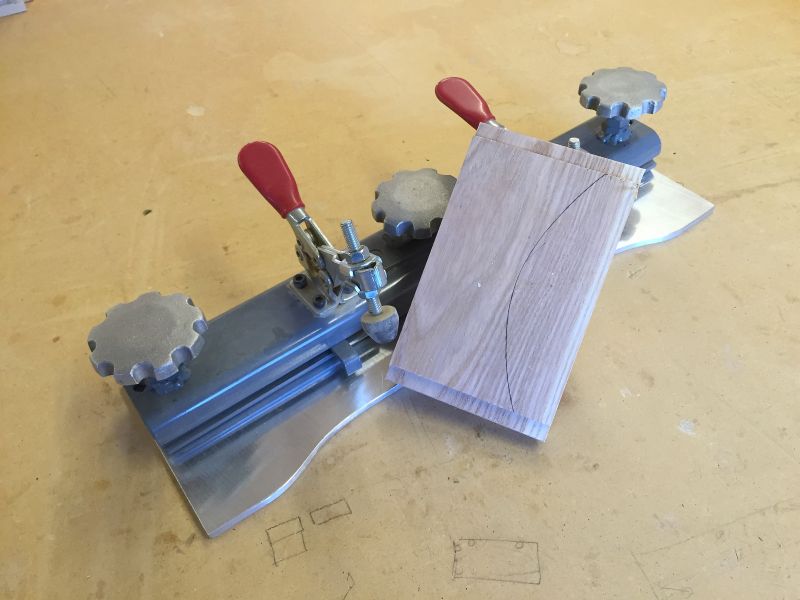
This was done much the same way the arch was cut into the top rail, by use of another jig fixture but with opposite patterns.
First I inserted the pattern and then positioned one end of the panel to the edge of the pattern.
Second, I strike a pencil line to mark the pattern shape on the panel.
Third, I cut the panel on the bandsaw as close to the line as possible. It doesn't have to be perfect as the panel will extend into the groove in the rail and will never be seen. The pattern will ride on another bearing to give a nice straight line.
Once all the panels have been cut, I clamped them into the jig with the matching pattern and now it's off to the shaper.
Again you can see the silver bearing below the panel cutter, this is what the pattern will ride on while making the shape. The cutter head is a three wing cutter, about 4" in diameter. You can also see an aluminum plate above the cutter. This is for safety and it helps keep the chips from flying upwards.
With all of the arches raised on the shaper, I replaced the shaper fence and set up the power feeder to do the remaining three sides of the panels, as well as the three lower doors that are square.
All the panels are now done and piled on the cart ready to be sanded, then assembled.
The last thing to do was to test fit a couple of the doors to make sure everything was shaped properly.
I made good use of the last day of the last four day holiday weekend of 2015.
This morning I was able to get the door panels out of the clamps and planed down to 5/8" thick, followed with a few trips through the widebelt sander using a 180 grit belt to smooth the panels up.
Using the sliding table attachment on the tablesaw, I squared one end and trimmed the other end to length then got them piled back on the cart. For now that's as far as I can go with the panels until I get the arches laid out on the upper door rails.
The next step was to get the door frames milled with the shapers for the cope and stick profiles. The vertical stiles are on the right of the cart and the horizontal rails are on the left side.
To do this I have two shapers set up, one for the cope profile and one for the stick profile. The cope is done on the ends of the rail using a sled with a hand clamp. The pieces are inserted in the sled face down.
Next I ran the Sticking and the bottom rails [the top rails will be arched with a separate operation] through the second shaper to cut the sticking profile.
On this shaper I have a power feeder attached as I run the pieces face down with the direction of the cutter head. This is the opposite direction than one normally would run through a shaper, it's called "Climb Cutting".
While this image shows the operation using a hand router, it's the same process when using a table shaper.
This is the reason for the power feeder, it keeps the pieces held securely to the table and against the fence, otherwise the cutter head would grab the pieces and shoot them out of your hands.
Why do I do it this way you ask?
Climb cutting allows one to shape the material without getting any "Blowouts or Tearing of the grain". With a climb cut, you don't get the splintering that you often get with a bit or shaper head fed counter-clockwise.
Climb cutting also has a burnishing effect on the wood, leaving an exceptionally smooth routed surface. I also hate having to make pieces over due to the blowouts or tearing.
This is what you get after the parts have been run through both shapers, I nice snug fitting joint.
Now that I had the stiles and bottom rails shaped for the cope and sticking, arching the the top rail was the next step. Using patterns and a pattern jig I placed the smallest top rail in the jig and sized it up with the appropriate sized pattern.
Marked it with a pencil
Then cut it on the bandsaw to get the majority of the material removed.
I repeated this step for all 13 pieces and took them over to the shaper that I used to cut the sticking profiles. For this operation I removed the entire shaper fence leaving just the spindle showing with the cutter head.
Just above the cutter head you can see a large silver bearing, this bearing rides on the pattern acting like the fence. This allowed me to shape a curved piece of material with the sticking profile.
When I got the first rail shaped, I assembled a test frame to make sure things were fitting properly.
All the frame parts restacked on the cart, ready to assemble once I get the panels done.
With this step finished, I can now grab the corresponding patterns for the door panels and using a similar method, I can start arching the tops of the panels to match the top rails.
With today being a holiday where not much happens (other than recovering from a hangover which I did not because I don't drink), I was able to take advantage of the free day and made some good progress on the doors and drawer fronts for my kitchen.
This morning I double checked my parts list against the actual frames and started ripping up the material.
After getting the material ripped and milled, I got them chopped up on the Up Cut saw, then stacked them on the cart.
But before I can run them through the shapers for the Cope and Stick profiles, I need to cut the Arch in the 4-1/4" upper rails.
Next I started cutting up the panels for the doors. I got the pieces cut for length, then matched them up for an oversized width and marked them.
Next step was to joint the edges before gluing them up.
Once jointed, good old bar clamps, lots of bar clamps were used to glue the panels together.
Done!!! I'll let these dry thoroughly overnight. A good day of progress.
The face frames are now done and behind me. I won't touch them now until I have the cabinet boxes built. So the next thing is to work on building the dovetail drawers.
This is a pretty simple process, most of it is automated with machinery, so I made a few videos to explain it better.
I order the drawer stock in, pre-milled to the finished sizes: 4", 6" and 8" tall x 5/8" thick. A 1/4" x 1/4" groove for the drawer bottom is also milled into the stock. All I need to do is to set the Tiger Stop for the proper length, and feed the stock through the Up Cut saw. Within a few minutes I have a pile of drawer parts ready to Dovetail.
My Dovetailer is a manual machine with air hold downs, buts it's waaaaaaay faster than using a router and jig from Porter Cable. With this I can load all four pieces of the drawer at once and route two of the four joints in one pass, then I flip the parts and do it again. In about 20 seconds all four parts have been machined.
The drawer Sides are loaded in the front sticking up,
The drawer Fronts & Backs are slide in from the rear of the machine.
Thanks to Quin and his GoPro, here it is action...
About an hour later, I wound up with a pile of drawer parts that are ready to be assembled.
I next sand any fuzz off the dovetail pockets and smooth the inside surface of the drawers parts with an orbital sander before assembly. The assembly is fairly straight forward: place glue in the pockets and beat the parts together.
Before the glue dries I then place the drawer into a pneumatic drawer clamp that presses the parts together and squares the boxes up. While the first one is drying a bit, I assemble the next one and then remove the first box.
Within about 20 minutes I have a stack of 15 drawers and 1 roll-out.
I let the boxes dry overnight and the next morning I use a 3"x 24" belt sander to smooth up the joints.
Once smoothed up, I use an air nozzle to clean out the joints and skim a bit of putty to fill in any chipouts or open joints. After the putty dries, using a pneumatic random orbital sander I remove the bulk of the putty and then route the edges with an 1/8" round over bit to ease the edges and then polish them up with #180 grit paper.
Now they're ready to finish.
Letting them dry completely overnight, the next job is to cut the drawer bottoms and slide them into the boxes and secure them with screws. For now they are done until I get the drawer slides, then I can install the release clips.
The sawdust began to fly the other night after getting the plans and the lists verified. The first project was to get the face frame material ripped up.
After sorting through the Ash lumber I ripped all the material needed for the face frames.
Next, I ran them through the planer to thin them down to a thickness of 3/4".
Once the planning was done I got all the pieces cut to length on the Up Cut saw.
Up next was to get the frames laid out and get the pockets routed in them for the pocket screws.
Pocket screws are used to assemble the frames, a quick and easy process. The machine has two routers, one will route the pockets into the back of the frames and the second router drills a pilot hole for the screws.
After the pockets are cut into the backside of the frames, I then use a clamping table to hold them into place whiles securing them with glue and screws. It's a 4' x 8' table that has an arm on rollers with four pneumatic pressure clamps that hold the frame in place while driving the screws in.
This will be the upper frame over the sink.
This one is the sink base cabinet
One thing I like to do with the sink doors is called an Inverted Frame. This is done by building a second frame and building it back 2" so that it's inverted into the cabinet. This does a couple of things.
1) It gives you a little space so your knees are not knocking the doors when standing at the sink.
2) It also allows some airflow into the sink cabinet to allow any moisture to escape.
This is something my father always did to his cabinets. While it's nothing unique, I always look upon it as a Trade Mark of his cabinets. Not many cabinet makers in our town did this to their cabinets. So I wanted to add this to my cabinets and carry on the tradition.
Face Frames are a pretty simple step, after several hours I had all 9 frames cut, milled and assembled.