Another session is upon us and with it brings a new operation that I've seen posted on Youtube by DJsTrains as seen on the previous post.
He explains how a simple interchange works with no run around. It looked simple enough and I got to thinking that I should be able to apply it to the ICG interchange at Ruston, LA. Right now I have two sidings there and the simplest thing to do for now until I see if it will work was to place a blue flag [simply a piece of blue tape] on one of the sidings and treat it like it was out of commission for now.
I gathered some cars and staged them to simulate the ICG and the Winnfield Local. With not much work or time, it played out pretty slick. So I think we'll give a it a go on this session. As mentioned before, this will make the two crews have to work together as opposed to having the ICG drop it's cars off at the beginning and then have the Winnfield local stop by and grab them on it's way back from Winnfield. Kind of excited to see how well this works within the session and how much confusion it'll bring.
Another thing I'm working on is a timetable. For now I'm not wanting to get overly involved with this and have to use a dedicated fast clock and a lot of extra paperwork. I'm planning to use this more so just to space out the traffic so we don't get things too jammed up. I only have one siding long enough to allow any of the run through trains to meet and that is at El Dorado. In past sessions we've had occasions where two of the longest trains have met in El Dorado and one of the trains just barely fit in the siding. While this can bring a little extra excitement and challenge to a session, it also takes time away from the session. For now I want things to flow before setting up this kind of a bottle neck in the sessions.
In ops session #6, the MKT coal drag met the SBD rack train at El Dorado. The coal drag was too long for the siding and we actually had to have both trains back out of town and swap tracks as the coal drag was too long for the siding. Even after changing tracks, it barely fit!
That's a little too close for comfort!
Well this got me to thinking that I needed to make up some sort of timetable or schedule to avoid this the next time. I'm working on this right now, but it's kind of slow going as I really have no idea of the best way to go about it. So it's trail and error.
I did download a Fast Clock app for my iPhone and I adjusted it to a setting of 3:1. Wanting to see how much time it would take to get from the main yard to El Dorado and back, including swapping out cars on the A/D tracks. Doug and I ran two of the four manifest that feeds El Dorado, wanting to keep the speed somewhat prototypical we set the throttle at 18%-20% and measured the train with my Accutrack tunnel. It was showing them traveling around 20mph. At this speed it took approxamtley 12 fast minutes to reach El Dorado, another 20 minutes to set out and pick up the cars on the A/D tracks, then another 11 minutes or so to return to the main yard.
After discussing this we decided to allow about 45 minutes to an hour for each train. This should give enough time to for any set backs each train may encounter. Another reason for wanting to spread things out is on the past sessions we normally started at 7pm and it would take about three hours to complete each session which would end around 10 to 10:30 pm. Some of the crews would have to bail before the session was over.
Talking to Steven, he told me that they run from 10am to Noon, take a lunch break and then would continue around 1pm for another couple of hours. So this time I plan to to start at 5pm and run till 9 or 9:30. It will also hopefully keep us from feeling rushed during the session. Setting the clock to a 3:1 ratio will give us a 12 hour fast session or the equivalent of 4 hours real time. The extra hour should relax things a bit, I hope.
In the future we might talk about the chances of running a day session instead of a evening session.
I've got the tracks cleaned, the paperwork printed and the manifest are staged as of last night. I need to get a few of the cars positioned on the layout, run the trains to see if they need their wheels cleaned and make sure their running OK. Then just tidy up the basement and we should be ready.
Once this session is over I have a bunch of outside work to complete now that Spring is here. Once I get the work done, I plan to finish up some projects on the work bench so I can continue working on the buildings and scenery in Malvern. I also have some problems with the DCC system that I need to get to the bottom of.
It's been a few months since I've had enough time to work on the layout. I've actually had enough stuff to keep me away from it since the last post in let's see........Wow almost two months!
No wonder Steven has been after me to get something written for the blog! LOL
Around the time of the last post I had just finished weathering up about 14 cars that I took to our local train show in Feb. I've been selling some of them on eBay to raise a few funds, get some more practice and try to thin the herd a bit.
Along with the weathering I've also been doing some repair for a couple of guys, as well as trying to get decal work done for another friend. That has been a challenge as the decals are not cooperating very well. They first were crumbling as they came off the sheet, so I tried giving them a coat of Micro Scale Liquid Decal Film, but even that didn't help. So we bought some new decal sets and while those are not crumbling, I'm having a hell of a time trying to get them to come off the paper! It's like they're glued to the paper.
After the show in February, several of us decided to head down a road that I'm not sure where it will lead us. Several of us got our heads together and decided to get some N scale Free-moN modules under construction and see if we could draw some interest in getting a group started up. While we had a great time with our Bend Track System for years, we decided to take a break and never really got back into the swing of things with the Bend Track modules. After that life kind of changed for several of the members and the modules kind of just faded away and then later I got started with the layout.
I've built four modules that will make up a 14' siding, Quin is planning to build at least one maybe two, and Mark, well Mark is well ahead of the game! He had about 6 modules built already and is planning several more. One of which is an End Loop, which is think is about done. LOL I just got a text from him saying it's done! What timing Mark.
One of the main reasons for getting some Free-moN mods built was
1) Mark has been wanting to start a group up here locally.
2) Quin and I have talked about building a smaller portable layout that we could take to the shows, much like Nscaleaddict has done with his Orin lines and Maria's Pass layouts. Quin was kind of a late comer to our group when we were playing with the modules and he never got around to getting one built.
3) There also needs to be a much better N scale display at the local train if that club wants to be able to draw in more N Scalers to not only their club, but N Scalers into the scale and the hobby itself. What they have for a modular setup is well, let's just say...... there could be a little more effort involved from a couple of their members.
Around December my friend Steven [the one who owns The Rock Island Ottawa Sands in N scale] asked me about renumbering some of his huge fleet of 2 bay sand hoppers. I told him I could help with that as I've made a few decals and that it shouldn't be too hard. Not really knowing what he had in mind I told him to send me over a list of numbers that he wanted and I would see what I could do for a fellow Rock Island Modeler.
Well the list arrived in a few day and WOW! he only wanted 75 sets of numbers! I was thinking maybe twenty or so, but he must have his heart set on renumbering his entire fleet! But it's not a big deal, with the right software and knowing how to use it made it a snap. I actually got a proof sheet made up and shot over to him last night.
So on top of the above listed things I'm doing that's keeping me from the layout, I'm now making a few decals for Steven. This morning we got talking about track plans and operations again, both on his layout and mine. We chatted about changing a few tracks on his layout and then I seen a video for a very simple interchange and thought it might work on mine. In doing so Steven told me that if I went through the small change that it would be a good thing to add to my blog, and that it would nice to see an update again since it's been so long.
Earlier this week he mentioned about the lack of updates to my blog and then he wants me to take time and make him decals! If that don't beat all? But it's all good, I'm glad to help. I just thought I would rib him a little. LOL!
As Steven would say "Speaking of Donuts" I mentioned a bit ago about some changes that I might make to the layout. It's nothing major, just a slight change in the tracks at Ruston, LA. Right now I have two sidings for the interchange. While this makes it easy to drop off and pick up cars, I watched a video that DJ made about Simple Interchanges. I got to thinking how this could add some interest to the interchange
between the Rock Island and ICG crews at Ruston.
Right now the way I work it
is at the beginning of a session I have a crew bring out the cars from
the ICG, set them off on one of the two sidings for the Winnfield local and take back what has
been set out from the last session. Then when the Winnfield local makes
it's run, it stops by and drops off any cars that are needed and picks up
what's there. Simple enough. But after watching his video I thought
how cool it would be to have the two crews work together to swap out the cars! Probably not the most efficient way of doing it but might add some head scratching and interest. See what you think. [Posted with permission]
I have another session scheduled for the 26th of April and I think I will give this a try. Instead of ripping up the track I might put a couple of thumb tacks on each end of one siding so as to make it inoperable for that session and see how it works out.
Then I have a few more things to get off the work bench, but after that I want to get back after the new building for Olin-Chlor.
In the mean time, Steven is about ready to have his inaugural run of his layout on Saturday March 29th! He got an itch to tear it up last summer and try something different and has been working on it feverishly all winter getting it rebuilt.
Take a moment and check it out his blog. It all started with this post.
Let's wish him luck!
Go Steven, High Greens.
One last note, some of you may have seen a new gadget on the top of the right hand column. I'm going to try and set up a "For Sale" page so I can list a bunch of my extra stuff as well as items from a huge estate collection from a good friend who passed away a few years ago. I hope to get it set up and ready in the next few months, unless Steven needs some more decals. ;-) ....and I even gave his blog a free plug.
Since Mother Nature decided to give us break today, 54° and sunny, I decided to swing through Malvern and see if anything was new on my way home from work?
As I pulled into town I noticed that the Razorback must be out on the road as the only thing sitting at the house were the new ALCo's, which looked to be untouched since the last time I visited. So I jumped in the truck and headed out of town to see if I could catch up with it. As usual, the engine house was deserted, so it was up to the scanner and I to locate the afternoon train by ourselves.
On the way out of town I did see that progress was being made at the Olin-Chlor plant.
*****
After playing with the new building one evening I decided it was a bit too big and was crowding the tracks more than I liked. I got the lower section cut back about an 1" and refitted with a new front, this gave me enough room where a maintenance truck could fit between the building and the loading tracks.
On the Crushmoore building I used Evergreen Corrugated siding, but this time I wanted to try something different that I've read about elsewhere. Others have posted on some of their blogs and forums that instead of buying the expensive sheet styrene from Evergreen or Plastruct, they have used the cheap plastic "For Sale" signs.
While at Menards one day I picked a 16" x 20" "For Sale" sign for $1.69 and another tube of glue to stick it to the building with.
The sign was pretty thin, probably around .020" or so, but it should work since this building would look more like a poured concrete structure when done.
I laid the sign on the workbench, the building on the sign and then traced the sides of the building. Being so thin I was able to cut the sides out with a good pair of scissors easy enough. I left the pieces larger than the building so I could trim it to fit with a utility knife after I got them stuck in place.
Within a few minutes I had all the pieces cut to size and they were ready to stick.
I'm happy to report that cutting, covering and trimming this building only took about 30 minutes!
I still need to go back and fuse some of the corners with the liquid glue and then file them smooth a s well the top edges.
"Hey wait a minute? Only 30 minutes? Crushmoore took almost a week to get all the sides covered and glued into place." What gives?
When I was picking up the glue and sign at Menards, I stumbled across some different type of glue, it was a spray adhesive made by Loctite!
Upon closer inspection of this new wonder glue, I read where it's Re-positionable and Permanent! You spray on a thin even coat, wait a few seconds for it to flash out, then you have 5-15 minutes to reposition your piece!!! Just what I was worried about when I was first working on Crushmoore.
After applying the first side of the building, I gently grabbed one corner and pulled, it came right off without disturbing the layer of glue! COOL! I pushed and prodded the first piece back into place and applied pressure for a good seat. I grabbed the next piece and got it stuck into place, on and on I went until I had all the sides covered. In some cases I had to take my sharp utility knife and trimmed some of the corners flush before applying the adjacent piece.
The only thing I did different with this building, due to the spray, was to tape off any areas of newly stuck plastic sides so I could keep them clear of any over spray. The next night all the pieces were stuck nice and tight.
The next job is to start adding the trim around the roof and then apply the vertical ribbing.
Before I get after the new building for Olin-Chlor, I wanted to play with some weathering again. I have a ton of older cars that I want to thin out and instead of listing them on eBay as stock cars I thought I would try dolling them up a bit and see if I could sell them to scare up some extra cash for the new projects in Malvern as well as get a little bit of practice in. These were all done using same technique that I used for the other locos that I've done before in this post. But this time I left a little more of the brown paint on so as to look rustier and more abused. One thing I'm looking for is a way to weather my fleet with a simple and fairly quick process that has good results. Like most anything with modeling, it takes time.
In the second batch I did the same thing but this time I wanted to add a few scratches, something I didn't do with the first round. I also took some side by side, before and after pics since I had duplicate cars to do this with. This give a real good sense of how much of a change takes place.
The more I work with oils the more I like them. They are very forgiving in that if you don't like what you've done you can simply wipe it off with a dry "Q" tip and try again. The only drawback to oils is it takes awhile for the paint layer to dry, but this also is good in that you have plenty of time to work with it. I normally leave each color coat to dry at least for 24 hours if not 48 hours before sealing each layer with a coat of Dull Coat.
While this may not be the best or fastest way to weather, it's definitely easy. Each color is wiped on and then wiped off, each time leaving a little bit more of each color so that it builds up layers giving it a deeper, richer color.
I can get 5-7 cars done in about week. Even with a large fleet, doing a few at a time will still take awhile. But as they say, the best way to eat an elephant is one bite at a time.
The last time I made a trip to Malvern was to see the new ALCo's. More chatter last week on the squawk box sounded like a few more ALCo's might be en-route. So I grabbed the camera and headed out.
Unfortunately, there wasn't a sole around the engine house to squeeze any more info out of. The same power that I seen last time was still tucked away and looked ready for the next assignment. But there was something new on the tracks behind them! It looked like a couple more RS11's and another unit which was just peeking out of the house.
Don't know if these are for more power or if they will be donors for the original three?
With nothing happening at the house I decided to drive into town and grab some foamer snacks [that would be some Nuclear Burritos and Chocolate milk] from the local Kwiky Mart a few blocks away.
As I rounded the corner I noticed that Olin-Chlor looked rather torn up. Upon closer inspection I could see they were breaking new ground for what looked like some kind of expansion!
*******
The last time I actually worked on the layout was the first of November. During the holidays I pretty much suspended all work on the layout and at Malvern. I got kind of sidetracked with a weathering project for a friend and while I had the stuff out I decided to weather up a few cars and see if I could sell them on eBay before Christmas.
Having some good luck with the first round, I opted to get a few more done while everything was still on the bench. During this process I remembered the announcement of the KATO Rock Island F2's! Damn! Sure am glad I was able to sell some of those weathered cars, might have to do a few more to keep Mr. Wallet safe?
Upon hearing this my thoughts began to drift back to my earlier modeling days when I first fell in love with The Rock! One of the first posters I got was a Howard Fogg poster that had a trio of Rock Island FA's splitting a pair of signals.
This got me thinking again about back dating the motive power from time to time or to just run a good mix of units. The biggest obstacle that I would need to cross would be getting the LifeLike FA's chipped. These are the newer LifeLike units with a split frame chassis, the FA1 & FB1.
After talking to several folks about getting this project underway. Two guys, one of which was Brad Meyers of N scale DCC Decoder Installs suggested looking into using one of Aztec pre-milled frames.
Long story short, this was the road that I took. I stripped one of my units down as per instructions and sent it to Aztec who promptly returned a milled frame within a few days. A couple of days later a Digitrax DZ125 arrived and was promptly installed. Success! Now with that done I only need to see if I can get them to run halfway close to the same speeds as the rest of my fleet, otherwise I will have to segregate them and they'll have to run by themselves.
So, with all that out of the way and my itch having been scratched, it was time to return to Malvern. Then next biggest job was going to get the buildings designed and built for Olin-Chlor Alkali Products. Knowing that any type of complex that deals with liquids would require a fair amount piping in order to look halfway respectable I knew I was going to come up against another challenge; All that Piping!
After finding an Olin-Chlor plant located near Charleston, TN on Bing maps, I noticed that they had a fairly simple square building right next to some loading platforms. Perfect!
With the method that I used for the Crushmoore building still fresh in my head, it looked like I should be able to use the same process for this building. Now after having some idea of what I could use for
the main building and some old Walthers petroleum storage tanks from
the old modules, I started playing musical buildings to see if I could come up with something that would fit the
space and my needs.
Let the fun begin.
After lunch today I turned the saws on and grabbed my pin nailer and bottle of glue.
The tall section is 9"w x 3.75"t x 2.25"d and the shorter section is 7"w x 2.5"t x 4"d. I think this time I will try and make a Concrete prefabbed building with ribs similar to this one.
Since the last post where I got a shot of the new ALCo's sitting in Malvern, I heard that the W&OV has acquired a few more, but have yet to see them around the shop. From the scuttlebutt I've heard they scored two more RS11's. One's in the Central Vermont green scheme and the other is an older maroon Lehigh Valley. The last one is suppose to be another red Lehigh Valley C420. It would seem as though they fetched a pretty penny for the two large Centuries?
With all this color, they are going to give The Rock a run for their money who has always seemed to have rainbow consists. Once they arrive I'll get some shots.
*****
Nothing new on the construction in Malvern but I would assume it should be starting again here shortly.
Since the last ops session in Nov, I took a bit of a break and got some
other things done that has been piling up on the workbench. A friend
wanted an HO boxcar weathered so got out the weathering supplies and got
after it. While I had the stuff out I decided to get a few cars of my own
weathered up and put them on ebay to see if I could bring in a little
extra dough for the holidays.
Just the other day I heard that KATO has announced a new loco, they're F2 A&B's. One of the sets that I have my eye on is a pair of Rock Island F2A's in the Red and Black scheme! I've always been a sucker for this scheme.
While it's from a much earlier time frame than what my layout is focused on now, they will look good with some of the other Red and Black units that I've picked over the years.
This had prompted me to rethink the layout a bit. No, I'm not tearing things down or changing era's completely, but I do think I'll be thinning out the herd even more than I have been. With the acquisition of the F2A's I should have almost enough older locos to run within a earlier era, say the early to mid 1960's, the time of my youth.
If I do not have enough locos to fill all the needs, I can always call upon some of the maroon units that I have like GP's, RS's and even a few steamers that are in storage and let them stretch there legs a bit. I have gaggle of LifeLike FA's in the Red and Black scheme as well as some undecs that will be painted in the solid maroon or maroon with stripes for more variety.
I don't think I will have to swap out any buildings or signs as the era will be close enough that it shouldn't matter. The only thing that might look kind of funny would be seeing FT's pull some modern 5800 cuft plastics hoppers, but such is life. Who knows, you might even spot a Blue and White geeps mixed in the consist with some FA's?
Back the layout, my next major project will be to finish a few more buildings so that I can get their foot print figured out and I can some grass down. I just about have the Heavy Metal building ready and the next will be the Olin-Chlor plant in the corner, followed by Frump Gas & Supply in the middle of the old Wye just outside of town.
During the last couple of trips to Malvern, I had heard rumors that the W&OV was looking to replace their two large ALCo Centuries [a C628 & C630] with three smaller ALCo B-B units.
Yesterday I heard some chatter coming over the scanner that there were some new visitors in Malvern. I grabbed my camera and made a mad dash to the engine shop.
There..... sitting on display were three smaller B-B ALCo's. One RS11 bracketed by two C420's! They are of course all second hand units, but what a sight for ALCo fans! These were so new they haven't even received their new markings yet. The first one is a Lehigh Valley yellow jacket, the RS11 is a Maine Central and the second C420 looks to be an ex Lehigh & Hudson River with CR paint-outs still in place.
The two big ALCo's are still sitting on the far track and I wonder how long they will be around or before they get shipped off to their new owner? Better try to get some shots while I still can.
I got talking to the engine house foreman who let it slip that the old D&H RSC-2 might also be replaced. He said they were looking at a smaller ALCo switcher, he mentioned something about it being an S-2?
An added surprise was the yellow caboose tacked on behind the L&HR unit. It looked like it might be an ex-MoPac caboose that got painted in the Borg colors? I didn't see any markings on it other than the road number. This should make a nice replacement for the old North Eastern style crummy that they had been using. I bet the crews will be happier. *****
I've always been a fan of ALCo's and thought this would be a good chance to show my love for them. I had the two Centuries for some time now and they worked fine but they just seemed to be just a bit too big for the little short line.
I picked up the L&HR from a buddy who was thinning his herd and thought if I could find a couple more that these might be the ticket. What I really wanted was an RS11 in the Lehigh Valley Cornell red or maroon scheme, but I stumbled across the Maine Central and since yellow weathers real nice, I thought I would give it a try.
I plan on weathering them up pretty heavily but leave the original road names & numbers in place and add a small stenciled W&OV under each cab. The caboose is a Bluford Shops ex MoPac that got repainted after the merger. I thought a yellow caboose would look good instead of the typical "Red Caboose" plus these are super nice models!
I suppose in the real world time frame that I'm modeling [1983], the Lehigh Valley Yellow Jacket would have not been the proper scheme for a second hand loco as this was not the last scheme that these wore, I believe it was the Cornell Red. But then again the Rock wasn't around in 1983 either! Maybe I'll have to keep my eye open for another LV C420. I think Atlas has announced a C420 or RS11 in Cornell Red or Maroon.
If anyone has one of these that they'd like to part with, I bet the W&OV would be interested.
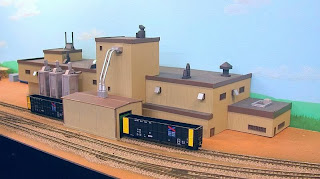
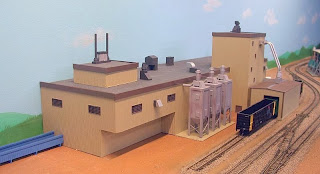
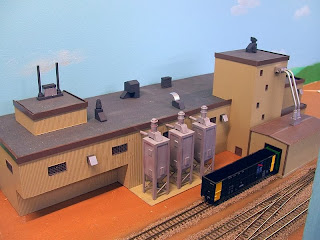
After a month of working on the Crushmoore building I think I've reached a point where I can call it good and move onto the other buildings in Malvern. There's still a lot of smaller details left to be added such as piping, weathering and misc items which I can do at a later time, but at least now I can get it located and start in with ground cover. I still need to add a small parking lot on the right side by the office, this I want to try using some roofing felt for an asphalt lot.
The last thing I added was the rooftop details. These were all made with LEGOs except for the Air Conditioning unit on the office, I think this was a Burt Industries detail. After gathering all the pieces I wanted, I glued them together and painted them an SP Lark gray and added silver to some of them for a bit of variety.
Using LEGOs for details is a great alternative to buying pre-made details and the possibilities can be unlimited. What a great idea!
While this may not be a masterpiece of a model, it has taught me that scratch building is not as hard as I once thought. It can yield a unique structure that you can't otherwise find on the open market and one which you can fit the area that you have.
This was a fun build and I'm looking forward to doing more of the same throughout the layout.