
Awhile back when I was contemplating buying or building a static flock box, I contacted a friend of mine: Michael W. I told him how I had seen videos of modelers who built their own in order to facilitate making their own grass tufts.
He told me instead of buying or building one, that in fact I already had one. He explained that my Woodland Scenics static grass applicator should work just fine with some minor modifications. Basically I just needed needed add some wire extensions to the unit and I would be golden. He was right.
However after trying it out, I was just not satisfied with the results, not because of the modifications I made, but because I had troubles getting the tufts to release from the wax paper or any other type of paper I tried, so I put things on the back burner. Then after doing a little more research via YouTube, I ran across a guy who made his tufts by applying the glue dots directly to a non-stick cookie tray, which I posted about and this worked so much better.
http- Static grass tufts and weedy tracks
Now I was ready to start getting some grass and weeds applied to the yard and between the rails and ties. I loaded up the WS Static King and got after it. The first thing i realized is the WS hopper is quite large and wanted a little more control of the grass as it comes out of the 2"+ diameter hopper.
My first try was to make a paper disc insert and slice off one edge or cut a smaller diameter hole out of the center of the paper disc. This worked, but not as well as I would've liked it to. So I sat down at the computer and started surfing with Google to take another look at the PECO or WWS Micro grass applicator again.
The hopper and handle is only about an 1" diameter and I felt that this smaller diameter would give me better control of the grass coming from the hopper. The problem was with the WS unit being 2"+ in diameter, I wound up covering an area several tracks wide. Then I'd come back with a vacuum and suck it all up from all those tracks, not to mention it laid the grass on thicker and heavier than I wanted and wound up pusing more grass than I needed.
But there were two issues I had with the micro applicator 1) The price of the unit and 2) It was powered with a 9v batteries and I loath batteries as they are usually dead when you need them. So I figured that I could find a 9vdc, 1-3amp wall wart that I could connect to the unit so it was AC powered and I wouldn't have to rely on the batteries.
Another call was placed to Michael to confirm my idea and he told me NOT to buy anything! Again he said I had everything I needed except a few small parts. What he told me to do was to make my own Micro applicator by using my WS Static King for the power supply. I needed to find a suitable tube and some screen and a couple of longer wires and make it out of.
After brainstorming with Michael on the phone, I bounced it around in my head overnight, this is what I came up with.
The applicator is made from a 7"- 8" length of 1"ID PVC tube. A threaded adaptor. A small circle of screen from an old kitchen sieve. Two sections of 18ga wire and three alligator clips.
The screen was cut to the inside diameter of the threaded adaptor. I drilled a hole in the side of the adaptor to insert the wire. Since the screen was aluminum or stainless steel I couldn't solder it to the wire. So I tinned the tip of the red wire to thicken it a bit, stuck it through the hole, slid the screen down into the adaptor so that it laid over the tip of the wire. Once I had it set in place, I inserted the PVC tube into the adaptor and tapped it snuggly down onto the screen so it made good contact with the wire. I tapped it with a hammer to set it, but did not glue it so I could make changed if needed. Then i cut off most of the threading. I added one red alligator clip to the screen wire and made a black wire extension as well.


I still need to make some minor adjustments to the unit but overall it works quite well. It has more than enough juice to work properly, It's small enough that I have more control of the grass so it doesn't several at once, and it's easy to load the hopper. Once thing to mention about the PECO/WWS version, the hoope is a very small cap and can only hold about a cubic inch of material at one time, so you wind up adding more quite often if you have a lot to cover.
Here's how it connects to the WS Static King. Michael told me to attach a small wire to the little screw that holds the brass crown in the hopper back when he told me how to make the flock box.
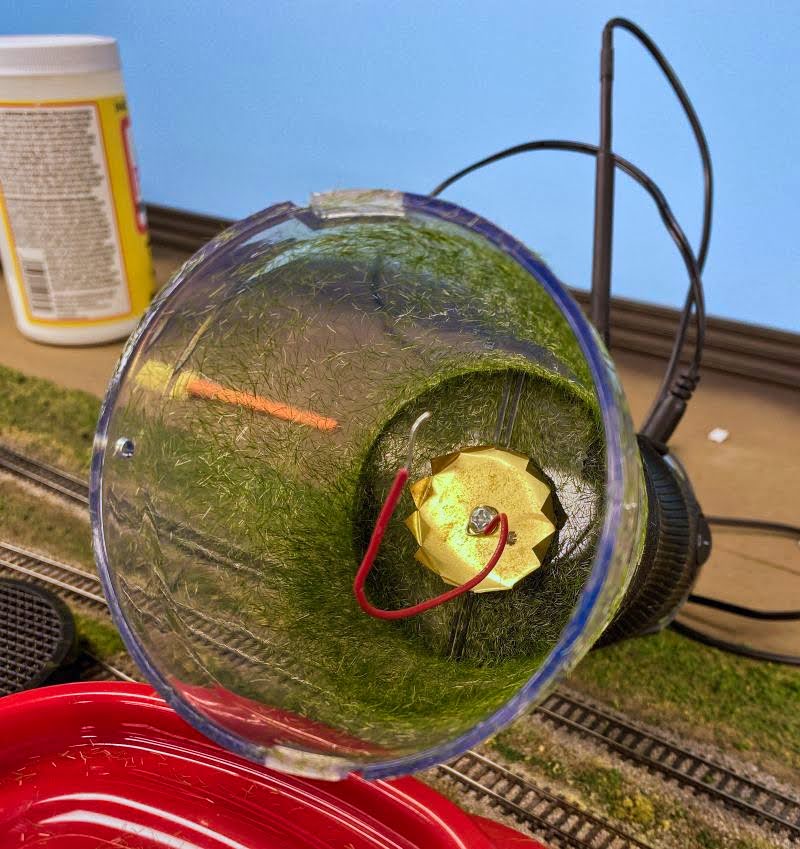
The red wire of the PVC tube attaches to the small wire in the hopper and the black extension wire clips to the black lead coming from the WS Static King.
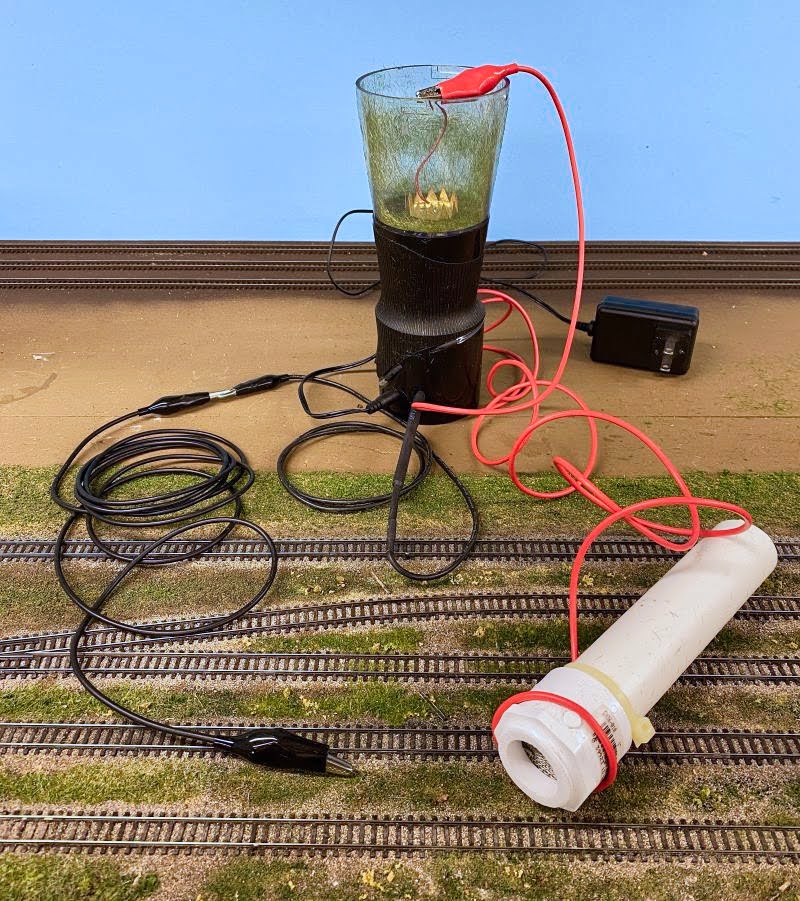
I still need to make some adjustment to the tube, mainly something to hold the wire in place. I have also got a couple of zaps from it as well, which I think it came from where the red wire enters the tube and was jumping back to me? Maybe need to wrap some tape around the unit to help insulate me? It would be nice to find some large diameter heat shrink tubing.
Overall I think this is a winner and want to thank Michael for his insight and help.
I have played with it a bit and will be posting some pictures of the results when I next get a chance.
No comments:
Post a Comment