Sunday, May 20, 2012

Reclaimed space...

...for the operators, not for more layout though.

The curtains that you see in the background are covering up several metal 5 shelf units that I installed years ago to clear out the basement so I could start on the layout.  Then I hung the shower curtains so things wouldn't look so cluttered.


After the first ops session I was told "Those shelves have got to go"!  Which I planned to do eventually.

If the El Dorado yard operator was working the yard, he would have to move out of the way to let another crew get past.
At El Dorado,  between the fascia and the shelves there was only about 27" inches of space, and around the corner there was even less, about 20"

Now with the shelves removed, I have about 43" at El Dorado and about 36" around the corner.


When I tore the shelves down, I re-built them into three shelf units and then slid them under the layout back to back like I had planned to do all along.  These will then be covered once I get the rest of the skirting installed.  In the last picture above you just can see one of the new plastic three shelf units that fit nicely under the south end of El Dorado. 

Here are some of the shelves under Haskell.

Now you see them


Now you don't


I plan to hang another curtain at a angle so as to cover up the gas meter and then plan to repaint the walls and clean the floor so I can get it repainted as well.  Slowly but surly it's coming together and another step closer to scenery!
Aaaaahh!

Wednesday, May 16, 2012

Thank you!

Just a word of thanks to the followers that are watching.

Please bare with me as I'm going through some uneventful phases of the layout that are not very photogenic.

Just tonight I finished tearing out some shelving that I installed several years ago to make room for the layout when I first started.  After the first operating session it was noted that the shelves had to go.  So go they did, I broke the 5-five shelf units down into 10- three shelf units and slide them under the layout.

I've also been working on Speed Matching my locos, working with my wheel report and next I plan to tear out the yard at El Dorado and rebuild it with 2 Arrival / Departure tracks so as to reduce the work load for the yard crews. I hope to have the yard rebuilt by mid to late summer so we can put it to the test with the revamped Wheel Report!

After that, I hope to start on some scenery in Malvern.  I want to start experimenting with the back drop first.

Thanks again for watching along....

Monday, May 7, 2012

Car Routing on The Little Rock Line

In the early 80's a friend and I had the chance to operate on a large club layout in Des Moines.  They had a Crow's nest where the dispatchers worked from and we were granted the opportunity to run a local and make some set outs.
That's all it took to get me hooked!
I knew that when I finally got a layout up and running I wanted to have a layout that was based on operations, not just "Roundy Rounds".

Over the years I have looked into several forms of car routing.  The first was a computer generated program called "Ship It!"  I also thought about using the Car Card system as well as the DOT system [that makes use of the colored dots that are stuck on the roofs of the cars].

When I finally got the layout to a point where I started to think about how to operate it, a few things had changed.  My eyes for the most part.

The issues that concerned me with these car routing systems were:
The Ship It program and the Car Card system relied on the actual car number, which in N scale seems to be the biggest complaint "It's too small to see the numbers".  If you weather your cars, it can make it even more difficult to see them. Another drawback, you couldn't have duplicate car numbers as it might add a little confusion from time to time.

Both Ship It and the Car Card system require a fairly rigid control and placement of the cars. Should a car get moved off the layout for repairs, or is not placed back in the same location before the next operating session, it can mess with the system.  However, Ship It has a way to TRACK a car and knows where is should be, while the Car Card system you can just move the matching card when the car is moved.  Not having ever really played with them enough to know for sure, I decided it might more trouble than what I wanted to mess with.

The Dot system, while it seemed easy enough to work, never really appealed to me as it has a tendency in my mind to ruin the overall LOOK of the layout.  Nice scenery, weathered cars and locomotives and then here are brightly colored dots moving around the layout on top of the cars. I didn't think this was for me either.

Then a friend came across a system called the "Wheel Report".

The system uses no waybills, car cards, or computer generated switch lists. It's basically made up using a simple printed spread sheet that is filled out by hand. Being somewhat of an Excel junky and seeing how Excel could automate it, we started designing it.

We based the method closely to how it is described in an article by Jim Hediger published in the May 1984 Model Railroader with a few variations that fit my needs and layout.

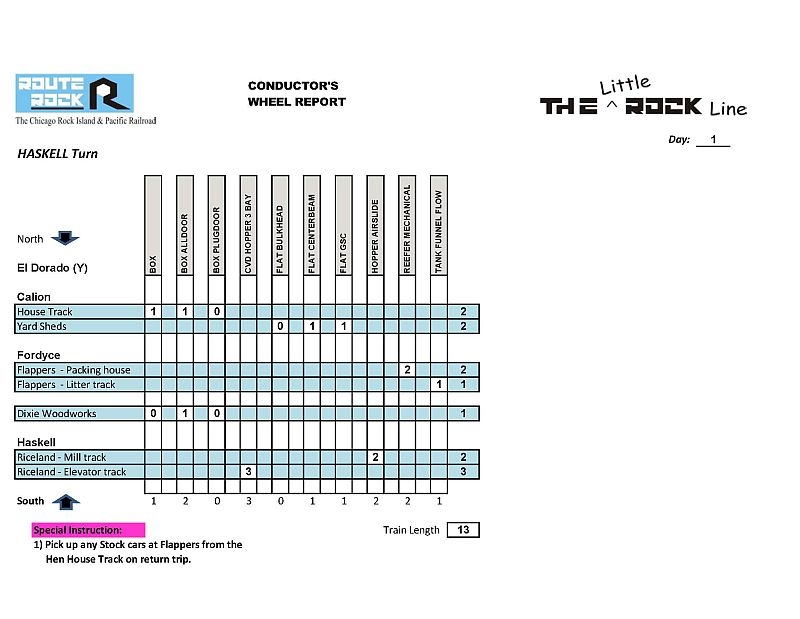
This form, called the "Wheel Report" is then used to govern the car movement during each operating session.  On a prototype railroad, a Wheel Report is a list of cars in a train showing destination, weight, load or empty status, etc. for each car, which the conductor updates as the train picks up and sets out cars en route and gives the location for the spotting of each car.

My Wheel Report has this combined into one simple sheet per train or switch job.  It has a list of car types across the top and the towns with each industry down the left side. The value at the intersection of each row and column specifies  how many of each type of car that is to be spotted at each industry at the towns along the line.  Instead of using the actual car numbers, this method relies on just the type of car.  So it is up to the Yardmaster to choose the type of car from the pool rather than a specific car number.

These are filled out randomly before each session.  I had planned to use dice to randomly choose the amount of cars that needed to be set out but my friend then showed me a handy little random number generator at RANDOM.ORG.  You just plug the minimum and maximum number of cars that each siding can hold and click "Generate" 

Update 07/22/13
The Wheel Report has been automated by Steven [Owner of the  The Rock Island; Ottawa Sands in N Scale
Steven gave me the ability to bring up the file and press F9 which automatically fills in the cars that will be requested per session without having to go through the entire list and manually fill in each industry's need with Random.org.

Instead of having two identical sheets, one for each direction of travel like Jim Hediger used on his Ohio Southern.  I use only one sheet for each train as my locals make an "Out and Back" run starting from the yard at El Dorado.  This makes things a little easier as you only need to worry about trailing point turnouts during the run with no need of any "Run-arounds" or complicated movements [for the newbie's to worry about].  

I've set the train length for the locals to be a maximum of 15 cars [average length - 50'], at least two locos and a caboose.  The sidings at Dubach, LA and MQ siding [between Calion, AR & Fordyce, AR] were designed to fit this requirement.  I left enough room to fudge if needed.


***

On the Ohio Southern's Wheel Report, it states that whatever amount of cars get set out per siding, then the same number of cars needs to be picked up.  Thus keeping the train lengths the same and ensures that the train will fit into all the sidings.  My Wheel report also shows only the cars that are needed to be set out and not what needs to be pick up.  
For my needs I have changed this a little.  If a siding can hold three cars max and that industry called for only two cars to be set out, but there are already three cars on the siding, the crews can choose how many cars to be picked up: 2 cars or all 3 cars.  The crews of course will have to do a little math and make a quick count to make sure they will still be able to fit into the sidings. 

Another way that my Wheel Report differs is that I have multiple sheets that get printed for each train and switch job per session.  This is where the use of Excel comes into play.  The sheets for all three of the turns: Winnfield, Haskell and the W&OV, are where I input all the cars called for that session using the random number generator. 


This information placed on these lists are then cascaded down by Excel and populates the other lists with the proper info. This includes: 
The Yardmaster list
The four Manifest lists
The Blocking list for El Dorado
The Winnfield & Haskell turns
The W&OV turn
The Switch jobs for the ICG and Riceland
and the Blocking list for El Dorado yard.


***

On the Ohio Southern, eleven pairs of Wheel Reports were made up, each with a different day numbered 1 through 11. Depending on which day of the month the session was run on, he would pull that days wheel report.  If they ran on the 21st of the month, then he would do a little math like this:  He would add the two digits of that day 21: 2+1=3 and then would pull out the third day's session.  On the 29:  2+9=11, ect. ect.

Once each session of mine gets filled out, I can save them as a file and they can be re-used for another session later, or I can continue to generate a new list for each new session.


Another thing where Excel came in handy is when an odd number of cars are called for El Dorado.  Excel adds up the total amount of cars called for each local and then divides them in half and sends half of the cars on the LRMP's and the other half on the MPLR's.  This works good until an ODD number of cars are called for. Since you can't send "Half a car" on both trains, Excel uses a True/False statement that is based on the "Day" that's listed on each sheet. Depending if the DAY is odd or even will depend which train gets the ODD car added.
This also gives a nice variation in train length for each session.


***


All said, there are eleven sheets to print for each session.

The Yardmaster uses the Yardmaster's list at the main yard to pre-stage the four manifests that will feed the yard at El Dorado.  This list shows how many and what types of cars are needed for the four manifests, the running sequence of the four manifests and the location of the cars in each manifest that will be dropped off at El Dorado.

The Yardmaster list


Once the Yardmaster has the trains made up and ready to go, The Wheel Reports are handed to the crews who are on duty. 
The symbols stand for:
Little Rock - Missouri Pacific
Missouri Pacific - Little Rock

The "W" indicates that these trains will deliver the cars needed for the Winnfield & W&OV turns.
The "H" indicates that these trains will deliver the cars for the Haskell turn. 


The SB LRMP-W


The NB MPLR-W


The SB LRMP-H
The NB MPLR-H


The Blocking for El Dorado


The Yard crew at El Dorado uses this sheet to bring all of the cars together to make up the two locals as well as the cars needed for the W&OV.


When the El Dorado crew has the locals ready to pull,  the Wheel Reports are then handed over to the local crews and they proceed to make the runs, setting out the cars at the industries along the route.

The Winnfield turn


The Haskell turn


The Malvern Job/Turn


The Malvern list is used by the W&OV crew to gather the cars from their industries at Malvern at the beginning of each session.  After they build their train [called the Razorback] they will deliver them down to El Dorado and exchange them for the new cars listed on this sheet.  Once the Razorback returns to Malvern, the local crew will use this list to commence dispersing the newly delivered cars.


The last two sheets are used for the ICG interchange and the Riceland switcher.  These sheets simply show what and how many cars are needed to be pulled and spotted for the locals when they arrive at each location.  These are performed at the beginning of each session while the locals are being built in El Dorado.

The ICG Interchange

The Riceland Job

Each of the sessions is independent from other sessions. This means the cars do not track from session to session.  At the beginning of each session the cars that were picked up from the last session are then returned to the main yard via the four manifests and thrown back into the pool for the next session.

The nice thing about this system is if a car gets misplaced or shipped on the wrong train or to the wrong industry it doesn't really effect the current session or following sessions.
Also if a green crew is running a local and just wants to run the train and not make any set outs or makes a wrong set out, again, it has no cascading effects on future sessions. 

The scheduling for all the working trains is still being worked out at this time.

All the through trains that are staged in the main yard are run at random intervals with no specific schedule for now with the exception of a SB reefer train.  It needs to drop off livestock cars at Flappers in Fordyce before the Haskell turn makes it's run.  Once they have been unloaded, then Haskell turn can pick them up on its way back to El Dorado. 

The longest siding on the layout is the passing siding at El Dorado; this siding determined the length of all the through trains.  Any meets of the through trains that are needed will be made here.  This is also the only scheduled stop for the NB Amtrak.  This also forces the locals to take the other four sidings on the main when a through train approaches.

Since the entire layout is dark territory, trains run by a verbal track warrant [which is still being worked out].   The hottest trains on the line are the SB Reefer train and the NB Amtrak, all other through trains have priority over the locals. 


***


Since the layout became operational about three years ago, car routing has been on the front burner.  We've tested the routing system that I've described above for three sessions so far.  I've had to make several minor adjustments after each session, but nothing major.


The first session went smoother than we had hoped for.  The only two problems that arose were 1) We had two cars that got put on the wrong train, which turned out to be operator error.  
2) After both the LRMP & MPLR trains dropped off their cars, there were too many cars at El Dorado yard and we had no empty tracks to switch them out with!


Before the second session, I made the following changes that we discussed after the first session and changed the Wheel Report by splitting the LRMP and MPLR  trains into four separate trains: 


The "W" trains deliver cars called for the Winnfield & W&OV turns.
LRMP-W 
MPLR-W 
The "H" trains deliver cars called for just the Haskell Turn. 
LRMP-H
MPLR-H


The second session [which was nothing more than an abbreviated session to test out the changes] proved to be the answer and the yard crew wasn't sweating bullets trying to figure out how to move the cars so they had room!


The third session went even better.  The crew at El Dorado had more than enough room after clearing out some of the cars from the previous session and only having the smaller number of cars to deal with for the Winnfield & W&OV turns.


The other thing that I did was I redesigned and included the Blocking sheet for each session.  This gave the El Dorado crew a simplified sheet to follow as it not only shows how to block the locals but also shows what and how many cars are needed for each block. 


The other major change that I made on the main yard helped out greatly in respect to the flow of traffic. Both the four manifests as well as all the staged through trains can move in and out of the yard without tying up any of the tracks.   These changes can be seen on this post: Redesign Of The Main Yard


While this may not be a prototypical car routing system, it seems to work and keeps us happy while playing trains.

Thanks for reading!


Sunday, January 8, 2012

Connecting multiple Digitrax UP5 panels

While we were working the first operating session, several of the guys were complaining that they were loosing control of their loco consists and that the throttles were showing weird displays.    Since most of the guys were not familiar with the my Digitrax system, I kind of brushed it off as a lack of knowledge until I had it happen to me. Now I am no expert when it comes to the Digitrax system as a whole, but I do know enough to make it usable.

Recently the command station had also started giving me 9 beeps at various times when I would first turn the system on.  I looked it up in the manual and it said this:

9 Beeps = DCS transmit failure. LocoNet fault

    Not knowing what that meant exactly I contacted my Digitrax Guru and told him what was happening.  He proceeded to ask me the following:

    How many throttles do I have plugged in?  I told him about  5 or 6.
    He asked me how many UP3 , UP5 and UR91's I had connected to the Loconet and if any were powered by a separate power supply?
    I told him 9 UP3&5's and one UR91 and that the UR91 was the only one that had power.
    He asked me how many of the throttles had a 9v battery installed and how many wireless throttles I was using?
    I told him that I had not installed any batteries yet.
    He asked me how much voltage was showing on the DT400's when I plugged them in?
    I checked and it showed 7.8v to 9.2v.

    He told me to unplug all the throttles, turn the system on.  When I did, the command station did not beep.  My DT400 now showed I had 10.3v.

    Then he explained that the reason the command station was beeping 9 times is that there was too much of a power draw from having all the throttles plugged in at one time.  Since none of the throttles had no batteries installed, they were drawing all their power from the Loconet cable, therefore there was not enough power to run the system properly.

    He explained that since I had that many UP 3&5 panels, it would be a good idea to power them with a 12v power supply.  I could have up to 9 panels powered off of one power supply.  He also told me that if I could split them into two groups of 5 and have both groups powered with their power supply, that would be even better.

    He told me how to do this very easily, which was to Daisy Chain each group of 5 panels with a single wire,  which then connects back to a 12v power supply.  This provides a separate 12v circuit from which the throttles can draw from if they have no batteries installed instead of trying to draw power through the Loconet.

    I did this for both groups of 5 and when I plugged the first throttle in, it showed 11.6v and as I plugged more throttles in, the voltage only dropped to around 10.7v.. 

    My Guru explained to me that there was a small hole on the rear of each UP panels where you could solder the 12v power wire into very easily, this picture shows the location of that hole.


    When I went to install the panel and crimp the +common lead to the power wire I had strung, it occurred to me that if I ever needed to remove the panel, that I was going to have to cut the wire, then re-crimp it upon re-installation.  So I bought some bullet connectors and made a second lead for each panel.

    This picture shows the black wire that I soldered to the rear of the UP panel and the brown wire is what I crimped to the +common wire I had strung under the layout. Once everything was installed, I just pushed the bullet connectors together.  Now if I need to remove the panel I just need to pull the connectors apart.  My Guru gave me an A+


    Friday, December 16, 2011

    Redesign of the main yard

    Before I get into the explanation of the yard modifications, allow me to give brief history of it first. When the yard was built it was designed for the use with our Bend Track modules.  We wanted someplace where we could build and tear down the trains other than on the mainlines.  Nobody wanted a dedicated set of modules that took up half the setup. Since Bend Track does not have an operating pit like Ntrak can have, we decided to create an operating pit.

    The yard was built in a shape of an "L".  It started out 4' wide at the head end, then the long leg was 8' long by 16" wide, enough to hold 9 tracks.  By the next show we added another 16" x 8' section that doubled the length. We found this to be long enough, but it was no fun trying to back a train in or out of the yard.
    The next expansion was to widen the tail end of the yard to 36" and make the 8 tracks doubled ended with a loop that returned on the ninth track.  The third expansion was a short 6 track yard that attached to the back side where shorter trains could be stored and built.  On the fourth and final expansion, the little yard was replaced with two sections that was 12" wide x 8' long.  Now we had two sub yards with eight tracks each.  Included were two By-pass tracks that ran down between the two sub yards on the front two sections of the benchwork, one of which served as a reverse loop section.  This was needed as the head end of the yard all came together into one track that turned the whole yard into a big loop with 18 sidings.  The nice thing was a train could then enter onto the modules via a wye in either direction, then stay on the inner mainline or could cross over to the outer mainline.


    This configuration also worked for the layout as well but after the first real operating session, one of the members who played the Yardmaster came up with a better idea that would take away the need for a reverse loop section all together.  The idea essentially separated the single yard into two inline yards that folded back on themselves.  Then the single yard throat was replaced with two throats.  The last addition that needed to be made to complete the plan was a crossover from the left rear yard ladder to Rear By-pass track.
    All of the modifications can be seen in this picture in orange.


    This now made for a run through yard and became an extension of the layout. With a run through yard the reverse loop [in red] was no longer needed but I decided to keep it intact electrically for times when and if we needed to turn a train.
    Everything went well until I tried to power things up.  Long story short, I had to completely re-wire the entire yard.  The yard was wired for common rail since we built it before we made the jump to DCC and all the rails were wired alike.  The Red wire to the front rail and the Black wire to the rear rail on ALL of the tracks.

    So, since I had this job ahead of me I decided to it right.  I used a Digitrax PM42 to break the yard into three blocks.  The front yard was on one circuit breaker, the rear yard and the engine facility on a second.  Then I set the PM42 so that I had an auto reverser for the reverse loop section which was also protected by a third circuit breaker.

    In doing this, I did a lot a reading and research on this kind of a setup.  I was told by a friend that this could be done very easily with the use of a PM42.  But 2/3 of what I read on the net made it sound like it would not work or would not work very reliable.  Well, so far so good.  It works like I was told it would.  This is the first time that I have ever used an auto reverser.  Let me tell you, it is soooooo nice not to have to make sure that the switches are lined up just so.  The first loco that I ran through the crossovers just putted right along without any sign of hesitation.  The only sound I heard was the PM42 when the reverser clicked to reverse the polarity. 


    So, after three loooooooong weeks of modifications, this is how it turned out.


    The new track at the left is the lead from the rear staging yard. This track enters the layout through the backdrop and dumps out at Haskell, AR. and runs south to El Dorado.
    The right track is the old ladder track, this leads from the front fiddle yard and
    Front By-pass/Reverse Loop.  It enters the layout at Winnfield, LA and runs north to El Dorado.


    Before

    After


    This is the new crossover that will allow trains that leave the front fiddle yard to by-pass the rear staging yard making use of the rear ladder track and to enter the layout at Haskell, AR as a southbound.


    The engine facility hasn't changed much other than I re-laid the fuel and ready tracks in the foreground.
    The Front by-pass becomes the Rear by-pass before it runs behind the engine house. Then it runs on the far side of the caboose track.
    There are two sets of Left Hand crossovers that connect the rear by-pass with the front by-pass that creates the reverse loop ability.  The first set is just out of the picture to the left.


    This gives a good idea of what the yard looks like.  The yard is 16' long and 28" wide in the middle.  There are a total of 18 yard tracks [Both the fiddle yard and the staging yard have 8 tracks each].  Then the Front and Rear by-pass tracks that run between the two yards.


    While this in not a Prototypically designed yard, I think it will serve the purpose quite well.


    Saturday, October 15, 2011

    Modifications at Haskell, AR

    In September we started working on the operations and after we ran a few test runs several things came to light.
    My original thought was to have the Haskell turn work the Riceland plant.  After the first run we saw just how long it would take.  So it was decided that Riceland needed to have its own switcher.  Even though the switcher only needs to move no more than 5 or 6 cars and get them ready for the local, the amount of time that it reduced from the Haskell turn was enough to warrant this.
    Now all the Haskell turn has to do is pull into the siding, run around it's trains, swap out the empties with the loads that the plant switcher has ready, then tie back onto his train and start back to El Dorado.

    Two things that came out of this change was it reduced the work load for the Haskell turn and it created a simple and easy job for a newbie to get his feet wet without having to feel overwhelmed with a large amount of switching.

    Now that I had to keep a plant switcher in place, I went about re-arranging the track.  I added a switch lead and a third siding to act as a pocket track.

    This is what I started with.


    This what I ended up with.


    Friday, September 16, 2011

    Fascia

    In July I started applying the fascia. I finished in late September.
    The process of applying the fascia took less than two weeks, but the rest of the time was spent painting the schematic!

    I started out painting the Yellow first with a small roller, then taped it off with 1/4" masking tape.  The Blue came next followed by the Orange. Each color was followed by a stripe of tape. Once I had all this finished I sprayed a coat of Clear acrylic over the tape to help seal the edges so to prevent the black from bleeding under the masking tape.  Once the coat of Black dried, I slowly peeled all the tape off.

    "Why did I do this you ask"?

    I visited a NKP layout years ago and he did the same thing, but he used only Yellow for his schematic.  Since it was the first time seeing this layout, I had no trouble navigating the track plan when it was time to run trains.  All I had to do was to look at the fascia and I knew where each of the towns were located, as well as which tracks the industries sat on. 

    I used Blue for The Rock mainlines, Yellow for the W&OV trackage and Orange for the ICG trackage.

    I printed out little signs for each of the towns.  Avery labels work ideal for this.
    Since my industries are fairly well spread out and not that complicated, I may forgo the industry labels for now.

    It does look kind of busy and a little distracting, so once people get use to the layout, I can always pullout the roller and black paint!

    I also got started hanging the skirting.  I just used Velcro to attach them to the back side of the fascia.


    Thursday, April 21, 2011

    Trackwork and wiring completed

    With the track work 90% completed, it was time to start laying out the sidings to see how the buildings would fit the spaces.  Instead of making mock-ups I chose to print out the footprints of the building kits on paper and lay them into place to get a feeling of area that I would need.  The tracks were just tacked into place so moving them was an easy job.

    Once the buildings that had a questionable area to fit was determined,  I tacked the sidings back into place and I started dropping the feeder wires so I could get power to the rails.
      
    I chose Digitrax for my DCC system.  This was the first time that I actually wired a layout for DCC and was looking forward to seeing just how easy it was.

    I used 18ga trunk wires and 22ga feeder wires soldered to the rails.  Stringing the trunk wires was a breeze and I had them done in two nights.  The feeders took about a week or so.  I had heard of people using the SUITCASE connectors and then seen how a buddy used them on his layout.  It looked simple enough.  


    Once I had acquired enough of these connectors, I started in.  It took me three nights of about two hours each night to get them finished.  This proved to be very simple and I would recommend them to anyone.  I ordered mine from and online supply house like Mouser.com.  I found them locally at Radio Shack or the big box stores but they were about three times the price.  I think I ordered something like 400 of them for around $0.30 each.  What I didn't use I sold to some of the other members in my group.  

    They sell a special pair of pliers that press the metal tabs into place, but for the price of the tool, I grabbed my trusty pliers.  Yeah, I bent the tabs over on a few of them but once I got use the feeling, the rest went pretty well.     


    Winnfield is the southernmost terminus on the layout for the SB local.  In the foreground we see the siding for Union Scrap.  The track that the two boxcars are setting on creates the continuous loop.  On operation nights, "Stored" boxcars will be set here so as to create a block for the loop.  This will also be another job for the Winnfield local.  Every trip to town, the crew will need to swap the position of the "stored" cars and exercise the axles so they don't rust tight while they are stored here on the end of track.


    Backing up a bit we can see Tioga Jct.  This is where The Rock leaves their rails and begins to usage KCS trackage into Alexandria, LA.   To the left is the open staging for the ICG.  These two units have a short train ready to set out at Ruston, LA.  [the next town North].


    Here at Ruston, LA. we find several cars waiting to be picked up by the Winnfield local on its next run.


    Just another view of Ruston, LA.
    The silos in the distance are the plastic pellet transfer station for ARKLA Plastics  in Dubach, LA.


    Setting on the outskirts & south end of Dubach, LA. are the silos of ARKLA Plastics.


    At Dubach, LA a small siding has been installed off of the main siding for the purpose of a run-around track and pocket track to store cars for pickup on the return run of the Winnfield local.
    In the background we see A&A Cement Works.


    The aggregate track in the rear has been raised about 1" so they can dump the gravel into a pit for sorting.
    The building that is setting in the foreground will be replaced with a Medusa Kit when it gets built.


    On the north end of Dubach, LA the team tracks have been installed for the Piggly Wiggly Distribution center.


    Crossing the Louisiana / Arkansas border after leaving Dubach, we swing into the town of El Dorado, AR.  Here we see the yard from the south end.  It is here that the NB and SB locals originate and terminate.


    Looking south at El Dorado yard, the buildings against the backdrop is where the actual township of El Dorado will be located.  It will be raised about 2"- 3" above track level.


    Today we find the house tracks and the caboose tracks full.  


    At Calion, AR.  The shed track and the house track have been laid in place.  The white paper cut outs are the footprints of the buildings.  I've used these to determine the rough location of the tracks.


    Here's another view of Calion Lumber Co.  The house track is in back.  Sheet goods and other construction products are unloaded into the building.  The yard track in front is for the unloading of dimensional lumber that will be placed in the racks of the open sheds.


    Fordyce, AR is the home of two industries: Flappers Chicken and Dixie Wood Mfg.  Flappers has three sidings, from left to right: The Hen House is the receiving track for livestock. The reefers are sitting is the packing house track and the tankers are sitting on the litter track for editable tallow.  In the foreground right, the boxcars are spotted at Dixie Woods Mfg.


    On the west edge of Haskell, AR a lone flatcar is spotted for unloading of a brand new Excavator at Mclehaney Equipment Co.  Flappers can be seen in the upper right.


    Giving the town of Haskell, AR. it's largest employer is Riceland Industries.  Here rice is brought to the elevator for shipment to the gulf for export.  Some of the rice will be processed at the mill in the foreground where the rice is de-hulled and refined.  Rice hulls are used as a pressing aid in fruit juice extraction and as bedding in poultry houses. 
    The tracks leading off to the left will wind up in Malvern, AR.  These tracks have been sold to the W&OV [Warren & Ouachita Valley]


    As we enter the town of Malvern, AR. we see the engine facility of the W&OV in the foreground and Olin-Chlor Alkali Products in the background. These tankers will be filled with hydrochloric acid and returned to the ICG at Ruston, LA.


    Just around the corner we see coil cars setting at Heavy Metal Mfg. ready for unloading.  Right behind Heavy Metal is the Pulpwood plant: Crushmoore Ind.  The Woodchip cars have been spotted and are ready for loading.


    Looking from the west end of Malvern the track in the foreground leads to the next town West and to the Gritty Gravel Co.  The hoppers on the siding have been returned for a fresh load of aggregate to then be hauled to A&A Cement Works when ordered.  The next track is for the unloading of pulpwood for Crushmoore Ind.  When unloaded, they will make way back to Ruston, LA and the ICG interchange.


    Now the next step: Make up the car routing system and get some buildings and scenery started!