A proto-freelanced N scale layout depicting Subdivisons 38 & 39 of Rock Island's Southern Division.

Monday, December 20, 2021
Engine house tracks pt2
Thursday, December 16, 2021
Engine house tracks
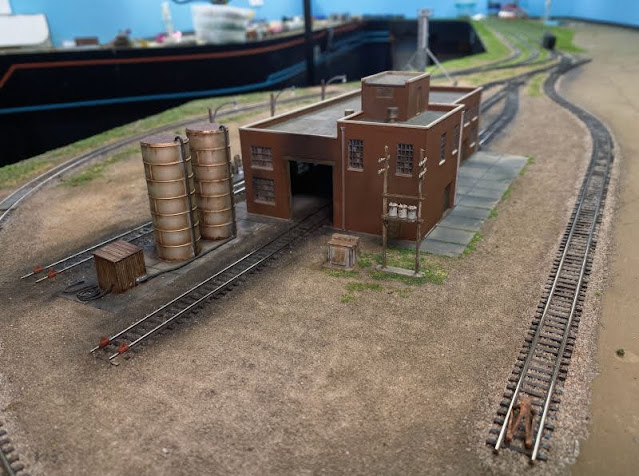
I've been working on the tracks around the facility lately, mainly weathering them.
I used some black and brown Bragdon powders to make the tracks look dirty and oily. In a few spots I wanted to make it look wet from fuel spills. I achieved this by using a small dollop of glossy Mod Podge and thinned it to a wash and then applied it to the areas where spills would likely be. It soaked in and when dried it looked wet. I also did this around some of the piping and hoses.
The other thing I added were some wheel stops. These were purchased off of Etsy from a guy who makes some N scale 3D printed items. These are pretty nice little wheel stops.
Tuesday, December 7, 2021
Dead Weeds Update
I sat down tonight to start removing the dead weeds and to my surprise, they popped right off. I rolled the parchment paper back and used a tweezers to grab an edge and off they came. I'm not sure if using Elmer's glue over Mod Podge was the trick, but whatever it was it worked.
After staring at them for about 30 minutes while I peeled them, I actually kind of like the darker color. This color is Mud, the lighter is Dirt. But I think both will work just fine, once they get installed they should blend right in.
The yellow grass worked and looked much better than the light green did which is what I suspected. As I said before, these are made from a mix (2:1 ratio) of 4mm & 7mm grass. I did this because I thought a dead weed might stand out a little better next to the 2mm & 4mm green that I used elsewhere, we'll see what it looks like after I get a few installed.
As I was placing them in the tote, it looked like I had a bunch of Sandburs!
The only issue I saw was some of them had flakes of paint that stuck to them, but they come off with a quick flick of a fingernail.
Overall I think these will work just fine.
Sunday, December 5, 2021
Dead weeds
After getting the foundation for the engine facility pretty much finished up I went back to making some weeds, this time I wanted some dead and brown weeds to spark a little contrast with the grass that I covered the yard with.
I looked online for for brown static grass and only found a few places that had it, none of which really had what I thought looked like dead weeds. On top of that, what I did find one came from the UK and wanted $15 to ship a couple of bags to this side of the pond, the other was stateside, but the shipping was still about the same.
Not long ago I remembered watching a video where a guy was placing some grass tufts and as he peeled them off the paper it looked like he had sprayed them with brown paint? Sure enough, I went back and watched his video again and he used Vallejo. I didn't have any of that but I did have some TruColor browns.
The other thing I didn't have was some 4mm & 7mm Yellow Straw grass until it arrived in the mailbox today. So I figured I'd try painting some Light Green grass that I had on hand until the Yellow Straw arrived.
I started by applying dots of Elmer's glue full strength to some parchment paper. Then grabbed the three brown TCP colors I had on hand.
Later after the my Yellow grass arrived I quickly made four sets of tufts and set them aside to dry. This time I only used the Mud & Dirt and sprayed two sheets each.


