
With the trackwork complete, I circled back to a recent problem I encountered after the ops we had held in February. Just before that session I had replaced my Digitrax PM42's with DCC Specialties PSX circuit breakers. I had always heard good things about these and gave them a try.
Well the first thing I found out with these were just how fast they were. On only a few occasions with the PM42's did I see any shorting on the Peco turnouts. During the February session I had shorts showing up all over the place!
Most of these occurred when a 6 axle locomotive rolled over them. After a bit of research I found out what the problem was. Where the frog rails converge just in front of the frog, the rails are too close together and the wheels made contact with the very tops of the railheads. Not for very long either, but just enough that the PSX units could see it and they would shut down! That told me just how fast the PSX circuit breakers worked cause I never seen the PM42's ever do this.
I found three fixes for this after surfing the web. 1) One fix called for filing a "V" down between the middle of the rails to create a "V"and fill it with a drop of epoxy. This basically spreads the railheads far enough apart the wheels won't touch both rails.
2) This one calls for gluing a strip of 0.010" thick styrene to the outer edge of the plastic guard rails, thus forcing the wheels to stay closer to the rail they are riding on. 3) was to paint fingernail polish over the railheads, but this was said to be only a temporary fix as the nail polish would wear off after running trains and/or when cleaning the railheads.
Now this second fix is used more for the fact that the gauge is normally loser on the PECOs than on other brands of turnouts because they are of European design. But I read where this might also help to keep the wheels from touching both railheads? So I figured I give them both a try.
Here's a shot of the first turnout to get the 0.010" styrene treatment on the right guard rail. And as a bonus, it DID fix the issue that I had where one of units I was using to test the new tracks in Fordyce, the rear truck was picking the point as it went through the diverging route.
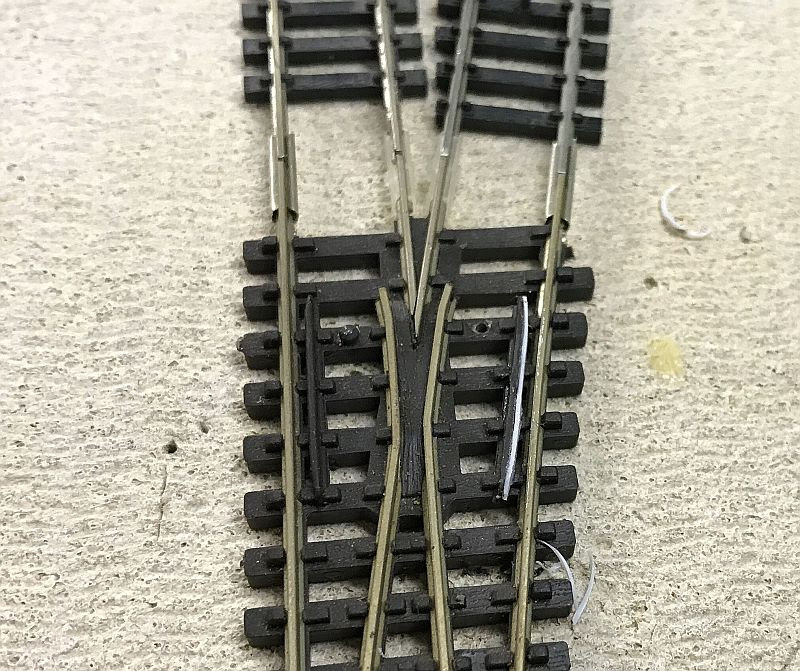
First I tried filing a "V" and filling it with epoxy. This worked on the first turnout like a champ. However it's damn hard to get a file in place to get the groove made. Next I tried using a dremel with a small stone bit to make a dimple in both railheads and fill that with epoxy. This also worked.
So I now have a new mission, find and fix the shorts. But how do I do this? Do I fix the one's I find as I find them? Or do I just go down the line, fixing one turnout after another until I have them all done?
No matter what I do, I have to keep reminding myself of something a good friend and I always joke about when we come across issues like this.
"Remember.....Model Railroading is fun!"
If it hadn't of been for the fact that I had pretty much everything I needed track wise to build this layout, I might have decided to go with PECO C55 or Micro Engineering track. Hell I might have even taken the time to learn how to hand lay my own turnouts.
Allen we had the very same issue with Peco turnouts causing derailments even using DC on our club N Trak modules not the shorting issue over 15 years ago.
ReplyDeleteWe did exactly what you have done and others have learnt on railwire just recently and that is to add a strip of styrene to the guard rails. That problem was then fixed. It also raised its head when a friend went from DC to DCC using Peco. Same fix solved the shorting. He did use nail polish on some and that also worked.
Rod.
That good to know Rod, Thanks for the confirmation.
DeleteI was told that the stips should fix BOTH problems so I'll plan to do the strips first, if that doesn't solve the shorts, thing I'll go after the point rails with epoxy!
Thanks again Rod!