Wednesday, February 18, 2015

Roadwork in Malvern, part 2


Last night I got a coat of paint on the new roads and was able to get the buildings set back in place.

I don't think they turned out too bad?  However, I think I prefer the use of styrene for roads, but the jury is still out on this.  With plaster you can do just about anything but there are drawbacks.  

The main one is it's messy as hell, both in mixing and in sanding them.  Almost as bad as sanding drywall mud.  I had my vacuum handy and was always using it to keep the dust down.  Even then it got everywhere and it actually changed the color of the ballast in places.  One thing I learned, I need to pour the roads before ballasting.  At least I think it would be better and I wouldn't have had to be so careful with the plaster.  Oops.

Using the Woodland Scenics Foam Tape to make forms for the plaster was pretty slick.  I did have a few issues where it stuck too good the surface and I had to go back and pick it off with a knife.  It did do a pretty decent job of keeping a nice clean edge to the plaster.

It was also kind of hard to keep the surface level with some of the large odd shapes I dealt with in Malvern, which meant a lot of sanding.

Regardless of styrene or plaster, you have to keep it down below the rail head otherwise you will be constantly repainting the area every time you clean track.  As I was testing the crossings with a loco, I went back with a #17 X-acto blade and scraped the plaster down below the rail heads and repainted.

None of these are a real bridge burner though, but at least with styrene there is no sanding dust to deal with. However trying to cut and fit styrene can be a bit of a trick, and of course the cost is probably a bit higher.

Anyway enough analyzing, here are the results of my efforts. 

Crushmoore's asphalt parking lot.


Heavy Metal's storage pad and the street.


W&OV's asphalt driveway


The road to Olin-Chlor


A couple of "over all" shots of the area.


I still need to go back and scribe some lines in the roads and Heavy Metal's pad for concrete relief grooves, add some pot holes and patches, striping and then weather things a bit. But all in due time, at least it feels good to make some visually interesting progress.

I think once I get some ground goop spread around and the first layer of foam down, things will start to pop.


Sunday, February 15, 2015

Roadwork in Malvern, and a milestone!


In conjunction with laying the pad at Olin-Chlor I needed a road leading into the facility.  I had originally planned to bring one in from the right side of the plant which would cross the tracks between the turnouts at Frump Gas and Olin-Chlor. I wasn't sure if I was going to be able to fit a road in there with the size of the building without having to squeeze it in, but after cutting the building down a couple of times it looks like now it'll be possible.

Like the pad at Olin-Chlor, I thought about getting another sign and making the pad around Heavy Metal, but Quin reminded me about the Woodland Scenics Road System which uses foam tape as concrete forms.  After I did a little research on how to do this, he gave me a roll of tape and small container of Smooth-it that he had on hand.  This turned out to be pretty simple and I got after it the first night. 

The first pad I laid out was the street and pad for Heavy metal and the drive leading into the W&OV facility.


Then I laid out the parking lot for Crushmoore's office.


These were pretty straight forward and could see how well they were going to work.  But the road I had planned leading into the Olin-Chlor was going to be a little tricky.  One thing I do not like to see is how some will lay the road flat upon the bench top up to the tracks and then angle it up sharply so it crosses the tracks.  I wanted it a bit more even and level with the tracks.  So what I did was to lay down some cork as a filler and then lay the form tape on top of the cork.  This will bring the surface of the road up much closer to the level of the tracks without that sharp rise.

I glued sections of the cork in place so I could then feather them down gently to the ceiling tile with a sanding block made up with 80 grit paper, then I applied the tape to the cork.  Then when the plaster is dry, I can peel the tape off and remove most of the cork.  On the back side of the crossing, I used a piece of foamcore to build up the mold which will also be removed after the road is in place and dried.  


OMG!!!  Sunday, February 15th, 2015  Mark this on the calendar!

After almost 9 years of construction, I have made the first attempt at scenery on the Little Rock Line!!!  It's not much to write home about, but it's a start!


Now I have built buildings and I have spread ballast, but this I consider the first application of real scenery! So it has begun.....


Saturday, February 14, 2015

Olin-Chlor expansion, part 7


OK I'm back on track with the Olin-Chlor expansion project! I got the Tomytec towers  assembled and ready to install.


They are probably not the best or greatest detailed kit, but with a little bit of cutting, trimming and filing, you can get the joints to fit a lot better than if you did nothing to them. Before the final assembly, I painted everything that was going to be silver with an Oxide Red.  Then I went back over them with a misting of Old Silver that I tinted down with black.  I sprayed on just enough to cover the majority of the Oxide Red to make it look like the silver is wearing off.  This is probably all the weathering they'll get for now.

Now that I had these done, I was able to play "Musical Buildings" and see how things would fit in the given location so I could get the concrete pads located. While doing this several things came to mind and changes were again made on the fly.

I decided to concrete the entire area in Olin-Chlor and then build up separate pads for the pipping cage and for the two cooling towers since the distillation towers already had their own pad.  

Next the building went under the saw again for the second time since I started working on it.  The first time I cut it down in depth.  I had actually given some thought to abandoning the building as I thought it was going to be too big for this location, but as I was moving things around, the thought occurred to me that maybe if I place a building flat behind it it wouldn't look like it was just plopped up against the backdrop, maybe give it some depth?  It just stuck out too far and everything looked to square and symmetrical.

I decided to cut it at an angle so that it was closer to the angle of the tracks.  This did two things for me: it took away some of the mass and it also gave me more room between the loading platform and the tracks which I could now fit a truck against the loading dock without using a shoe horn.   Since I cut the building at an angle, I did forego the idea of a building flat behind it as it would be hard to replicate a printed flat to match the angle.  It also made the area look a bit larger as it wasn't lining up with the walls or fascia. 

Another idea I came up with was something to hide the 90° vertical corner. Several weeks ago Steven and I was talking about getting some of the tall smoke stacks that are available from Tomytec for use on his layout.  I figured that I could use one to hide the corner, but they weren't as tall as what I wanted.  I wanted something much taller. Last Saturday while Quin and I was at lunch we ran over to Mynards and went to the plumbing department to look for some PVC pipe and fittings.

$3.05 later, I came home with these:


The two rings in the foreground we cut off one end of the coupling sitting next to it.  This was done to make a couple of rings around the stack, and came up with this.  Now it was much taller than I needed but it did the trick of hiding that corner!


Now with that covered I needed to find a way to concrete the entire area.  I didn't want to pour plaster in that big of an area, so I ran to Home Dumpo and picked up another NO PARKING sign made of styrene.  This one was a bit thicker than what I used to cover the building with and it was much larger, 15" x 22".  After getting it cut and fit to the area, I taped and glued the joints, then using a score I made all the concrete expansion joints at 15' squares.  I slightly angled the squares from one area to the next so it looked like multiple pours had been made over time.  

I stripped everything out the way and prepped the area.


Got the No Parking sign cut, fit and glued together. Got the building cut at an angle.  Got the Smoke stack sized and glued together and then started to set things in place.


Once this was done I sprayed the concrete pad with a spray bomb of gray primer but it looked too clean and too perfect, I wanted it to look like it had a little age. Next I sealed it with Dull Cost and wiped on a wash of India Ink and then blotted it off the excess with a napkin.  Greg, Steven and Quin all thought it looked like a big Marble parking lot!  Plus it was a little darker than I wanted.


The small platform for the cooling towers was painted with Polly Scale Aged Concrete, the building was painted using Floquil's Concrete and the concrete is the gray primer with the India Ink wash.  Looks like Greg, Steven and Quin was right.  A Marble parking lot?


So here is what I ended up with:


The next day I grabbed a bottle of Polly Scale "Aged Concrete" and ran over to Slobby Lobby with the hopes that I could pick up a some cheap acrylic craft paint and mix something closer to the Polly Scale.  I had given thought to breaking down and buying some the Woodland Scenics Concrete paint, but I just had the feeling that what they offered was nothing more than the same cheap paint at four times the price!
I did manage to come up with a decent match.  I don't recall what colors I used but I started with a gray and a beige that got me close.  Then I added a few drops of yellow and a couple drops of black. It came out very close to the Floquil Concrete, the same color as the building.

I'll try to get some shots of the paint colors in the next post as well as the concrete pad.   It's good to make some progress again.

Edit: Click here to jump to "Olin-Chlor Expansion part 8"


Tuesday, February 3, 2015

The traveling NSN observation car.


This morning I heard over the squawk box that some private varnish was suppose be trailing behind Amtrak's Rebel.  So I made a few phone calls and got the skivvy from some of the local railfans.
The Rebel leaves Alexandria around 9am so it was going to be an early morning for me.

After arriving in Alexandria I hit the local Quicky Mart to grab me some foamer snacks for the day then headed for the yard.  Within 10 minutes I heard that the Rebel just left the station and I caught up with her passing the house tracks. Sure enough, there was the private varnish just as expected, but what the?  The Gargoyle II?  Oh well at least it was something different to shoot for once.


I snagged one picture and sped out of the yard and headed for the diamonds at Winnfield to setup. No sooner than I got set up I could hear the Rebel nearing my location.


Another short jaunt down the road I and came to Ruston hoping to catch it again crossing the ICG diamonds this time. Made it just as it passed the tower.  If they keep their speed down this morning I might be able to keep up with it and get several pics before it leaves El Dorado?


I did manage to get a bit ahead of the Rebel this time. I caught it as it begins the swing into the big "S" curve on the north end of Dubach.


After Dubach they must have hit a slow order something as I made it to El Dorado with a few minutes spare.  It's a grab shot as it enters the yard limit, but what the hey?  Just as I got over to the depot to get a closer look, I found them spotting it on the house track, Really?


At first I thought they might have a bad order or something but when I asked the agent, they told me that their plans had changed and the passengers decided they wanted to take a detour over to Hot Springs, AR for the night and enjoy the National Park.  Awesome, that could only mean one thing!

The W&OV will be coming to down to El Dorado to pick up the car.  I wonder if they plan to tack it to the end of the daily Razorback and return to Malvern with it?  Oh this is going to make for some cool shots!  ALCo's on the point and private varnish on the rear!

Knowing the Razorback isn't scheduled to shown until 1pm or so I decided to go and grab a soda.  Just as I got back and parked the truck I heard the horn of the W&OV just north of town as it crossed the Ouachita river bridge.  But it's too early for the Razorback?

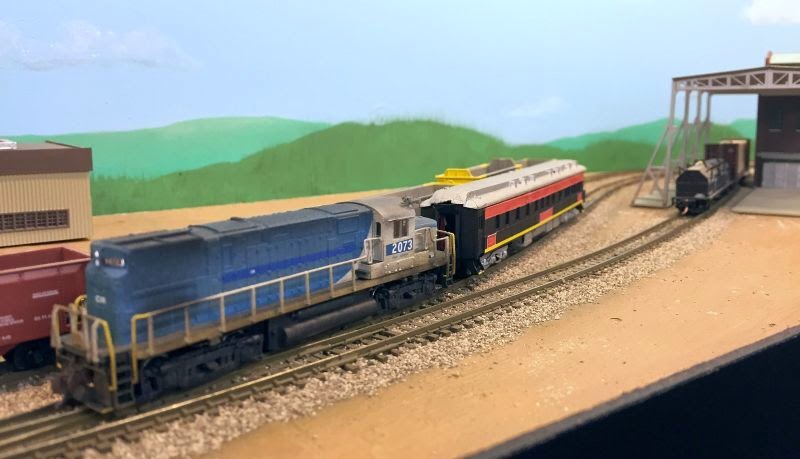
A few minutes later W&OV #2073 pulled down the passenger siding and eased up to the varnish and made the joint.  Much to my amazement they wasted no time in getting under way!  


I grabbed my gear and jumped in the truck and headed north to follow them.  I caught up with them at Calion just as they took the siding.  Ah, they must have been in hurry to get here so they could meet a SB?


Sure enough, no sooner than they closed the switch I heard a horn coming south through Fordyce.


Once the LRMP went past, the 2073 slowed to a crawl as they rolled down the siding only to come to a full stop on the north end of MQ siding, another train? Yep!  This time it's the SB Katy coal drag that is heading to Baton Rouge.  Well this would explain the rush to get out of El Dorado.  MQ is the only siding between El Dorado and Haskell.


Once Miss Katy cleared, the 2073 resumed north to the junction at Haskell.


With the Riceland elevator as a backdrop, I snapped another shot of 2073 in the junction siding.


I caught up with her again as she entered Malvern then again as she rolled past Heavy Metal and Crushmoore, Ind. 


By this time it was getting late and there wasn't many more good shots to be had before they reached Hot Springs so I called it a night.  On the way home I stopped by the W&OV shops and found Homer and asked him when they were coming back through?  As he scratched his head he said "Maybe in a day or two, wasn't too sure, but I'll give you a call when I find out, iffins you'd like"?.

On the way home I got a call from Homer saying that the group had decided to stay in Hot Springs for a full day and return the following morning.

Two days later Homer called me again to say they had a schedule on the varnish. "Gonna be in Malvern heading back to El Dorado later that day and that if I hustled I could catch it leaving Malvern around 11 am"

Just as Homer had promised I caught the 2073 doing the honors again, this time near Crushmoore.


Then passing Frump Gas near the Haskell Jct.


At haskell they had to wait for another SB grain train before entering the main.  
Cool!  A Rio Grande SD45! Normally I see more more SP power but this was a nice catch!  After getting clearance, they hustled through Fordyce, this time they didn't need to take the siding so I lost them.


By the time I reached El Dorado the switcher came out to meet them and looks like they're going to snag the car off the 2073 on the main and spot it on the house track with the 4206.  Looks like the 2073 will return to Malvern light, too bad I couldn't sweet talk a cab ride? 


A short time later the Rebel arrived in town and backed onto the varnish.  Again, wasted no time in departing.


A friendly wave and they were off.


The next day, a buddy called me and said he got some good footage of the Rebel running through Haskell with his new video camera.