So long 2018! This past year was not a good year and I for one am glad it's over. It's been a trying year with my knee injury lasting until March and the rest of the year was filled with a lot of personal work. We finally convinced my mother to move to a retirement community and the rest of my summer was filled getting her house and property ready to sell, by the end of the summer we wrapped that up. I still need to get my garage organized as it's full of stuff from Mom and Dads garage that I inherited. That will take some time yet, but little by little I hope to have that wrapped up by Spring or Summer. The Fall and Winter months of this year I worked in the basement trying to organize that mess as well. So I'm hoping that 2019 will be a little bit more relaxed. After wrapping up some more of the Bench Projects I've been working on like the pulpwood flats and some tank cars, I want to get started on the layout once again. Here's where I left off in March. In Haskell I was working on Gavilon Fertilizer. I had planned that Gavilon was to be a fertilizer plant that made both granular and liquid fertilizer. After discussing the idea with some friends, it was decided that a manufacturing complex may be too large for the real estate I had available. What they suggested was to create a smaller fertilizer distributor. So be it.
This distributor was actually served by another shortline railroad that had recently shut down and had abandoned the line which left Gavilon without rail service. Rock Island had decided to add a shoe fly from their tracks in Haskell so they could restore rail service to Gavilon.
Recently, I've been itching to get some ballast down in Haskell with the backdrop done and the tracks painted, but I first wanted to get the grade crossing installed before hand. When I installed the grade crossing for Crushmoore Ind a few years ago, I did after I ballasted and found it was kind of a pain to get them installed properly. I had to scrape a lot of the ballast out of the way first. This time I was going to install the crossing first then ballast up to it.
But this meant I had to figure out where I wanted it first and in order to do that I needed to know where the buildings would sit so as to make things line up. So I dug out a few kits that I had on hand and ordered a few more. I got started on some of the buildings before March.
First were the tank car loading platforms. These are the Tomytec version I had picked up, but later I decided to try some platforms that I found on Shapeways. They are still in the box and I need to dig them out and get them ready to paint. They should be a little more to scale and a bit more prototypical looking, although these platforms aren't too bad.
I had at first planned to use several of the Tomytec Spherical tanks but decided to use a more traditional design since this would be a distributor rather than a manufacturer.
These two small corrugated buildings are made by Deluxe and will be the pump houses from the platforms to the tanks and from the tanks to the truck filling station.
I wanted a shed to cover the hoppers that unload the dry granules to keep them out of the weather while unloading. So I picked up another Pike Stuff kit like I used for the chip loader at Crushmoore Ind. These are great modular kits that can resized in several ways. I made this one with only two wall sections unlike the one I used for Crushmoore where I used three sections.
Here it is sitting over the tracks on a platform made from MDF and covered with styrene for a concrete pad next to some PVC silos. The tubes were scraps from model sprues and conical sections are LEGO parts. The elevator is a Rix kit.
I plan to use the M.A.C. building from Pike Stuff for the main building. This will be the next project, getting it assembled and painted. I'll paint it to match the smaller pump houses and unloading sheds. Once I get that far I can then get the buildings placed so I can know where the crossing will go and I can start ballasting.
I'm hoping that 2019 allows me a little more time with the layout so I can make further leaps and bounds on scenery, I'm getting tired of seeing the ceiling tile...
One of the car types that is a staple on my layout is the Atlas 42' Pulpwood car.
I love these cars but they have always been a thorn in my side and a constant source of aggravation due to it's light weight when it's ran empty. Also I've never been a fan of the Atlas Accumate trucks and couplers. They never seemed to roll as nice as MTL's and the coupler pins would work their way out and catch on the track and then the couplers would explode rendering them useless.
In the past I tried swapping the trucks with MTL trucks but their coupler boxes sat too high and rubbed on the underframe, then the trucks would sit tilted forward. So I've gritted my teeth every time we had an Op Session hoping they would make it through without causing any issue.
In the past month I started on another project (ugh) that's been on the back burner for sometime as well, going through and thinning the herd. While getting that under way, I also started swapping trucks and couplers over to some of my newer cars. Once I got that done and got them put away in the proper drawers, my attention turned back to these pulpwood cars. The time had come to see what I could come up with. I had an idea?
Recently on another quick project I tried using one of the TrainWorx #620 body mount couplers that they designed to use on the older Precision Master's and Red Caboose covered hoppers so they had body mount couplers. I tried one of these to convert another Atlas tank car, one that Pat Sanders hadn't tried yet. Using this conversion kit gave me an idea for the pulpwood flats. I decided to try the #620's on the flats, but alas the lids were too thick and the couplers sat too low. I tried using a MTL 1015 and body mounting one to the pulpwood cars and after a little experimenting I found that this would work better. Since the frames were metal, I didn't want to go to the trouble to tap and drill them. On the #620's Pat Sanders used super glue to mount the couplers to the tank cars but I've never been a fan of super glue, to me it always seemed to get brittle and let loose after time, so I opted for a 2 part, 5 minute epoxy.
I tried one out and it seemed to work just fine. The coupler did pop off the next night while giving it a pressure test. The epoxy had dried, but the issue I believe was due to the slick Derlin that the 1015's were made from. I took my #11 blade and scratched the top of the coupler box and also the area on the frame where the coupler would be glued to. This gave the glue a little more tooth to grab to and I wasn't able to get it to come loose.
After several nights of assembling enough 1015's to convert all of my cars (and allowing my eyes to uncross and my fingers to uncramp) I started gluing them to the cars.
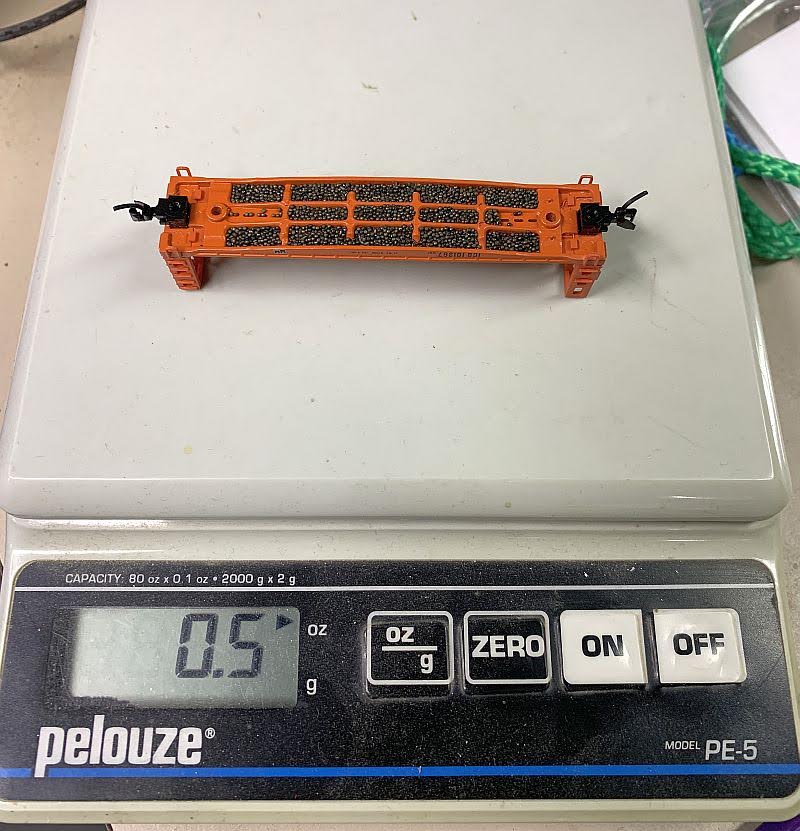
In the last post, I weighed my IMRC 60' flats cars with small buckshot and after posting them, Rod Warren mentioned that I should try using a neat little product called Liquid Gravity. It's basically very small, non lead based pellets that flows into and fills up the cavities much better than the buckshot I had used.
After doing a little research on the stuff I found a video from the manufacturer that showed the stuff and how to use it.
I found some on line and also picked up some super thin Super Glue.
Once the stuff showed up I jumped at the chance to play with it! It was a little hard to keep from having the pellets bounce all over, but I later filled the cars over a paper towel so that I could collect it and reuse them again. Once I got the cars filled I then dribbled the thin super glue over the top of the pellets and it wicked right in and flowed out evenly. Within 5-10 seconds the pellets were glued solid and I tipped the cars over to remove any of the loose pellets.
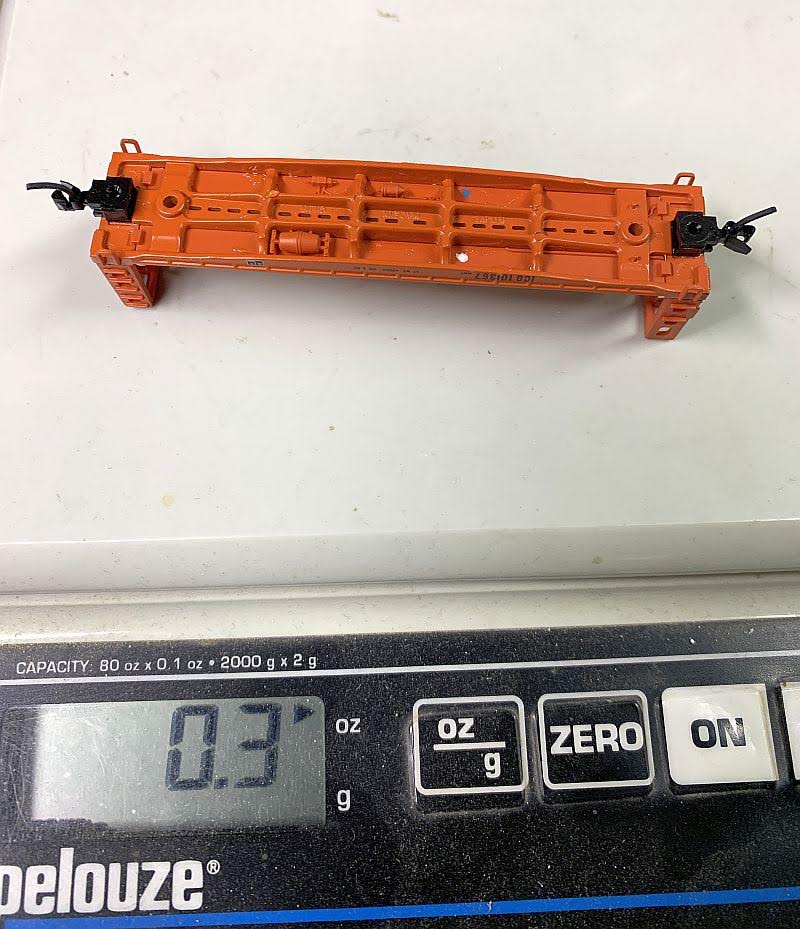
This added .2 ozs per car. Not a lot, but enough to make a difference.
After adding the new trucks (without couplers) it gained another .2 ozs
One issue I had with the couplers is they sat too low when the trucks were installed, so I added one of the little shims that is supplied with the trucks. This did the trick, yeah...they may sit a little too high for looks but now they work! Yes, they'll be a heavy little car once I place the original pulpwood load on them, but that's OK with me.


